| Contents | |||||||
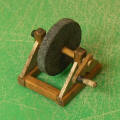 |
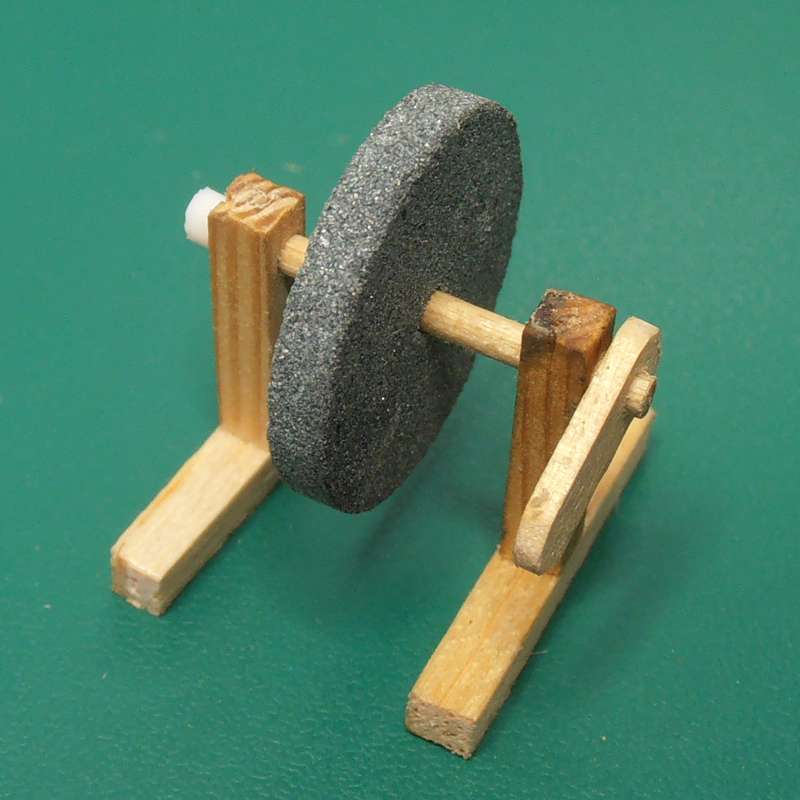
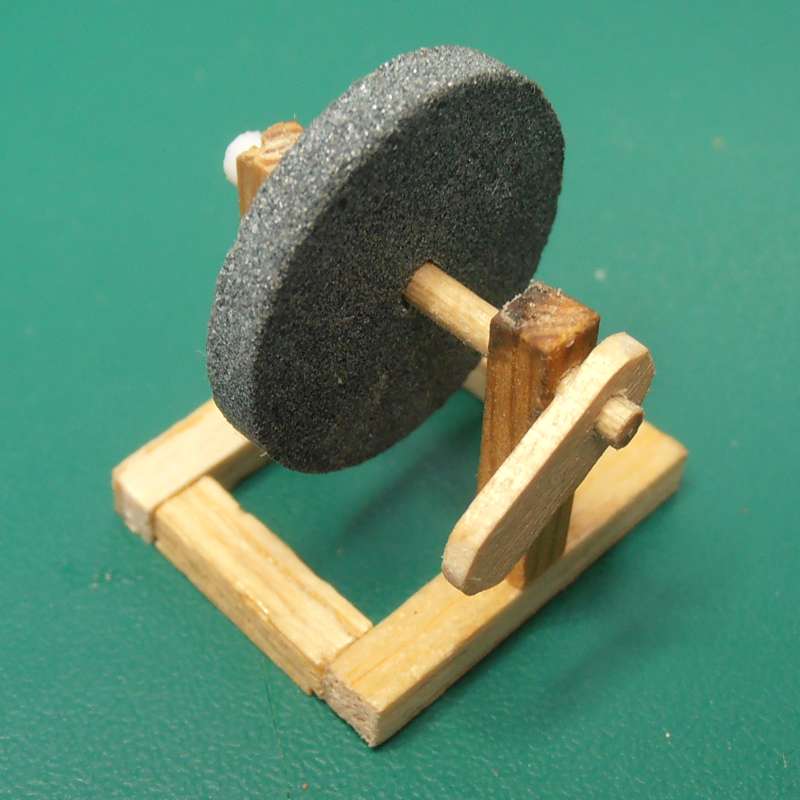
Grinding Wheel Making a grinding wheel from a rotary tool grinding disc. |
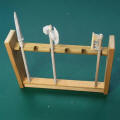 |
Weapon Racks Making a variety of racks to hold weapons and shields. |
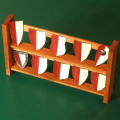 |
Kite Shields How to make kite shields from an empty plastic milk bottle. |
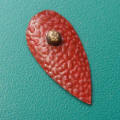 |
Textured Shields Making textured shields from an empty plastic milk bottle. |
 |
Shield Bosses How to make shield bosses from superglue caps.
|
 |
Shield Handles Making handles for shields from an empty water bottle.
|
 |
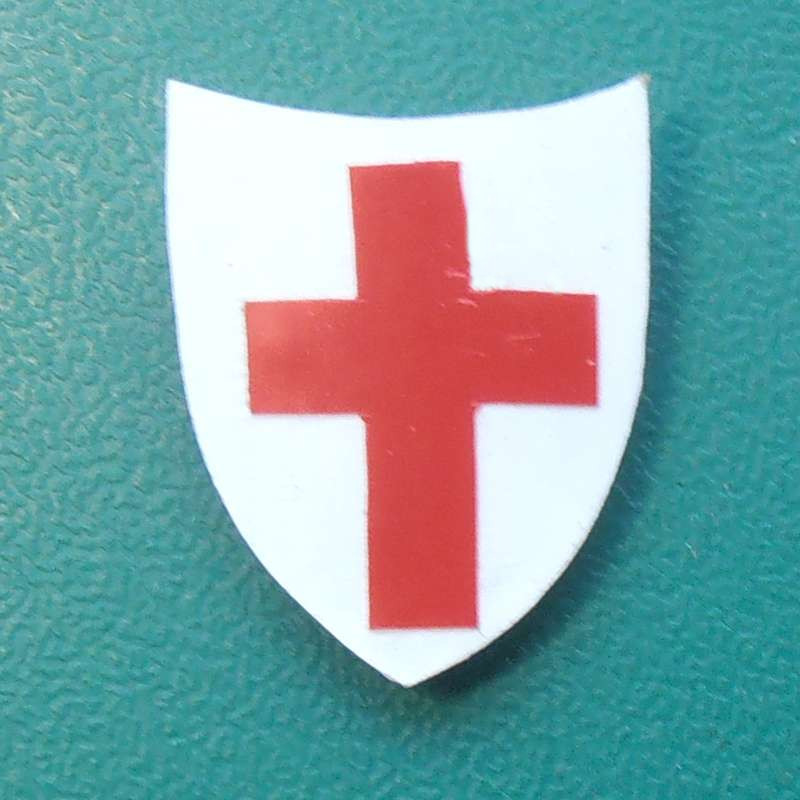
Shield Designs Adding designs to your shields using adhesive tape.
|
 |
Maces Instructions for making a variety of maces from beads and cocktail sticks. |
 |
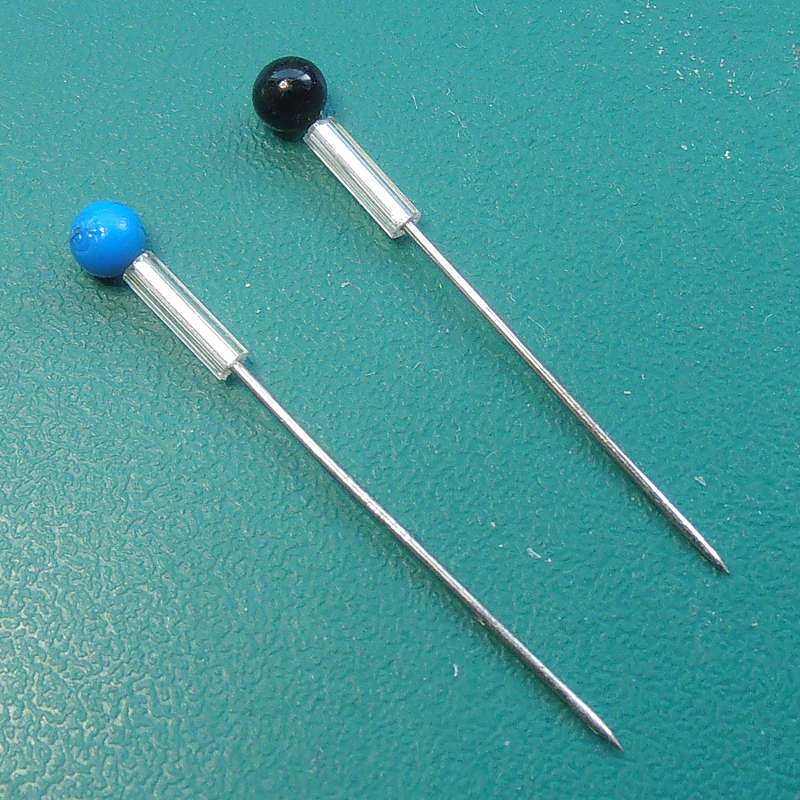
Rapiers How to make simple rapiers from dressmakers' pins. |
 |
Swords How to make a variety of swords from plastic card and other cheap materials. |
 |
Shortswords & Daggers Making shortswords and daggers from a comb and a hairbrush. |
 |
Practice Swords Instructions for making two styles of practice sword from pop-rivets. |
 |
Polearms How to make a variety of polearms from cocktail sticks and other cheap materials. |
 |
Spears Making spears from cocktail sticks and comb teeth. |
 |
Javelins How to make javelins from cocktail sticks and cocktail forks. |
 |
Boar Spears How to make boar spears from cocktail sticks and cocktail forks. |
 |
Cloaks Making dragon-scale cloaks from an empty plastic milk bottle. |
 |
Greaves How to make pairs of greaves from an empty plastic milk bottle. |
 |
Breastplates How to make breastplates from an empty plastic milk bottle. |
||

|
Grinding Wheel (Click thumbnails for larger images) |
|||||
|
|
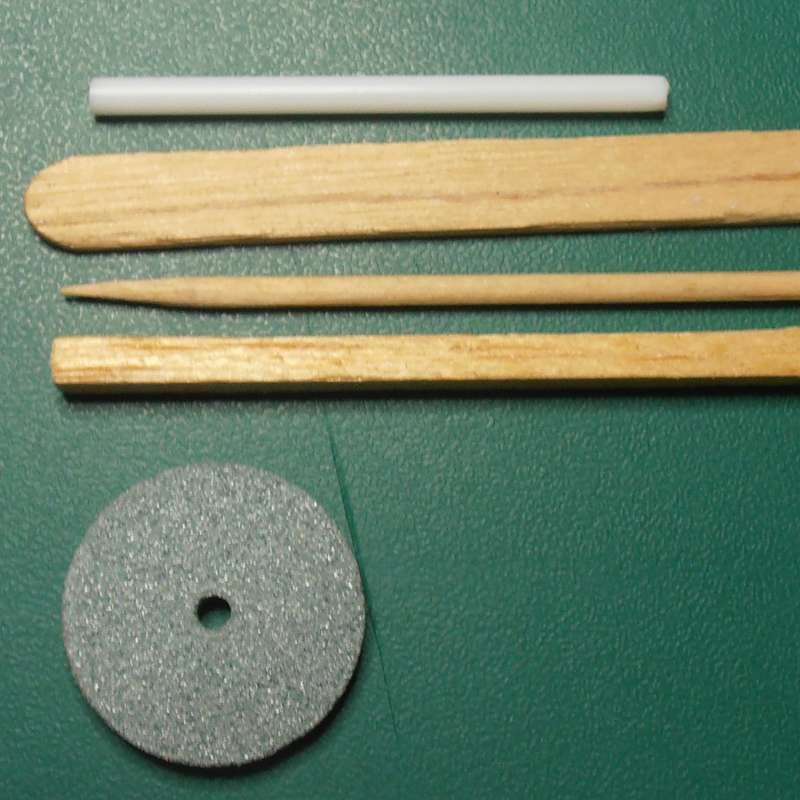
Materials & Equipment Grinding disc for a rotary tool Basswood strips Cocktail stick Plastic tube (cotton bud stem) PVA Craft knife Pin vice & drill bit Razor saw & mitre box Paint & paintbrush |
|
Stage 1 The cocktail stick will provide the axle for the wheel - check that it fits through the hole in the disc. Paint the grinding disc with thinned black paint. Allow to dry. |
|
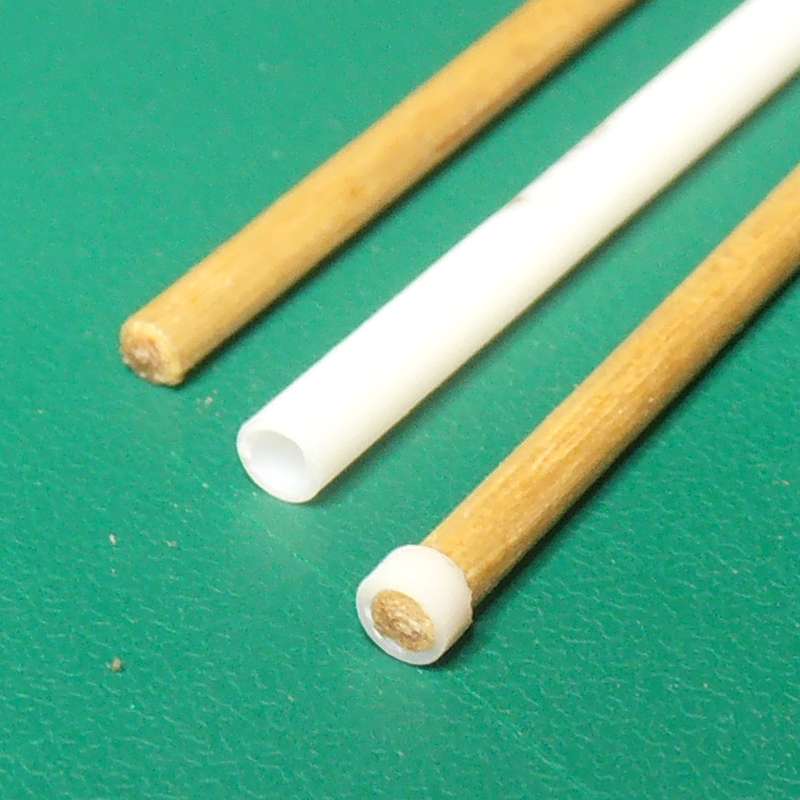
Stage 2 Trim the tapered part from one end of the cocktail stick, then cut a piece 23mm in length. Cut a piece of the plastic tube about 1.5mm in length and push it onto one end of the stick. |
 |
Stage 3 Fit a drill bit with the same diameter as the cocktail stick into the pin vice. Drill a hole near one end of a piece of 3mm square section basswood. Cut to a length around 15mm long for one of the vertical supports. Make a second identical piece. |
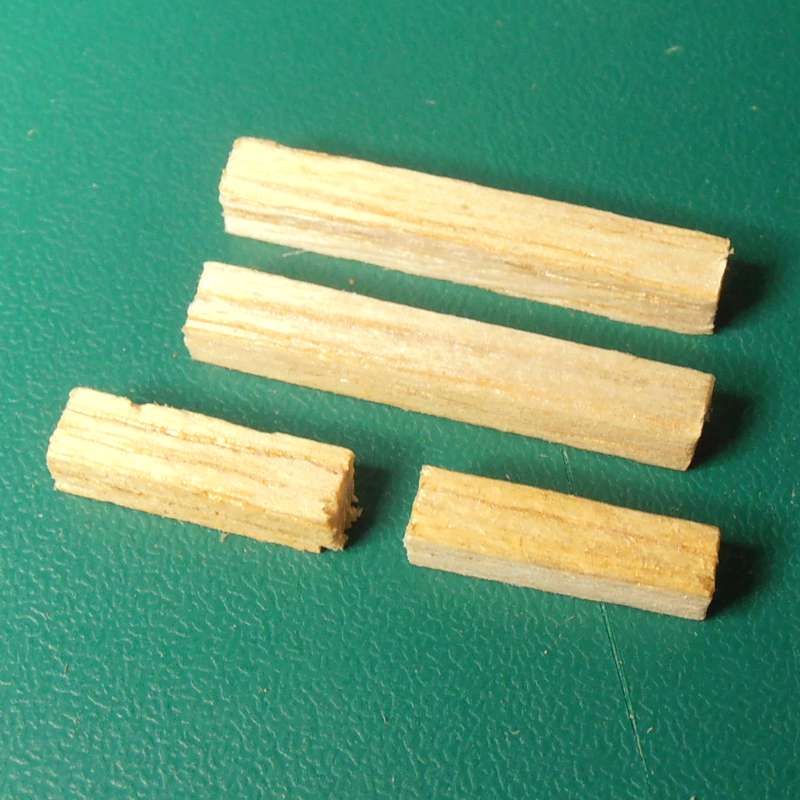 |
Stage 4 Cut two pieces of 3mm square basswood 22mm in length for the base of the sides. Cut two more pieces 12mm in length for the cross-braces. |
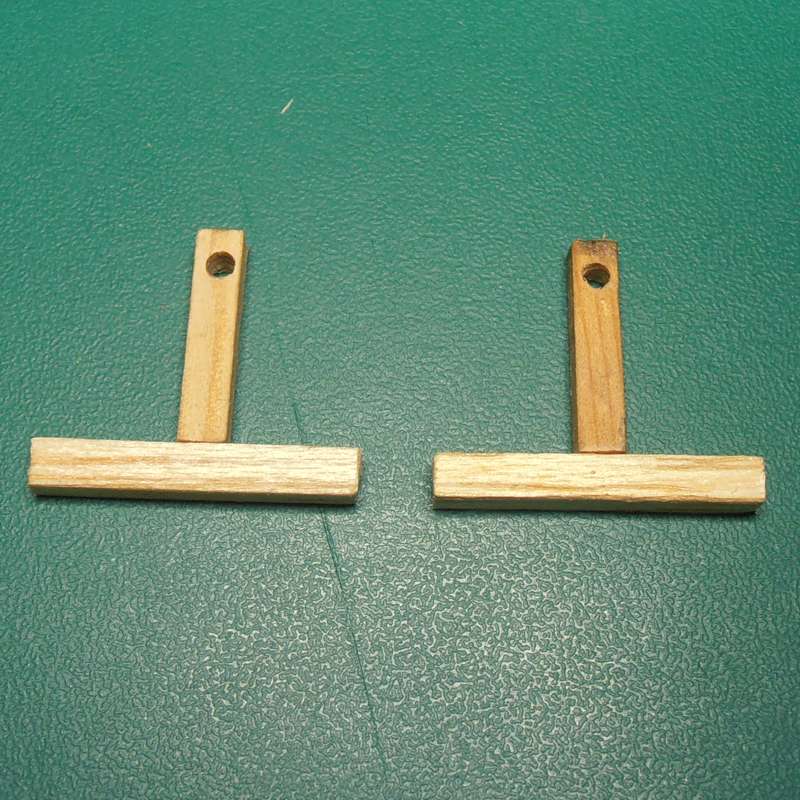 |
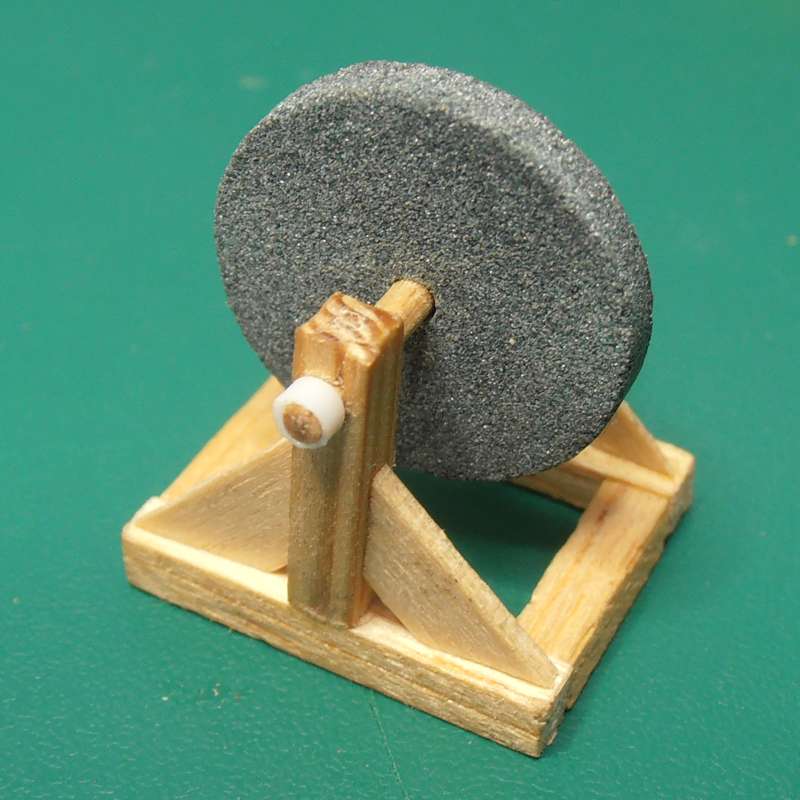
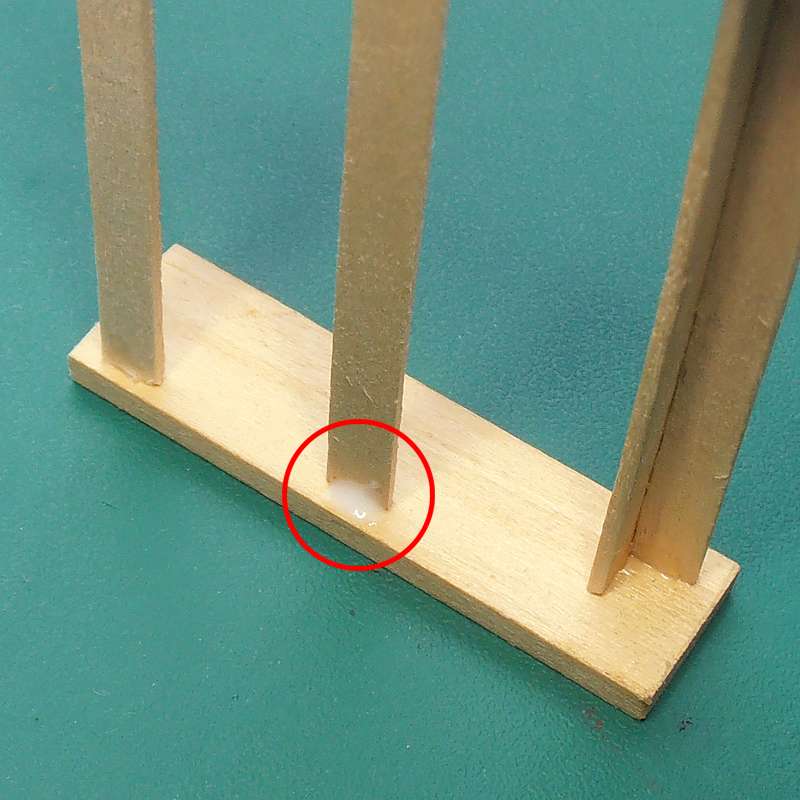
Stage 5 Attach the two vertical supports to the centres of the two bases with PVA. Check the holes for the axle are pointing the right way. Allow to dry. |
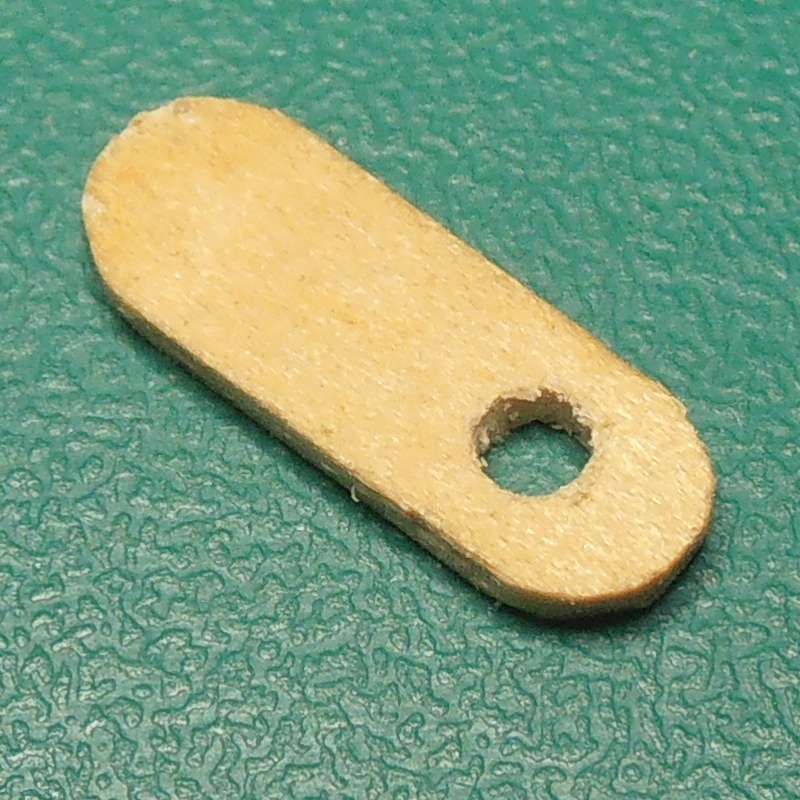 |
Stage 6 Cut a piece of a coffee stirrer to 12mm x 4mm. Drill a hole near one end of the piece to fit the cocktail stick. Trim and sand both ends to round off the corners as shown. |
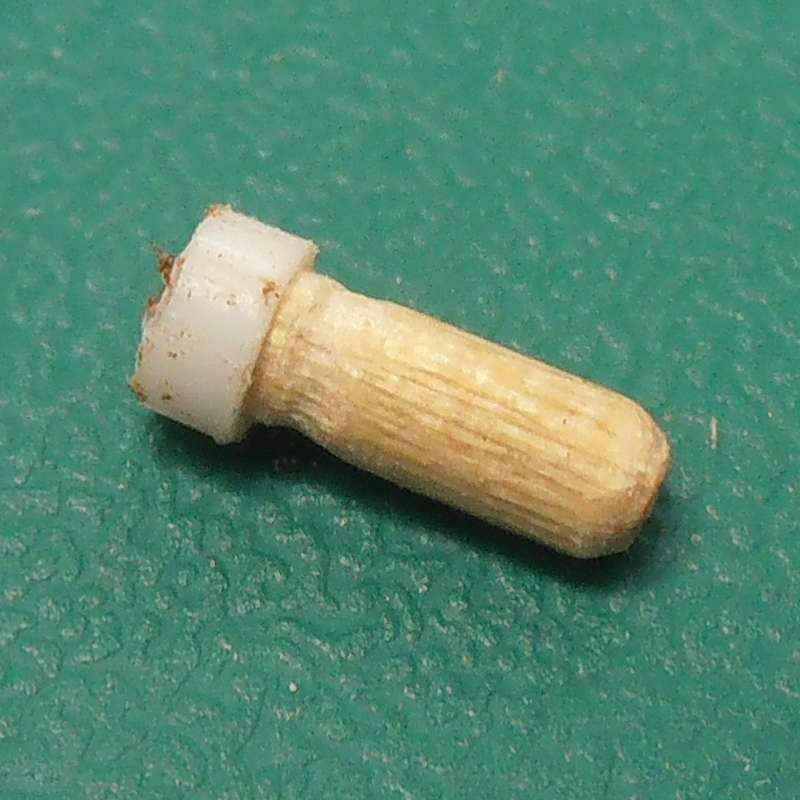 |
Stage 7 Round the cut end of the cocktail stick. Cut to a 6mm length and add a 1.5mm collar of the plastic tubing. |
 |
Stage 8 Thread the axle through one side support, the wheel, the second side support and the handle offset piece. |
 |
Stage 9 With a little PVA, glue the two cross braces in place between the side supports. Allow to dry. |
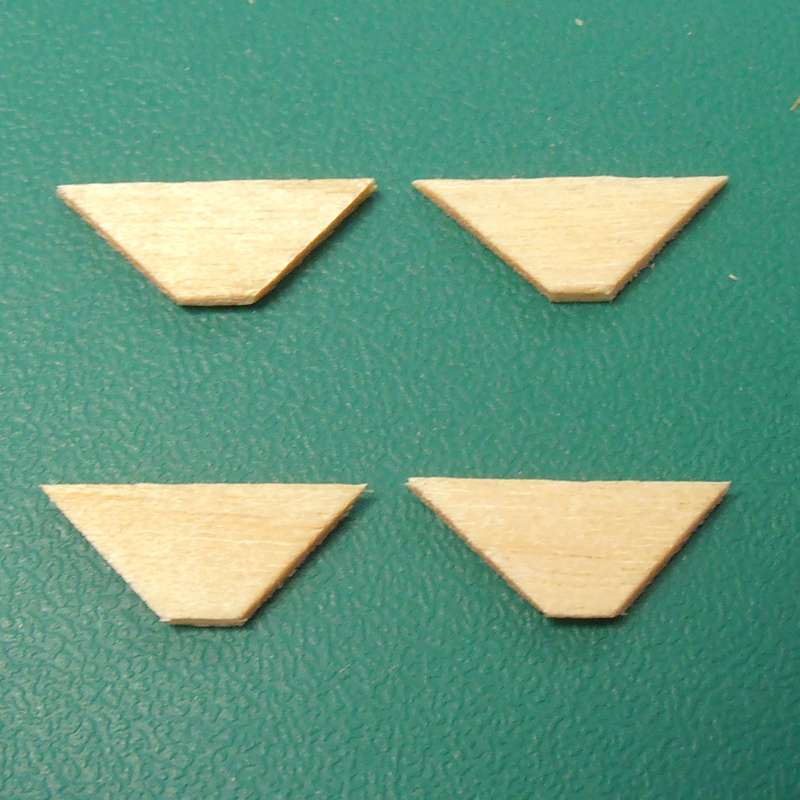 |
Stage 10 Cut four bracing pieces as shown, to fit against the side supports. |
 |
Stage 11 Glue these pieces in place with a little PVA. |
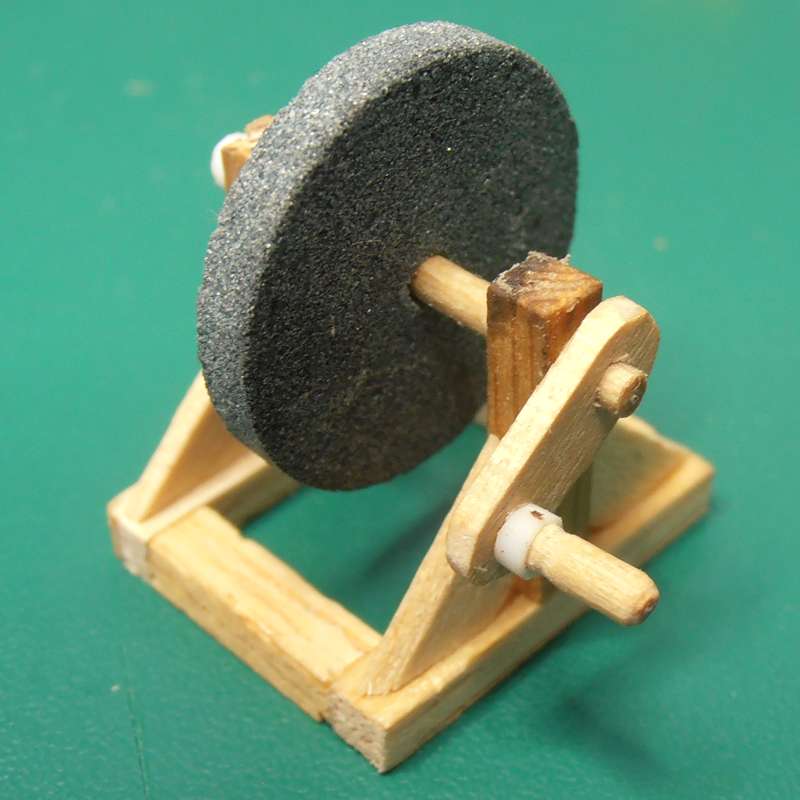 |
Stage 12 Glue the handle in place with PVA. |
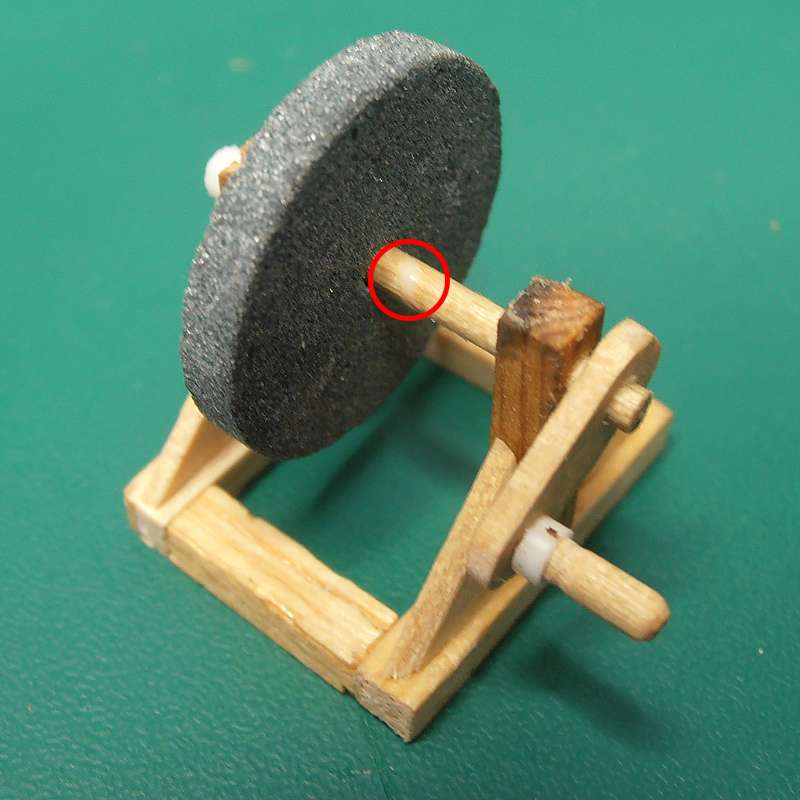 |
Stage 13 Add a small drop of PVA to hold the wheel in place on the axle, and another to hold the turning handle. Allow to dry. |
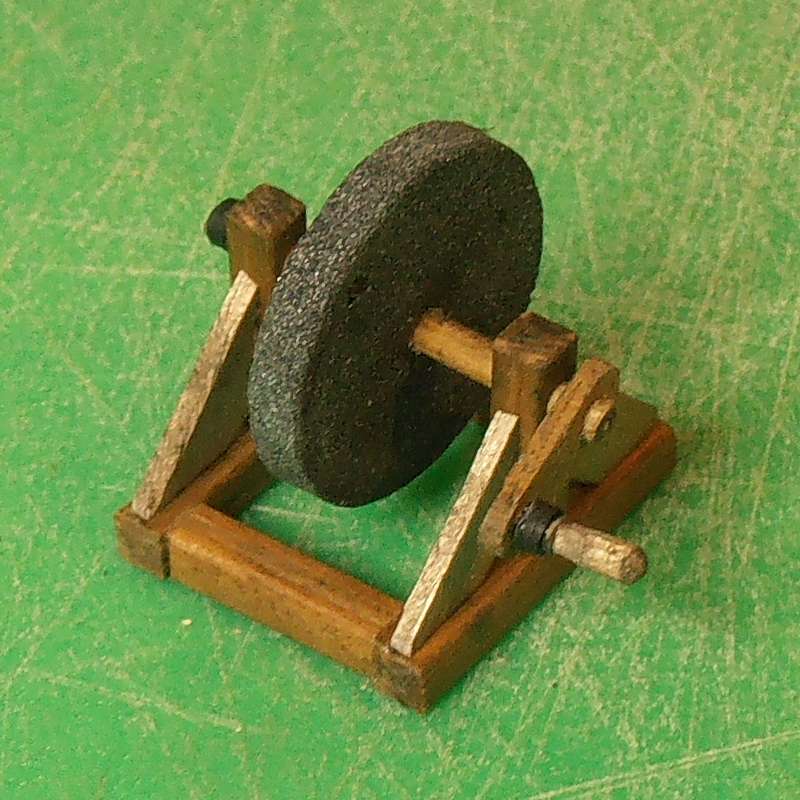 |
Stage 14 Add paint or stain to the wooden parts, and paint the two plastic collars to complete the model. |

|
Weapon & Shield Racks (Click thumbnails for larger images) |
|||||
|
|
Materials & Tools: Basswood or Balsa Coffee stirrers Razor saw and Mitre block Guillotine PVA Sandpaper / Emery Board Brown ink wash |
|
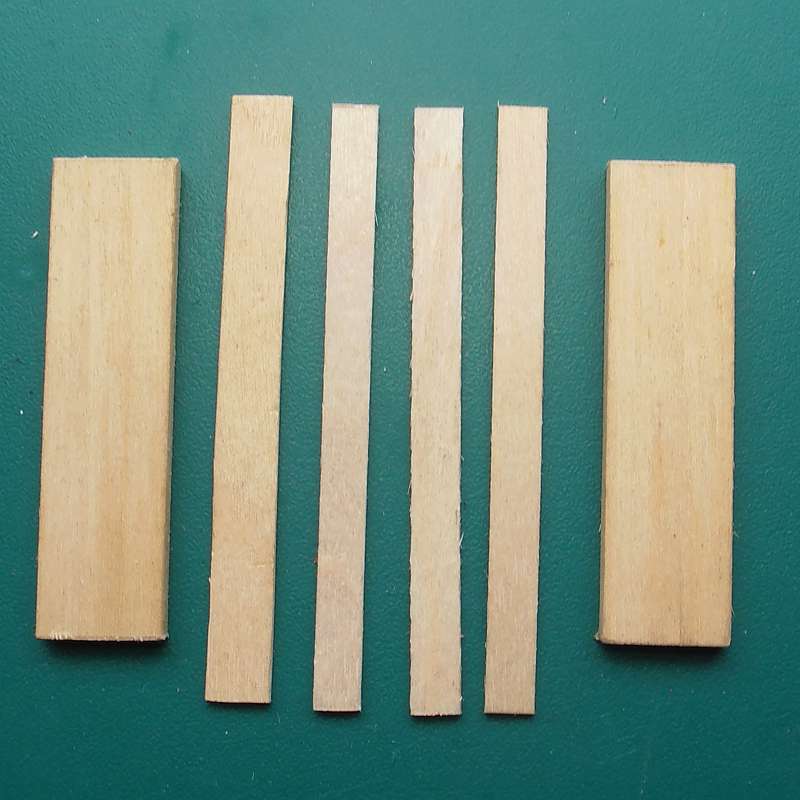
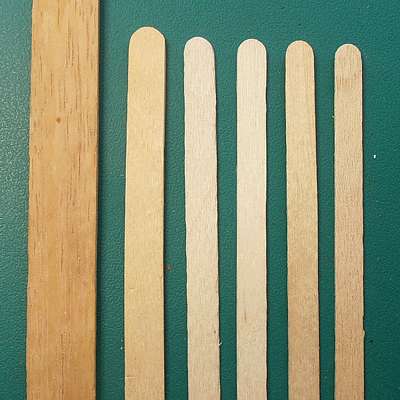
Stage 1 Cut two side supports for the rack using the razor saw and mitre box. I made mine 50mm (2 inches) tall from 12mm x 3mm (1/2" x 1/8") basswood strip. |
|
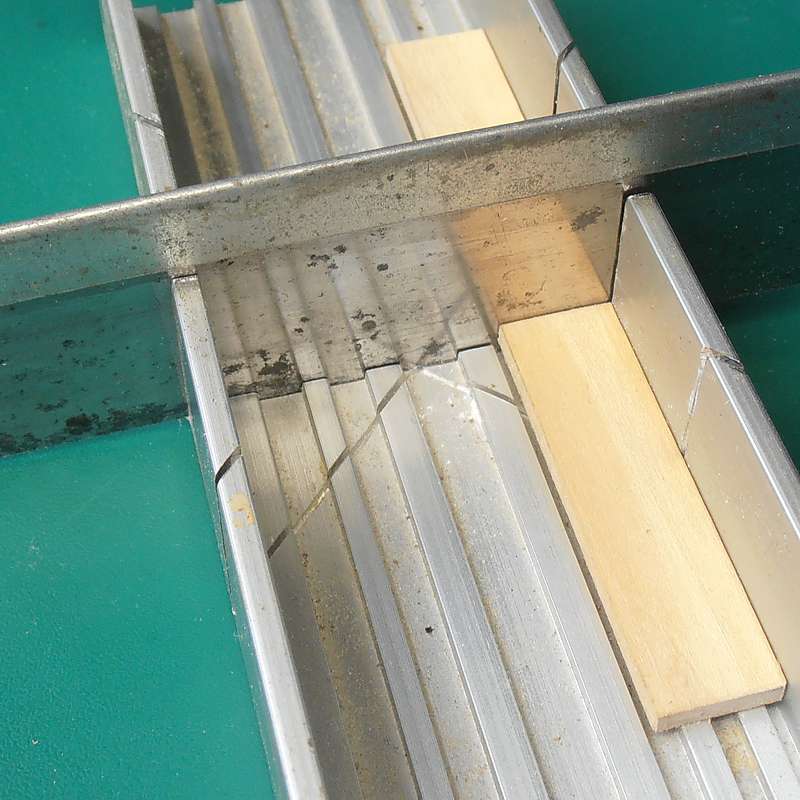
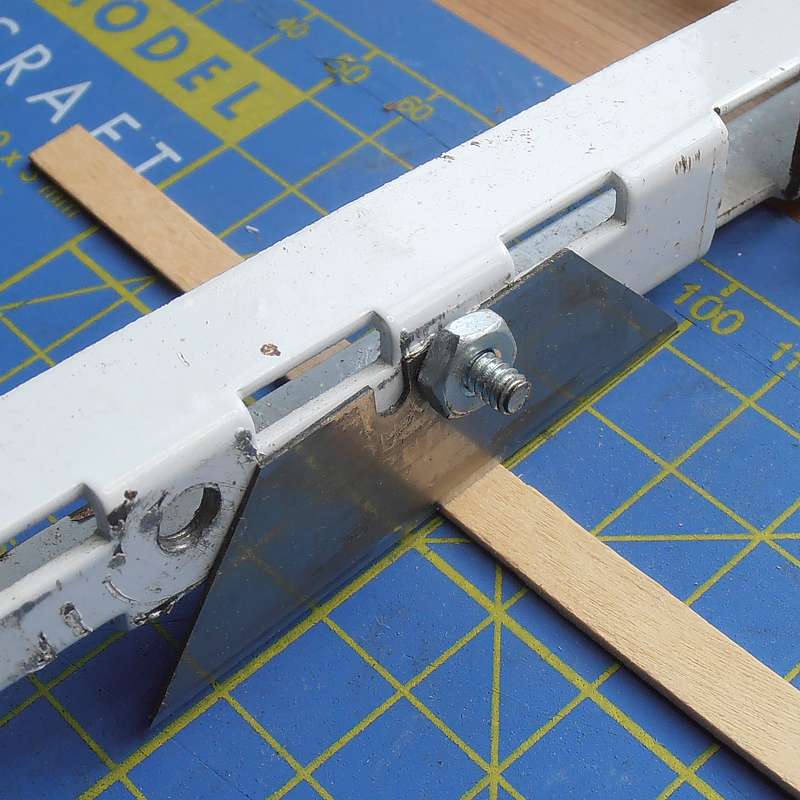
Stage 2 Cut four pieces of coffee stirrer to the width of your rack. I opted for 64mm (2.5"). I used a home-made guillotine to cut the strips to length, but you can use the razor saw instead. |
 |
Stage 3 Lightly sand the pieces with sandpaper or an emery board. |
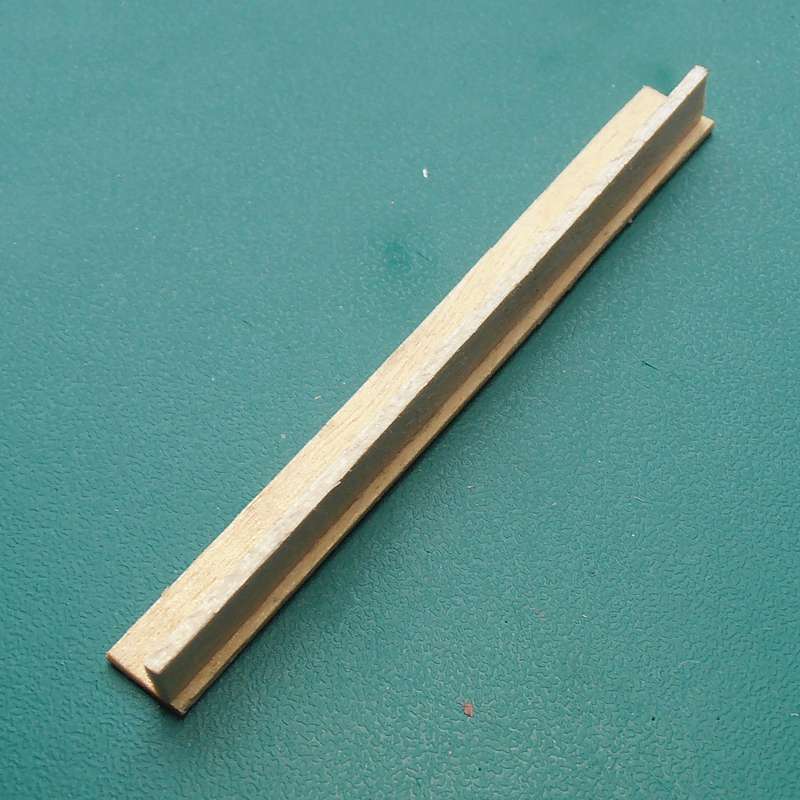 |
Stage 4 Apply a small amount of PVA glue to one side of one of the coffee stirrer pieces, and attach it near one edge of a second piece. Allow to dry for a few minutes. |
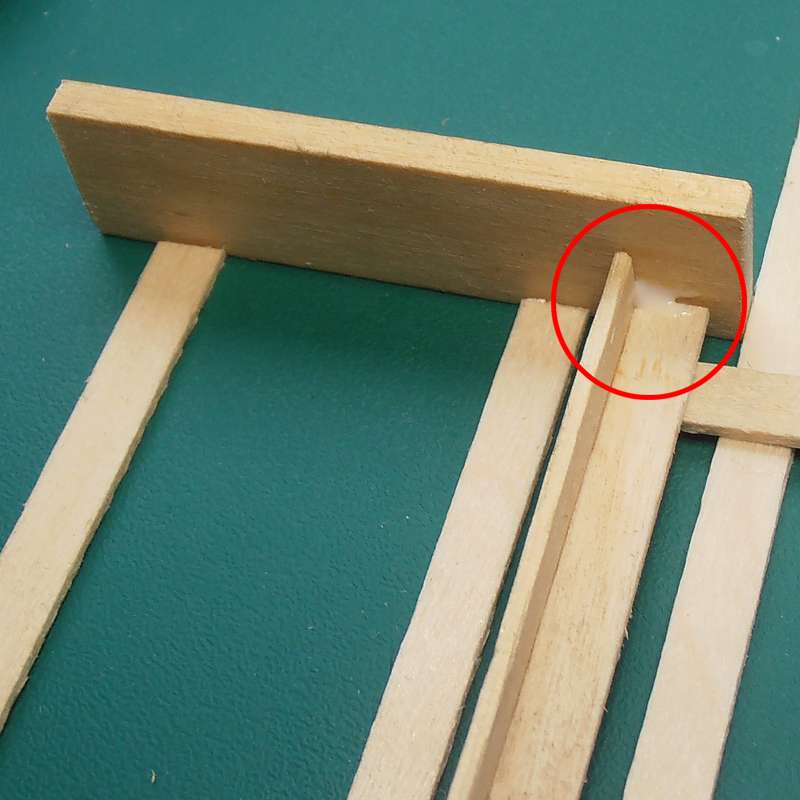 |
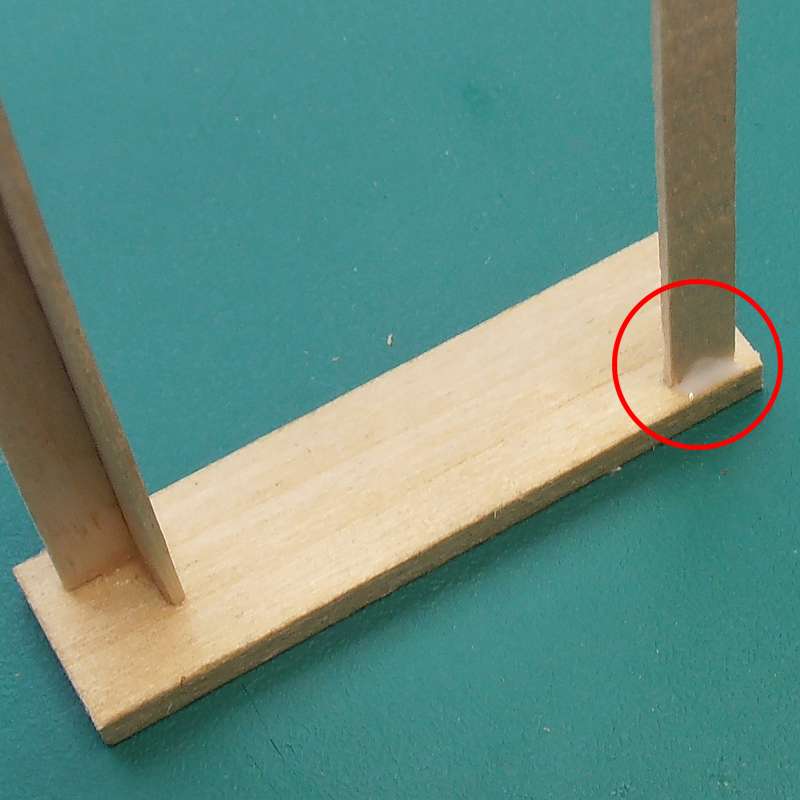
Stage 5 Glue the piece to each of the side supports near the bottom front edge. Use the other cut strips to keep the spacing correct, and spare pieces of wood or plastic as supports. Allow to dry for a few minutes. |
 |
Stage 6 Attach another coffee stirrer near the upper-back corner of the side supports with a drop of PVA. Allow to dry for a few minutes. |
 |
Stage 7 Using PVA, attach the fourth strip about halfway up the rack as shown. Make sure the rack is square and allow the glue to dry thoroughly for at least an hour. |
 |
Stage 8 Apply an ink wash to the wood to stain it to a suitable brown colour. If you prefer, you can paint it, but I like to preserve the natural wood-grain.
|
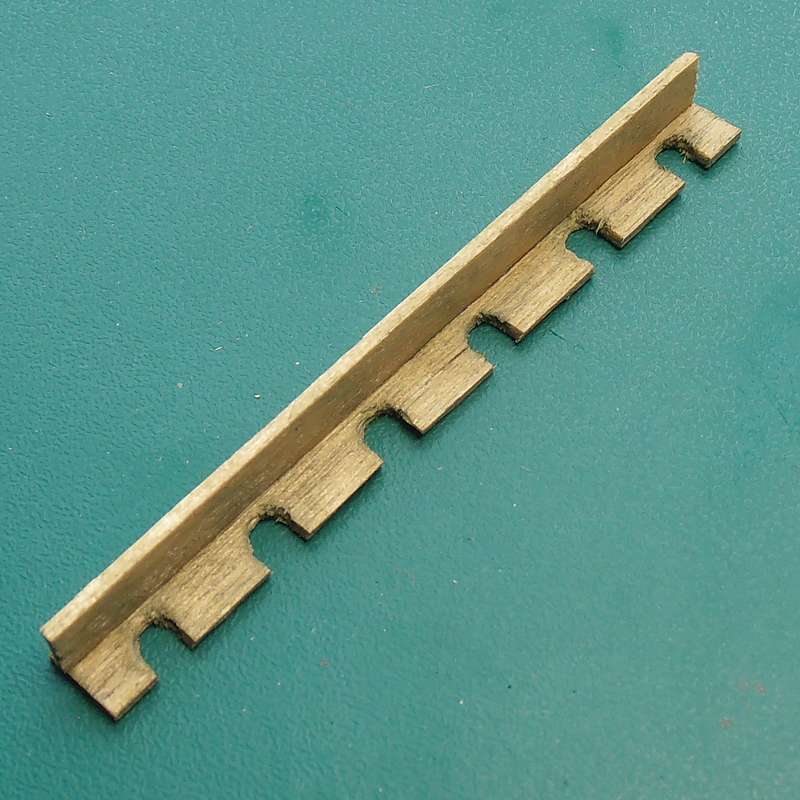 |
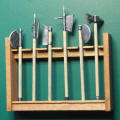
Option A To make a rack to hold pole-arms or spears, you can drill holes and cut slots to form the upper cross-piece.
|
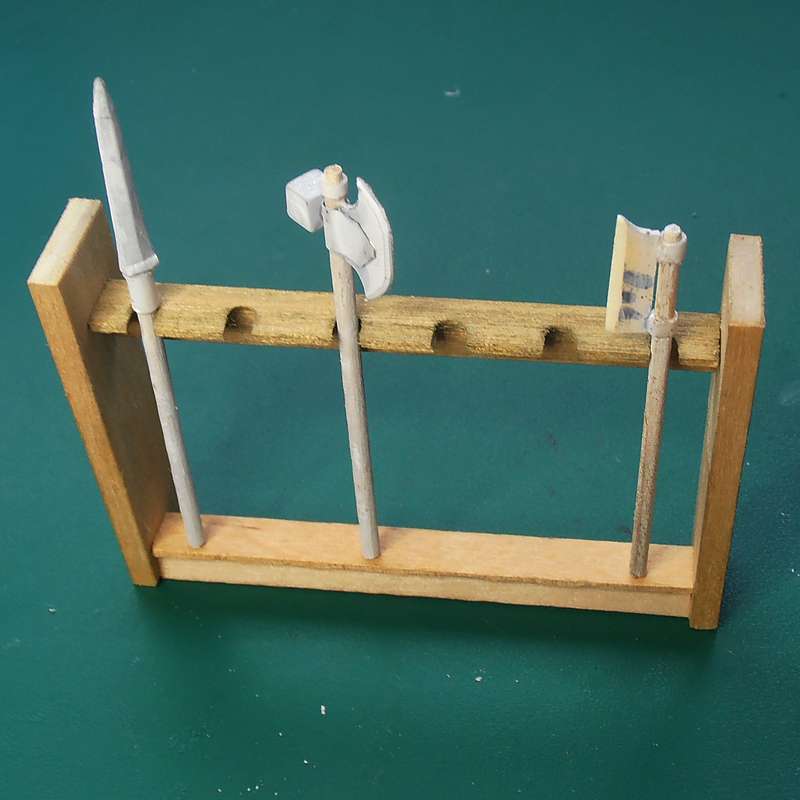 |
Example A A rack for pole-arms or spears.
|
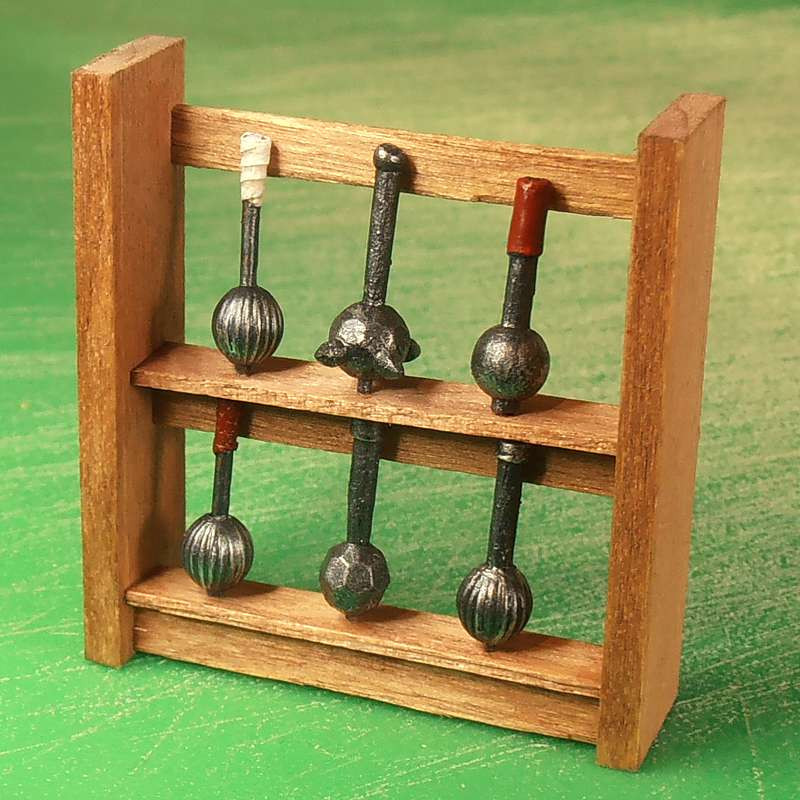 |
Option B For shorter weapons or shields, you can have two layers. The middle shelf is made in the same manner as Stage 5, but is glued with the vertical strip at the back, to support the lower layer.
|
|
Kite Shields from Milk Bottles (Click thumbnails for larger images) |
|||||
|
|
Materials & Equipment Empty plastic milk bottle Craft knife / sharp scissors Primer Acrylic paint Brushes |
|
Stage 1 Wash and dry the milk bottle, and remove the label. Cut out one or more of the corner panels as shown. |
|
Stage 2 Draw or print a template on paper, and attach it to one of the panels with masking tape. You can get about 10 shields from one of the panels from a 2-litre/4-pint bottle, assuming they are roughly 25-28mm scale.
|
 |
Stage 3 Carefully cut out the shield shapes with a sharp craft knife. You can use scissors if you like, but they will need to be very sharp or you won't get crisp edges. |
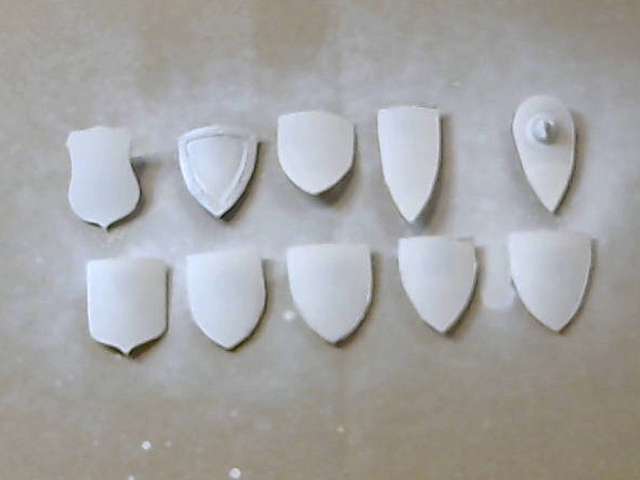 |
Stage 4 Undercoat the shields on both sides, allowing ample drying time before undercoating the second side. |
 |
Stage 5 Paint designs on the shields to finish them. I mounted mine on a rack, but they could also be used to decorate castle walls or on the sides of a Viking longboat. |
 |
Templates Click the image to open a PDF file with templates for 72 variations on shield shapes. The outlines should be about right for 28mm scale shields when printed at Actual Size. |
||||

|
Textured Shields from Milk Bottles (Click thumbnails for larger images) |
|||||
|
|
Materials & Equipment Empty plastic milk bottle Craft knife / sharp scissors Primer Acrylic paint & ink Brushes |
|
Option 1 - Stage 1 Wash and dry the milk bottle, and remove the label. Cut out one or more of the panels at the shoulder of the bottle in the marked position. It is much easier to remove a larger section first, and refine the shape afterwards. |
|
Option 1 - Stage 2 Draw a circle around a coin or using a circle stencil, and cut out the shape with a sharp craft knife. You can use scissors if you like, but they will need to very sharp or you won't get crisp edges. |
 |
Option 2 - Stage 1 Cut out the panel shown here, which is suitable for making textured kite shields. |
|
Templates Click the image to open a PDF file with templates for 72 variations on shield shapes. The outlines should be about right for 28mm scale shields when printed at Actual Size. |
 |
Option 2 - Stage 2 Attach a template to the plastic, and cut around the outline with a sharp knife.
|
 |
Stage 3 Undercoat the shields on both sides, allowing ample drying time before undercoating the second side.
|
 |
Stage 4 The plastic has a texture which looks a little like rough scaly skin. First I applied a green basecoat to the shield, and then an ink wash to accentuate this texture.
|
 |
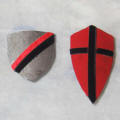
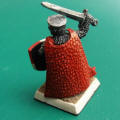
Example 2 This is a kite shield variant, made using the second option, with a boss attached. This time I opted for red scales.
|


|
Shield Bosses from Superglue Caps (Click thumbnails for larger images) |
|||||
|
|
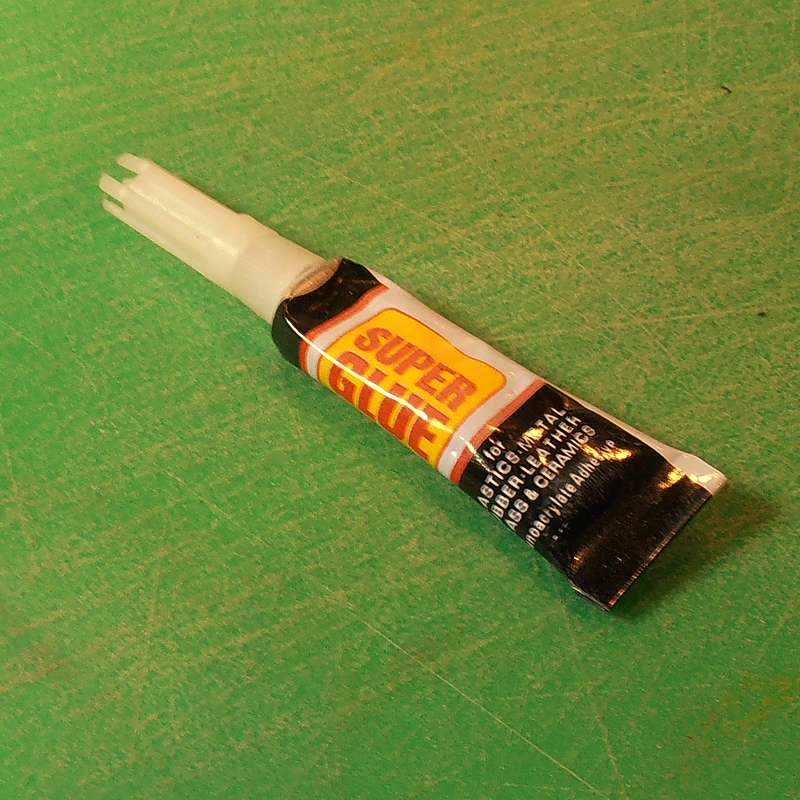
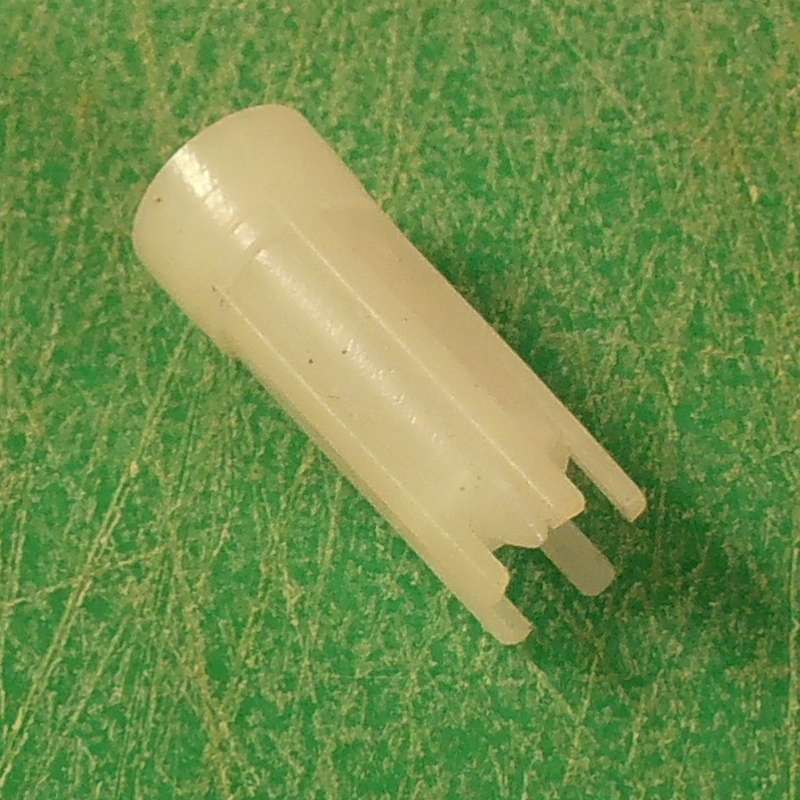
Materials & Equipment Cap from a tube of superglue Craft knife Model shield Superglue Tweezers Primer Paint & brushes |
|
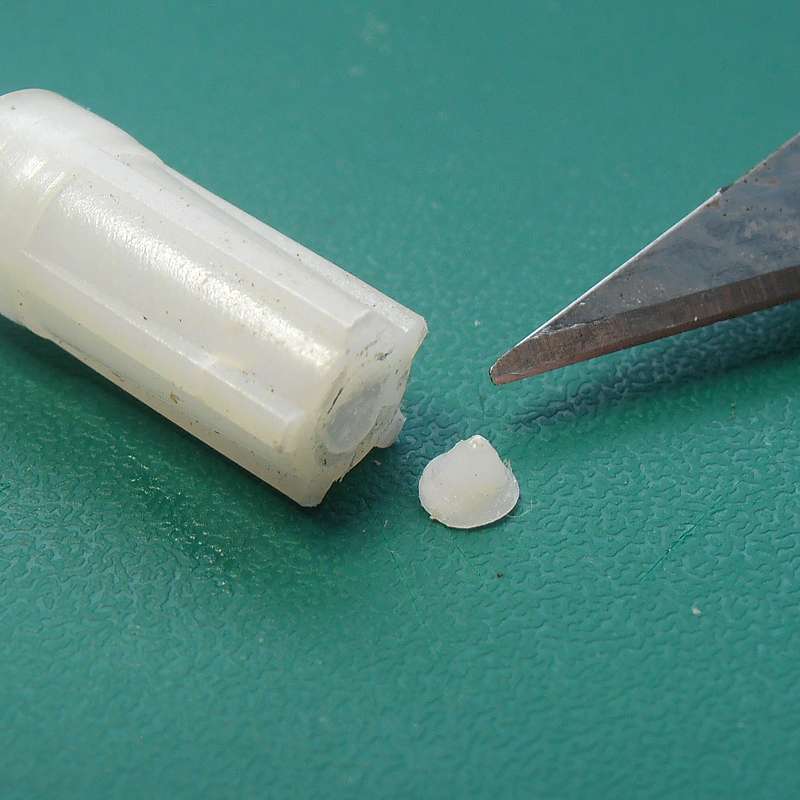
Stage 1 Take the cap from an empty tube of superglue. Clean the cap if necessary. |
|
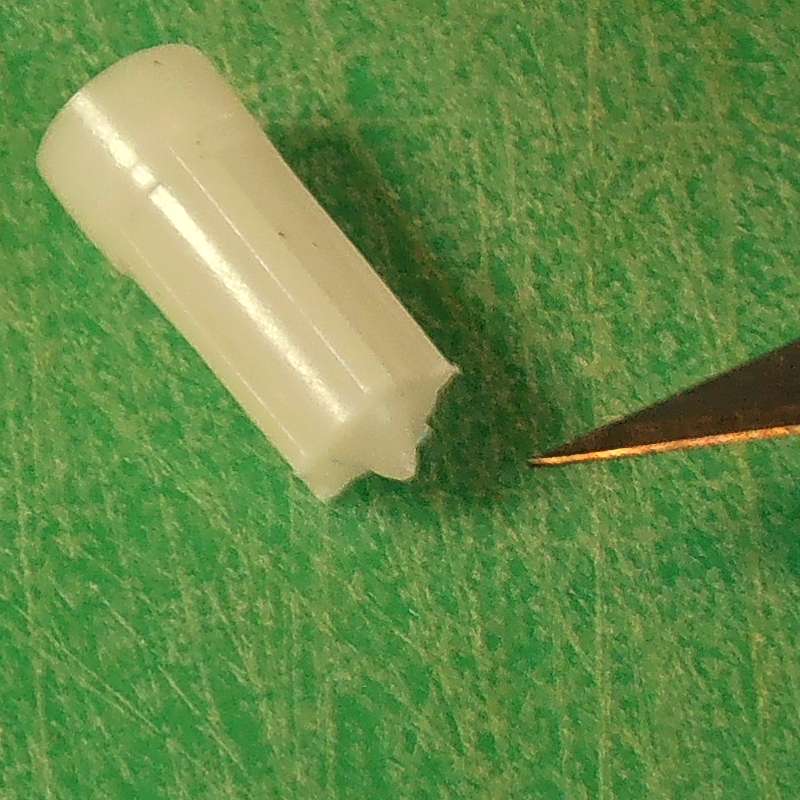
Stage 2 Using the craft knife, remove the five spikes around the edge of the cap, as shown. |
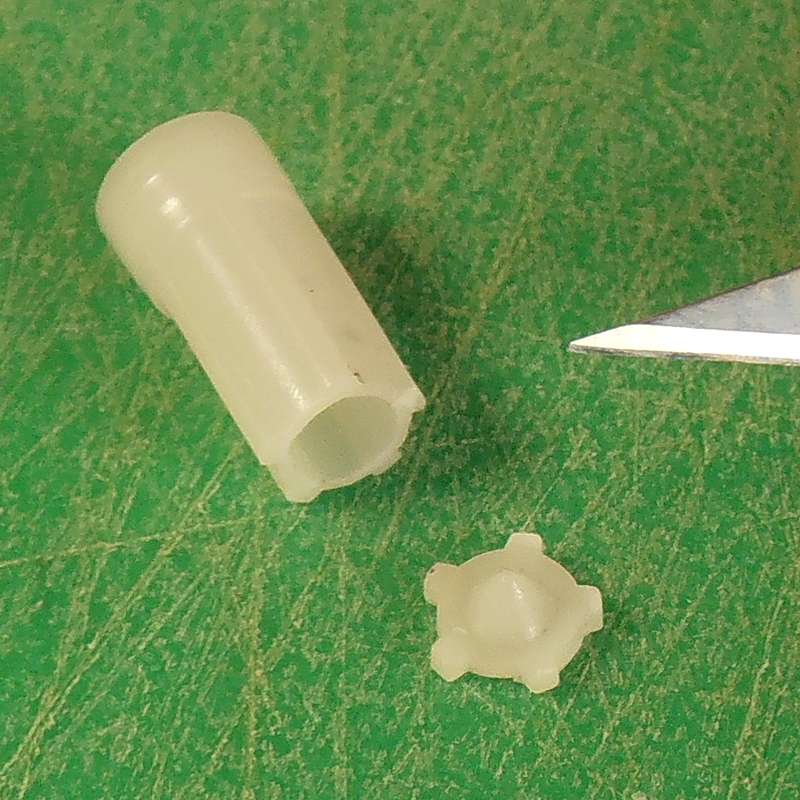 |
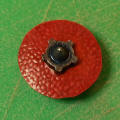
Option 1 - Stage 3 Carefully remove the top of the cap using the craft knife. You should end up with a piece around 1mm thick at the edges with a central bump.
|
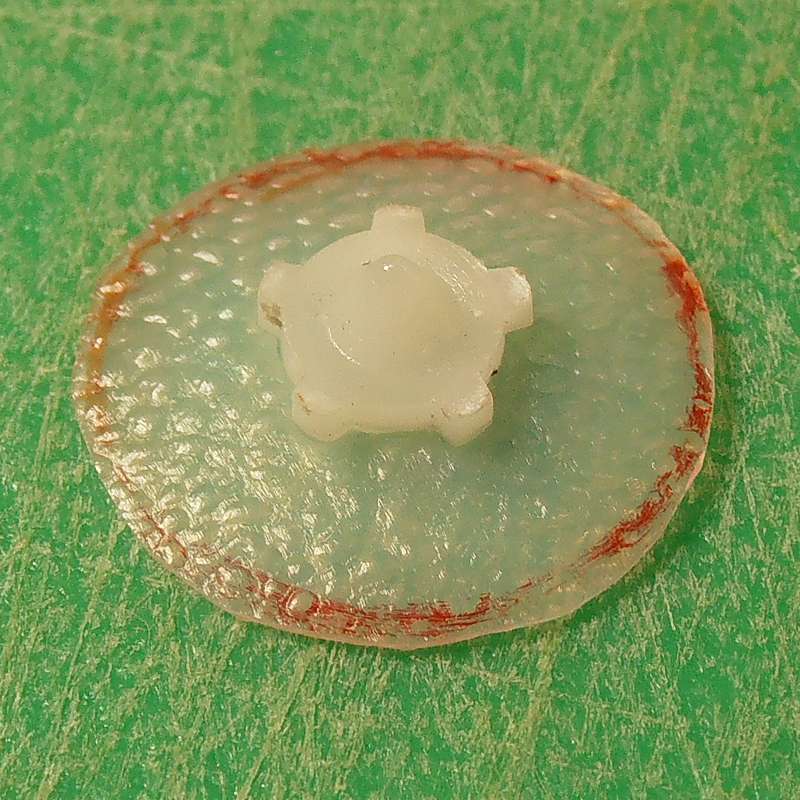 |
Option 1 - Stage 4 Attach the piece to the centre of a round shield with superglue. You will probably need tweezers to avoid getting glue on your fingers, and accurately position the pieces.
|
 |
Option 1 - Stage 5 Apply primer and then paint the shield in your chosen colour scheme.
|
 |
Option 2 - Stage 3 Carefully remove the small cone from the top of the cap.
|
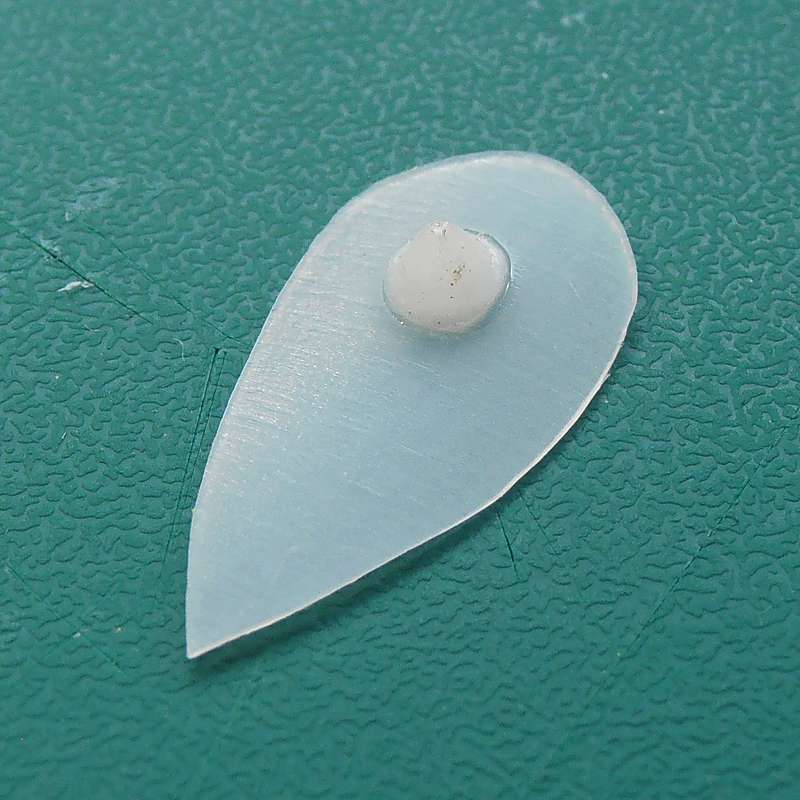 |
Option 2 - Stage 4 Attach the piece to a kite shield with superglue. You will probably need tweezers to avoid getting glue on your fingers, and accurately position the pieces. |
 |
Option 2 - Stage 5 Apply primer and then paint the shield in your chosen colour scheme. |
|
Shield Handles from Water Bottles (Click thumbnails for larger images) |
|||||
|
|
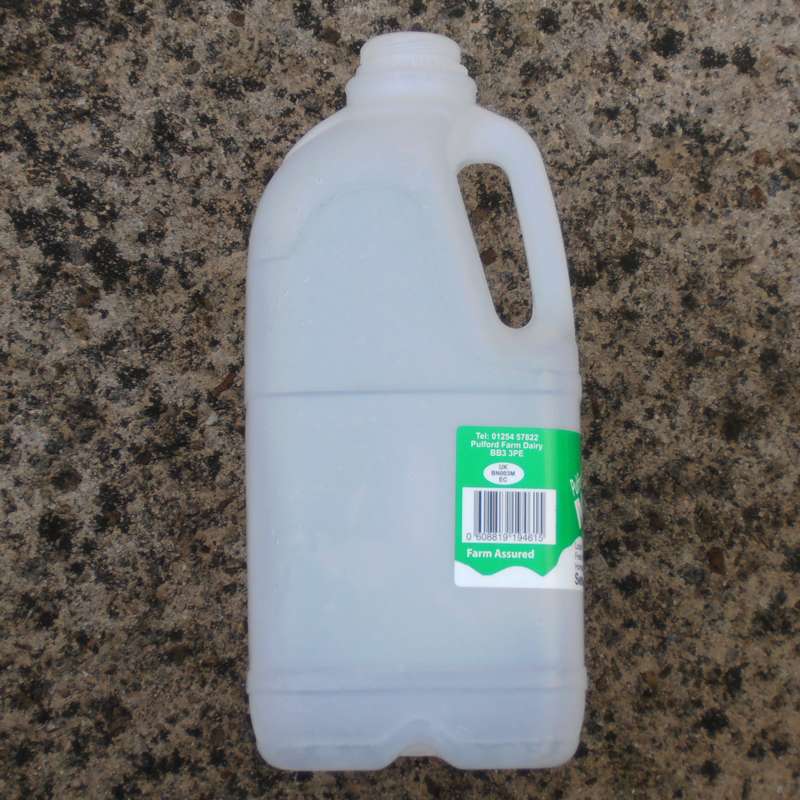
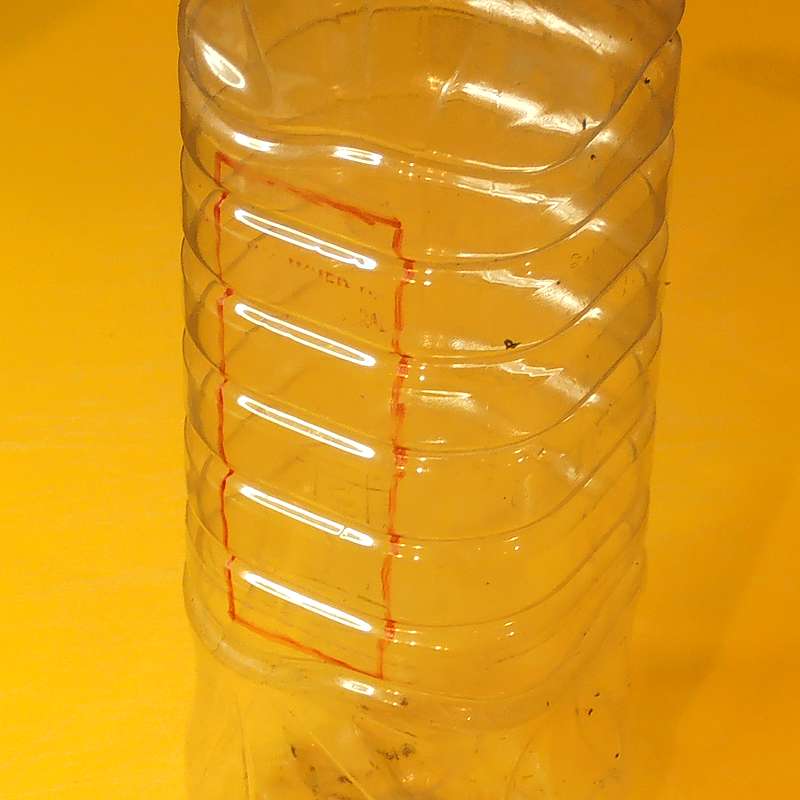
Materials & Equipment Empty bottle with flat sides and ridges Craft knife Model shield Superglue Tweezers Primer Paint & brushes |
|
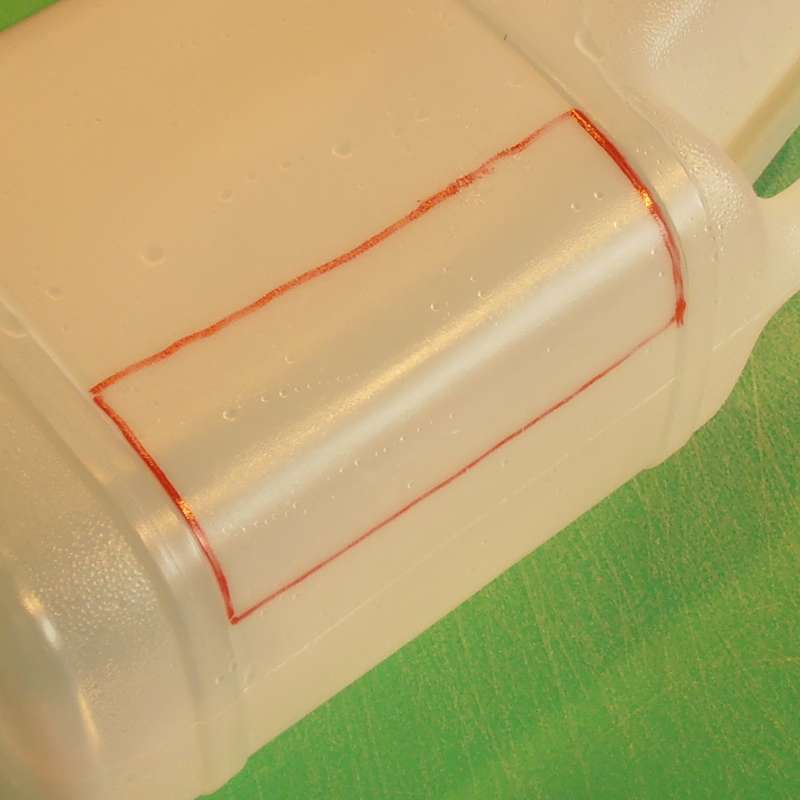
Stage 1 Wash and dry the bottle, and remove the label. Cut out one or more of the panels at the side of the bottle in the marked position. It is much easier to remove a larger section first, and refine the shape afterwards. |
|
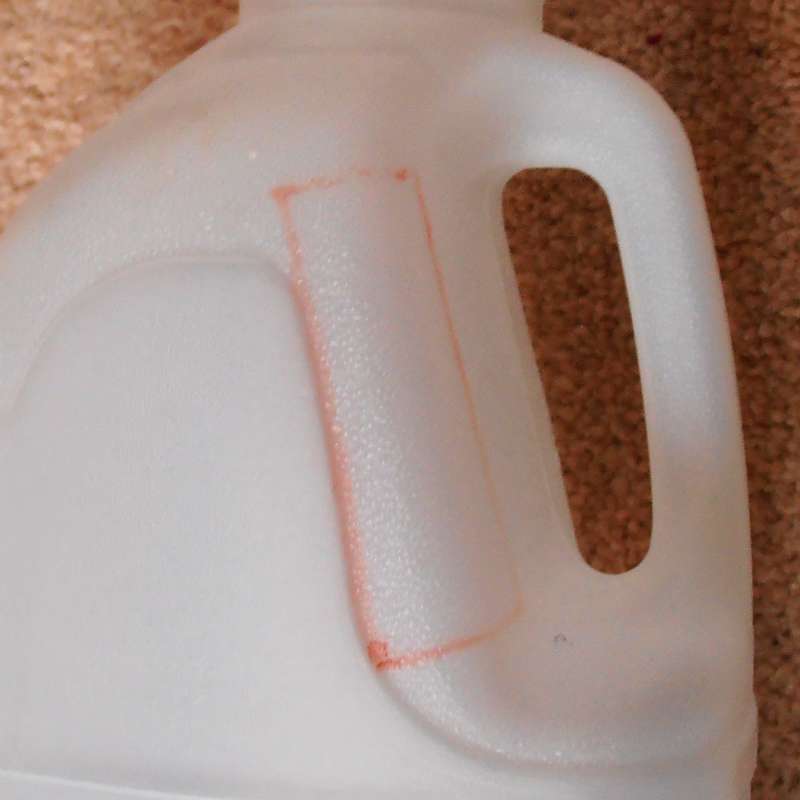
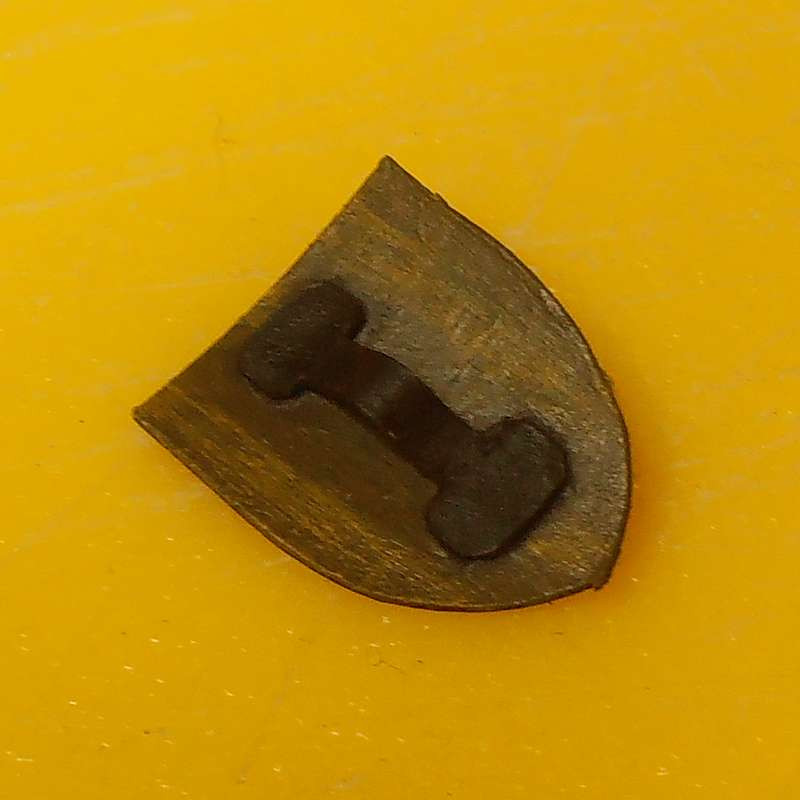
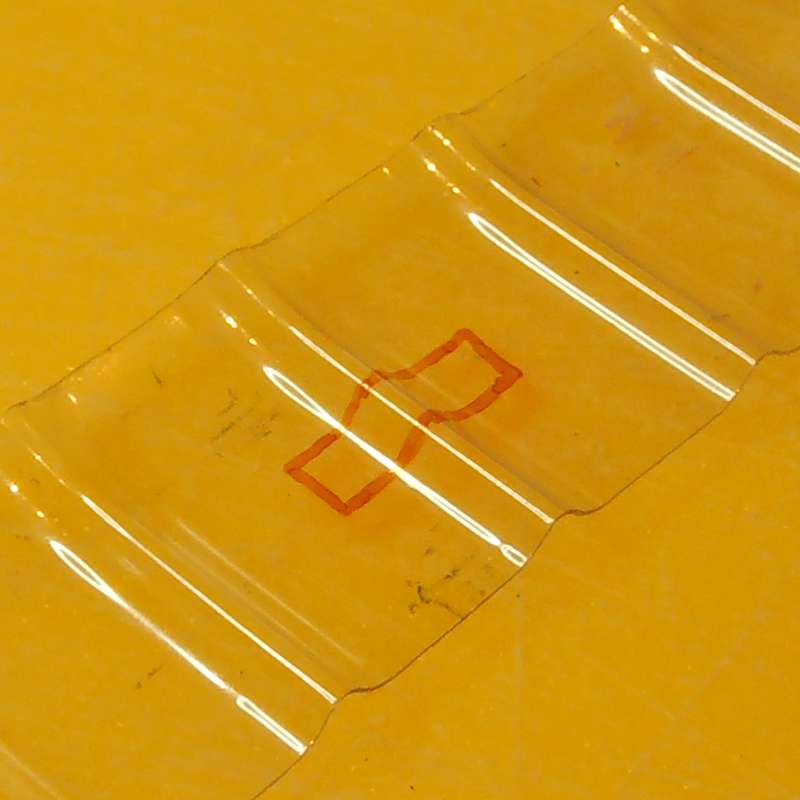
Stage 2 Cut a small rectangle from the panel using the craft knife. The ridge will form the strap of the handle. |
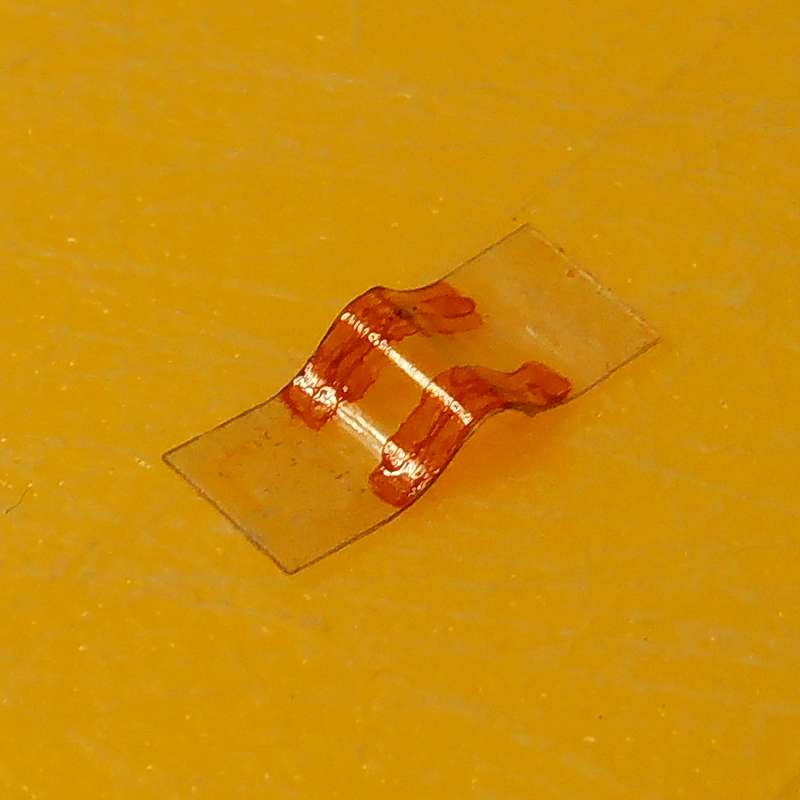 |
Stage 3 Carefully remove the material shown in the image using the craft knife. Trim all the sharp corners.
|
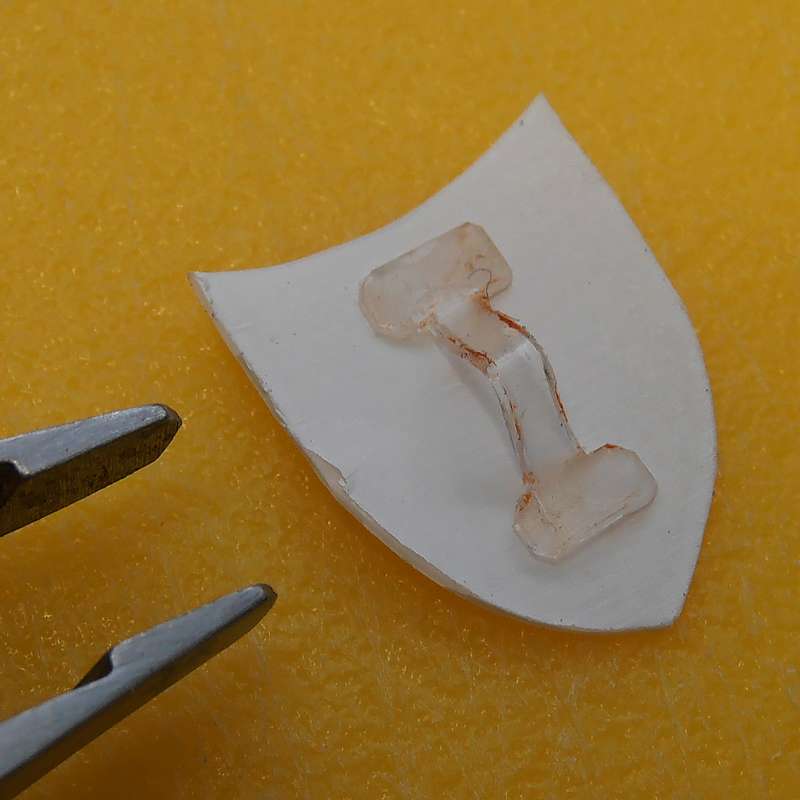 |
Stage 4 Attach the piece to the back of a shield with superglue. You will probably need tweezers to avoid getting glue on your fingers, and accurately position the pieces.
|
 |
Stage 5 Apply primer and then paint the shield and handle in your chosen colour scheme.
|
|
Shield Designs from Adhesive Tape, from an idea by George Fisher (Click thumbnails for larger images) |
|||||
|
|
Materials & Equipment Electrical Insulation Tape or Graphic Arts Tape / Whiteboard Marking Tape or Copper "Slug-Barrier" Tape Model shields Superglue Craft knife and tweezers Primer, paint & brushes |
|
Stage 1 Start with some model shields. You can prime and paint them before adding the tape, or add the tape first and paint over the raised design. Instructions below for making shields from an empty milk bottle.
|
|
Stage 2 - Option 1 Cut a design from the tape using a sharp craft knife. Place the design carefully onto the shield using tweezers. Burnish the tape with the back of your fingernail to ensure good adhesion and remove any air-bubbles. |
 |
Stage 2 - Option 2 Cut a strip from the tape to the desired width. Fix the tape in place on the shield, as before. Trim the tape around the edges of the shield with a sharp craft knife.
|
 |
Stage 3 If you aren't happy with the finish or colour of the tape, spray with primer then paint as desired. If you wish, you can coat the seams with a little superglue first, to strengthen the joints.
|
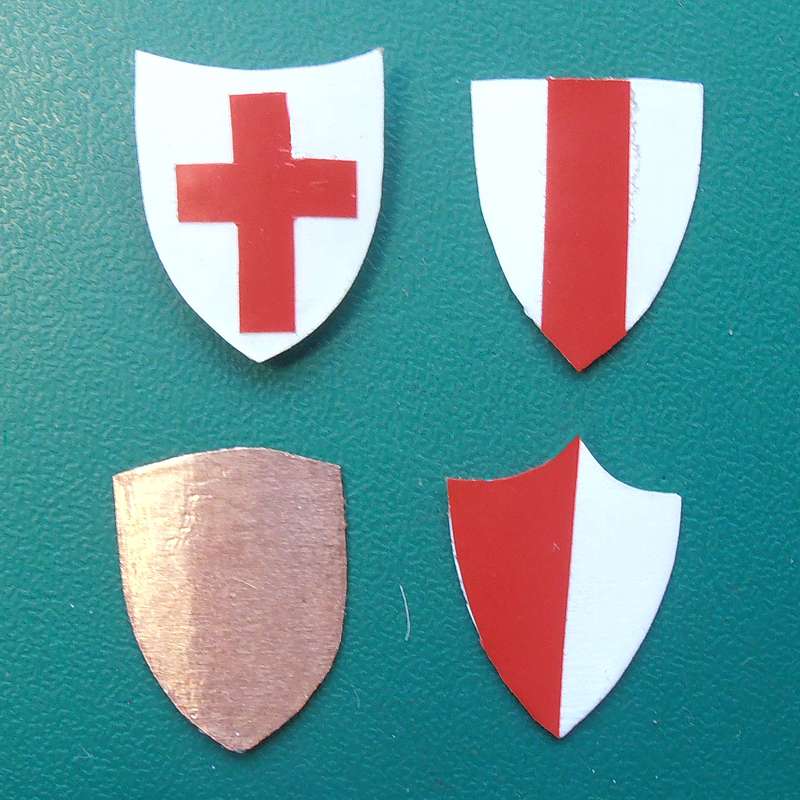 |
Examples 1 #1 - design cut first, then placed #2 - strip cut, placed and trimmed #3 - metallic copper tape covering the whole shield #4 - tape fixed in place, then trimmed |
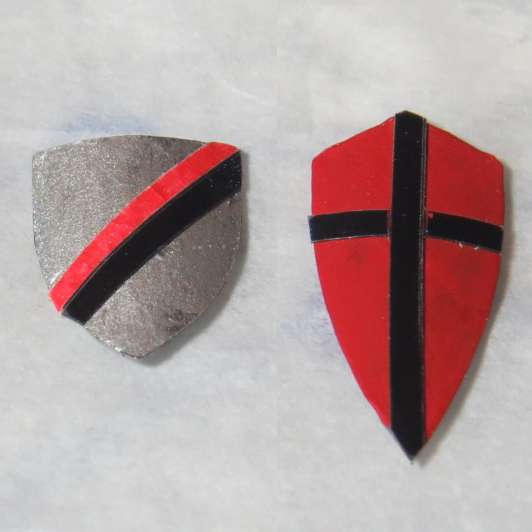 |
Examples 2 These are some of George's designs using the Graphic Arts Tape #1 - two strips of colours forming a bend sinister #2 - two strips forming a cross with the overlap carefully removed from the intersection |
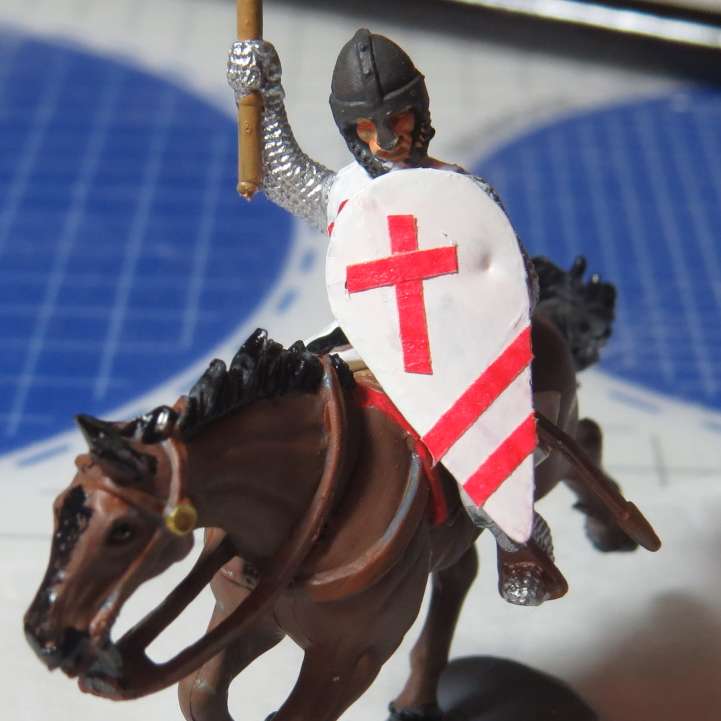 |
Example 3 Another of George's models with interesting design variations.
|
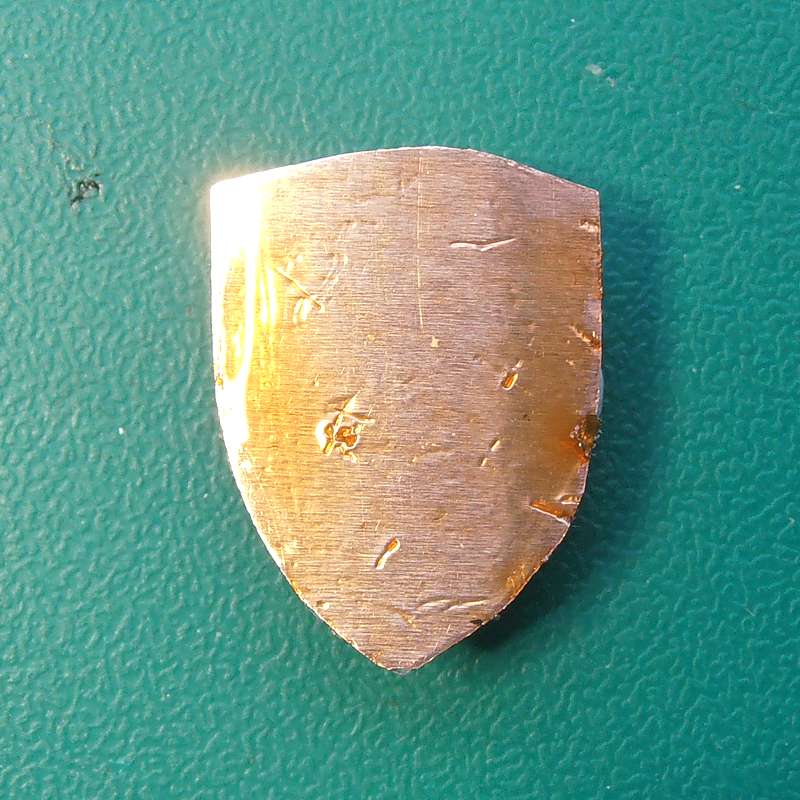 |
Example 4 This is the shield with the copper tape. I added some scratches and dings with the corner of a file, then applied an ink wash.
|

|
Maces from Beads (Click thumbnails for larger images) |
|||||
|
|
Materials & Equipment Beads Cocktail sticks Plastic tube (cotton bud shaft) Masking tape and cotton thread PVA, Superglue Craft knife, Tweezers, Sandpaper Paint and brushes |
|
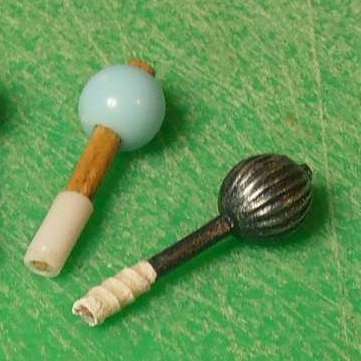
Stage 1 Sand the tip of a cocktail stick to fit through the hole in a bead. Attach the stick to the bead with a drop of PVA. Trim the point and handle to length - around 15-19mm looks about right. |
|
Stage 2 - grip options Add a grip from a piece of plastic tubing, cotton thread or a thin strip of masking tape wrapped around the handle. |
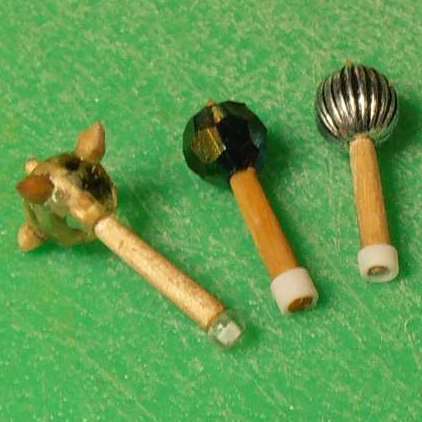 |
Stage 3 - pommel options Add a pommel from a short length of plastic tubing or a small bead. If you use a bead you'll need to fill the hole and then glue it in place.
|
 |
Stage 4 - optional Make spikes from short lengths cut from the tips of cocktail sticks. Attach these to the mace head with superglue. You will probably need tweezers to avoid getting glue on your fingers, and accurately position the pieces. |
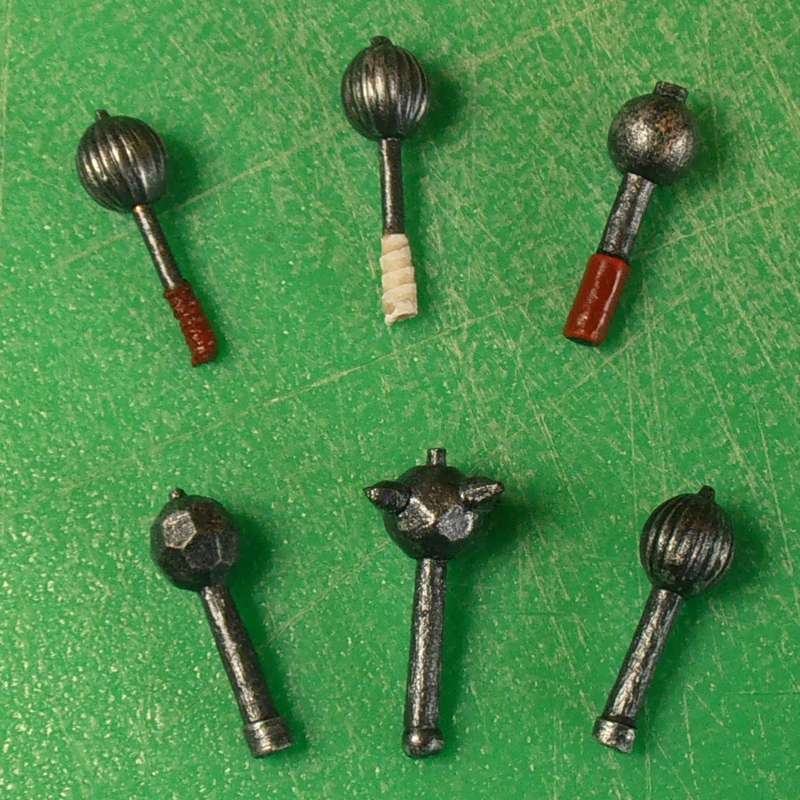 |
Stage 5 Spray with primer and allow to dry. Paint in suitable colours - I used a gunmetal basecoat with silver highlights. |
|
|
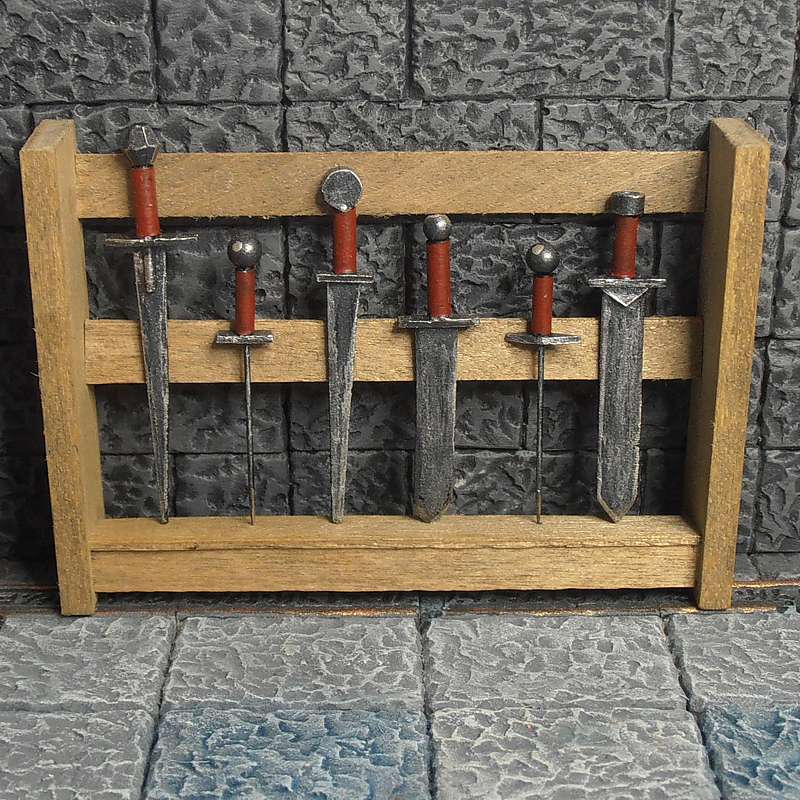
Example 1 I glued six different maces to a weapons rack, but you could add them to treasure piles or display them on the walls of the Great Hall.
|
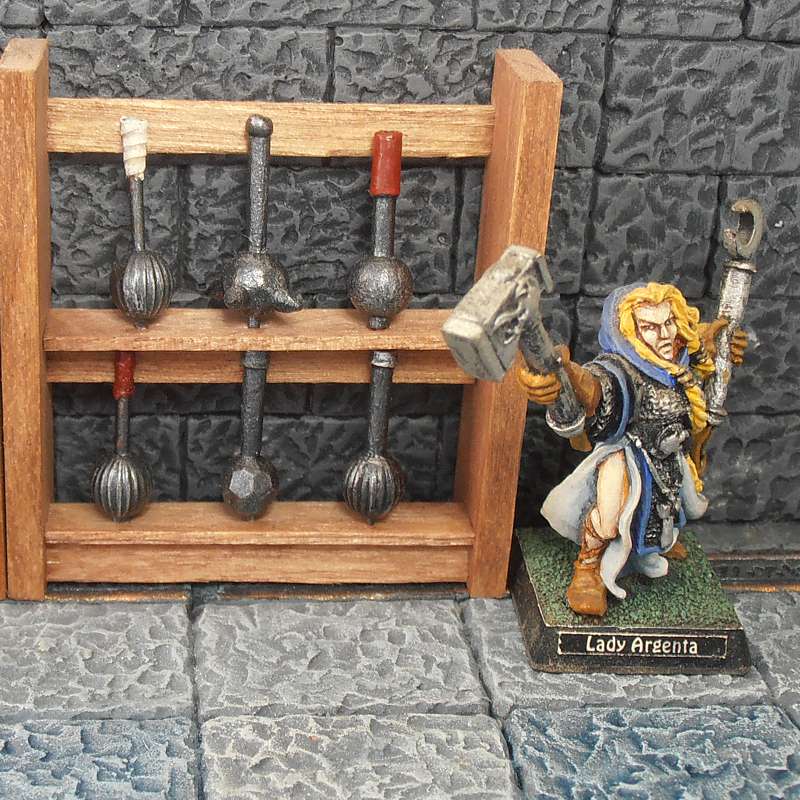 |
Example 2 The rack in a Hirst Arts room with a figure for scale. |
||


|
Rapiers from Pins (Click thumbnails for larger images) |
|||||
|
|
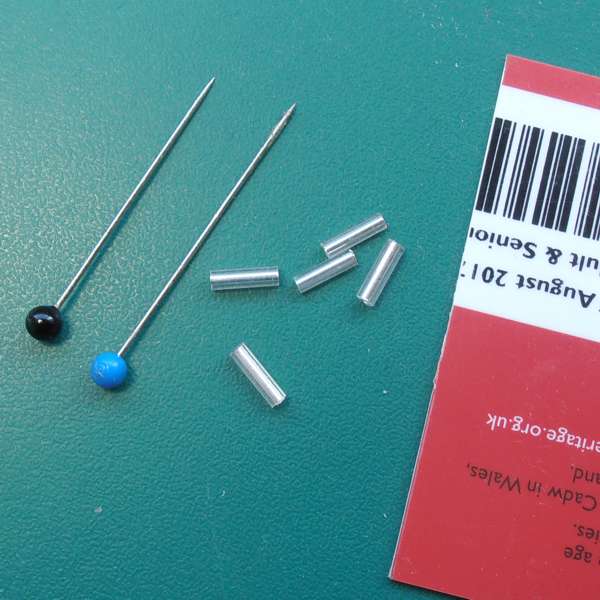
Materials & Equipment Round-headed dressmakers' pins Bugle Beads or fine plastic tube Plastic card (old ID card or similar) Superglue Craft knife, Tweezers, Map Pin or Pin Vice and Fine Drill Bit Paint and brushes |
|
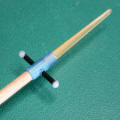
Stage 1 Slide a bugle bead onto the pin. Alternatively cut a section of the plastic tube to length and use that instead. |
|
Stage 2 Cut a small rectangle or diamond from the plastic card. This will become the hilt of the sword. |
 |
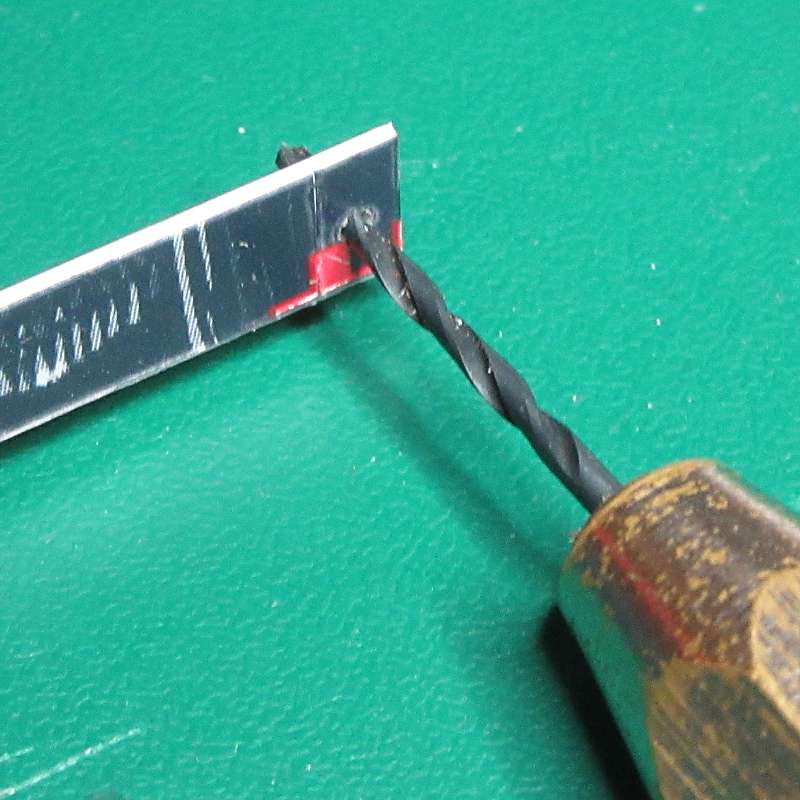
Stage 3 Using a map pin, make a hole in the centre of the hilt piece you just made. If the plastic is too stiff, you may find it easier to use a pin vice and fine drill bit.
|
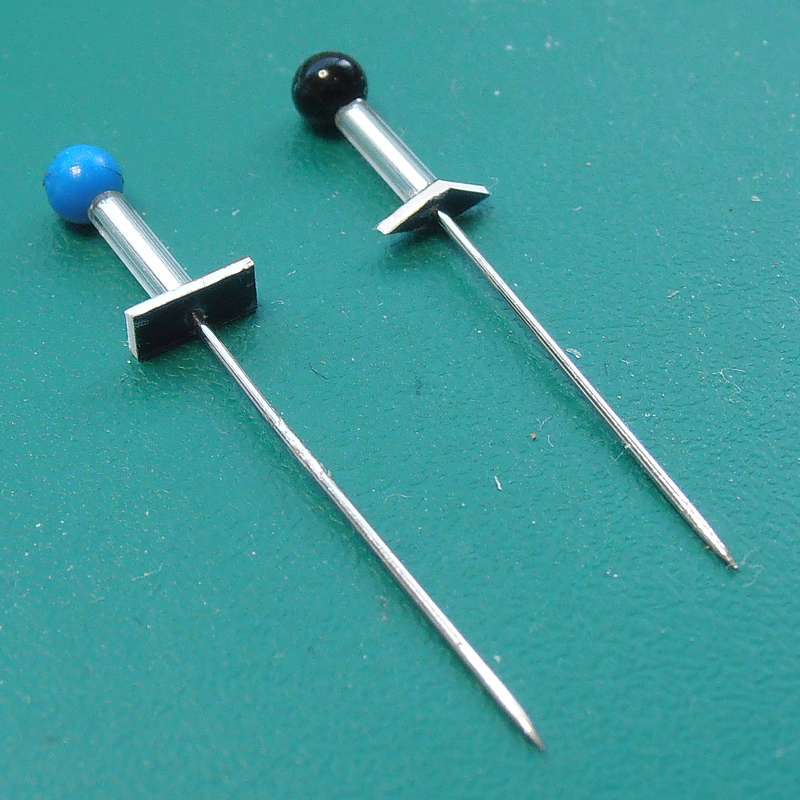 |
Stage 4 Slide the hilt into place. If necessary, secure everything in place with a tiny amount of superglue. You may wish to use tweezers for this step. |
 |
Stage 5 Spray with primer and allow to dry. Paint in suitable colours - I used a gunmetal basecoat with silver highlights and deep red for the grips. |
|
|
Example 1 Here are two of these rapiers along with four other swords on a rack.
|
 |
Example 2 The same rack set in a room made from Hirst Arts blocks to show the scale. |
||

|
Swords from Plastic Card (Click thumbnails for larger images) |
|||||
|
|
Materials & Equipment Plastic card (old ID card) Plastic tube (cotton bud shaft) Beads, sprue Superglue Primer, paint and brushes Craft knife Tweezers |
|
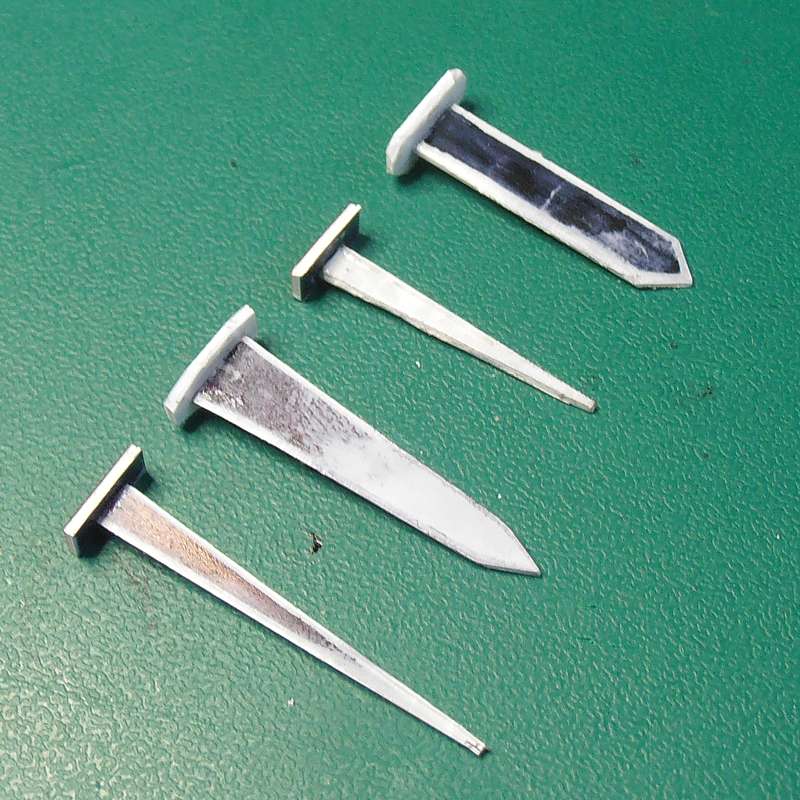
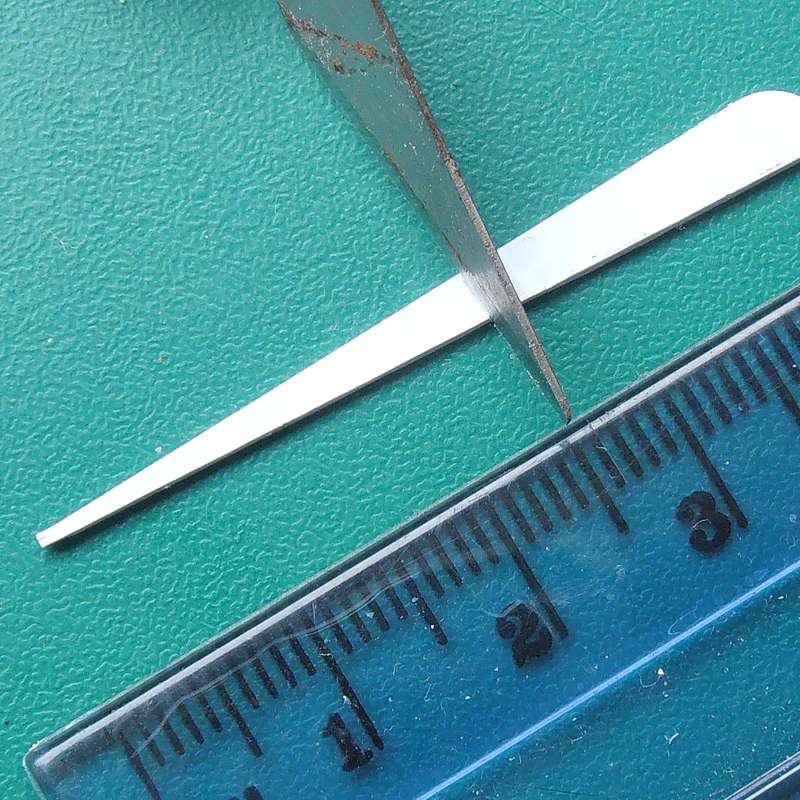
Stage 1 Cut a blade shape from thin plastic card. Blades can vary a lot in length and width, but between 12mm and 30mm (1/2" - 1 1/4") works well for 28mm scale figures. |
|
Stage 2 For added detail shave the edges of the blade by back-scraping with the craft knife - place the knife blade at right angles to the plastic and scrape along the edges. It may help to colour the plastic using a Sharpie to make it easier to see how much you have removed. |
 |
Stage 3 Cut a small rectangle from the plastic card for the hilt. You can vary the shape from a simple rectangle by trimming the corners at different angles, or rounding them. |
 |
Stage 4 Cut a piece of the plastic tube for the handle - 6mm (1/4") looks about right. For a simple variation, wrap the handle with a thin strip of masking tape.
|
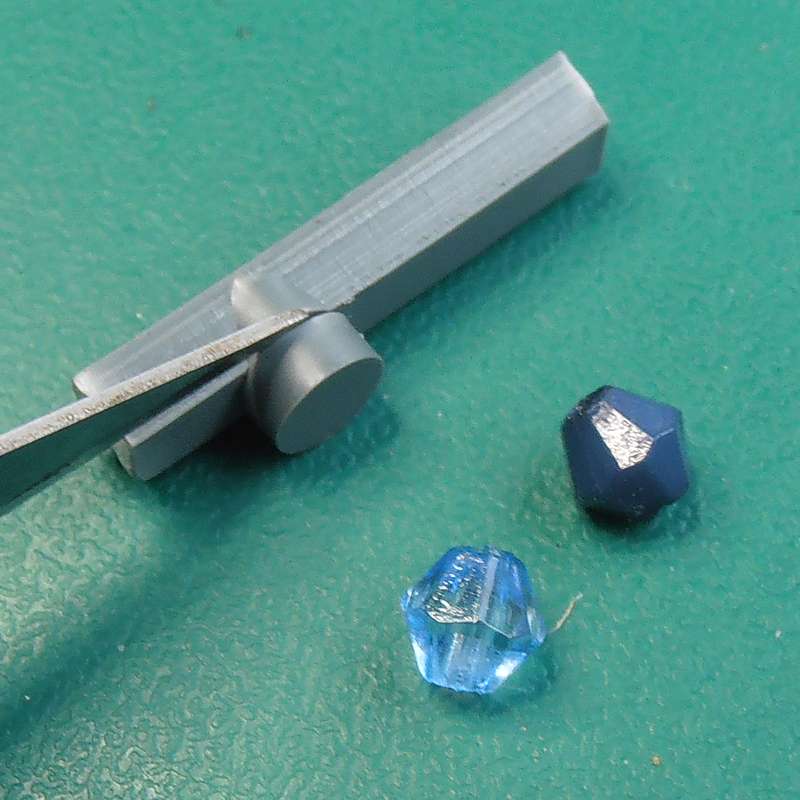 |
Stage 5 - pommel options Craft beads and pieces cut from old sprues make a variety of different pommels.
|
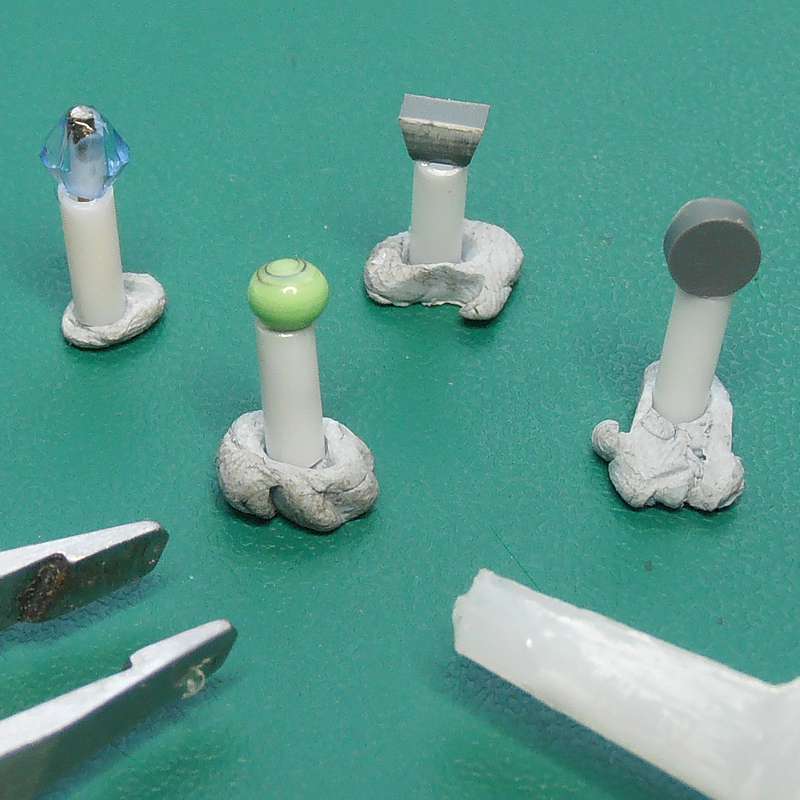 |
Stage 6 Attach the pommel to the handle with a small drop of superglue. You will probably need tweezers to avoid getting glue on your fingers, and accurately position the pieces. If you use a bead for the pommel, you can thread wire through to strengthen the joint and fill the hole. |
 |
Stage 7 Attach the sword blade to the centre of the hilt piece with a small drop of superglue. Use tweezers to help. Allow the pieces to dry before continuing.
|
 |
Stage 8 Glue the two pieces of the sword together. Use tweezers to help keep the pieces aligned.
|
 |
Stage 9 - optional Add more small pieces of plastic to the junction of the blade and the hilt for extra detail.
|
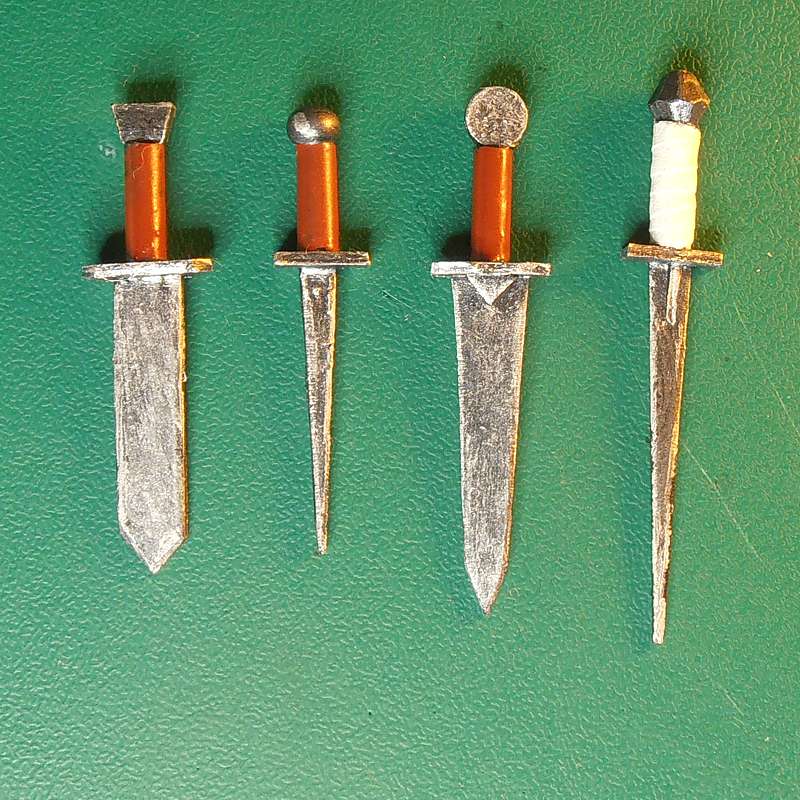 |
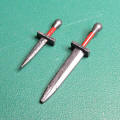
Stage 9 Prime and paint in your choice of colours - I used a gunmetal basecoat with silver highlights for the metal parts and deep red or white for the grips. |
|
Example 2 Here is a rack of swords made using the same techniques, along with a couple of rapiers.
|

|
Shortswords & Daggers (Click thumbnails for larger images) |
|||||
|
|
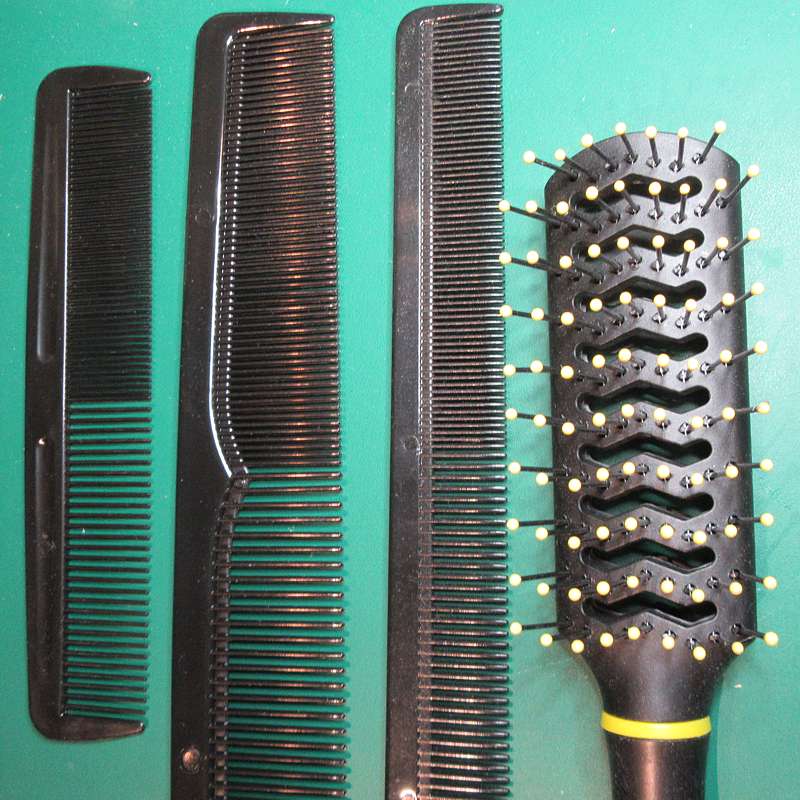
Materials & Equipment Plastic combs Plastic hairbrush Plastic card (old ID card) Superglue Craft knife Pin vice & drill bit Paint & paintbrush |
|
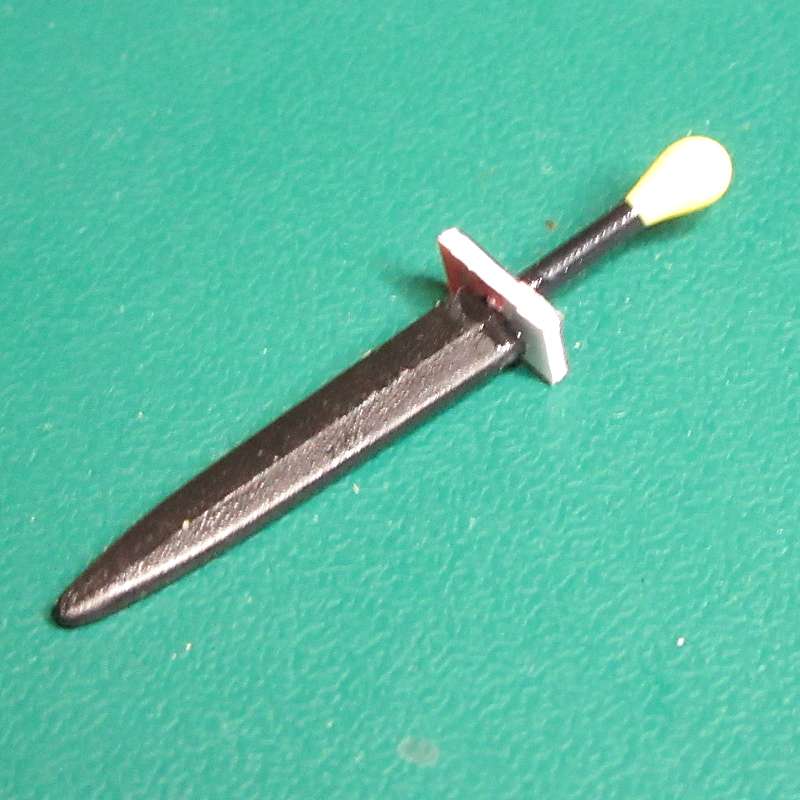
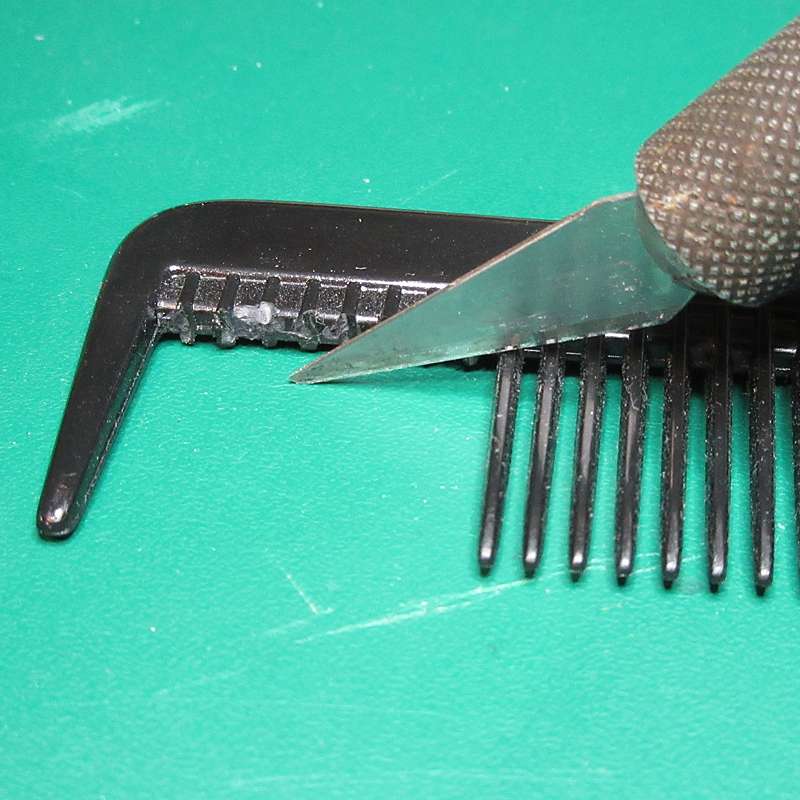
Stage 1 Cut a tooth from the plastic comb with a sharp craft knife. Trim the end to make the cut as square as possible. Trim the piece shorter if you want to make a dagger |
|
Stage 2 Cut a strip of plastic card to form the hilts of the swords. This should be a little wider than the comb-teeth blades (see the image for Stage 4). |
 |
Stage 3 Drill a hole in the centre of the strip, near one end. |
 |
Stage 4 Cut the hilt piece from the plastic strip. |
 |
Stage 5 (optional) Trim the corners of the hilt piece to vary the shapes. |
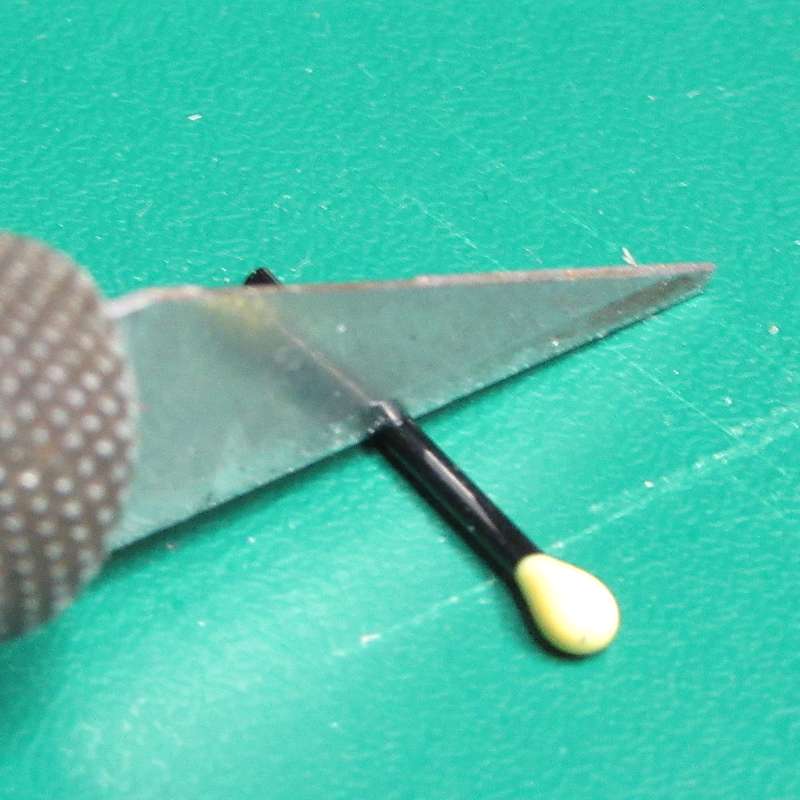 |
Stage 6 Cut a prong from the hairbrush, and trim it to length. About 6mm (1/4") of "handle" looks good for 28mm scale. |
 |
Stage 7 Attach the handle into the hole in the hilt with a small blob of superglue, and allow to set. |
 |
Stage 8 Attach the handle assembly to the blade with a small blob of superglue, and allow to set. |
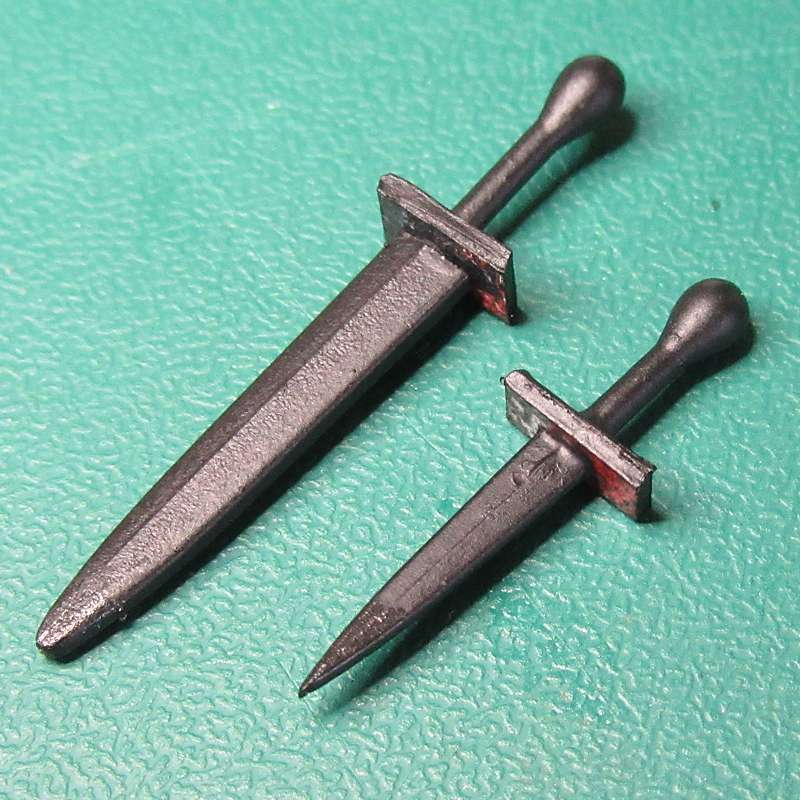 |
Stage 9 Spray with black primer and allow to dry. |
 |
Stage 10 Paint in suitable colours - I used a gunmetal basecoat with silver highlights and deep red for the grips. |
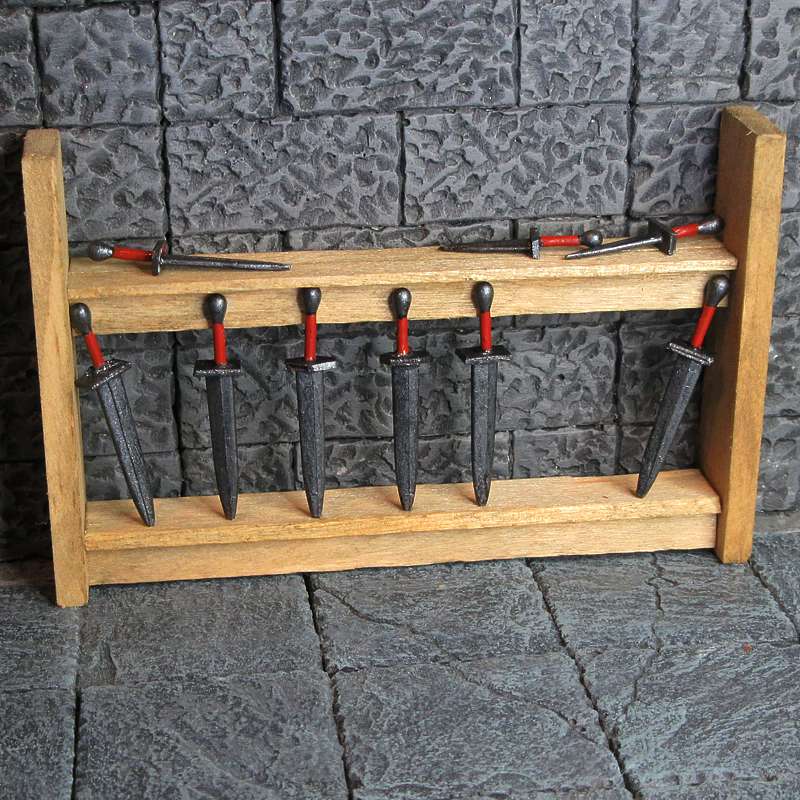 |
Example 2 Here is a rack of shortswords and daggers made using these techniques.
|

|
Practice Swords from Rivets, from an idea by Gabriel Tullis (Click thumbnails for larger images) |
|||||
|
|
Materials & Equipment Pop-rivets Metal file Hammer and anvil (or a second hammer) Pliers Primer, paint and brushes |
|
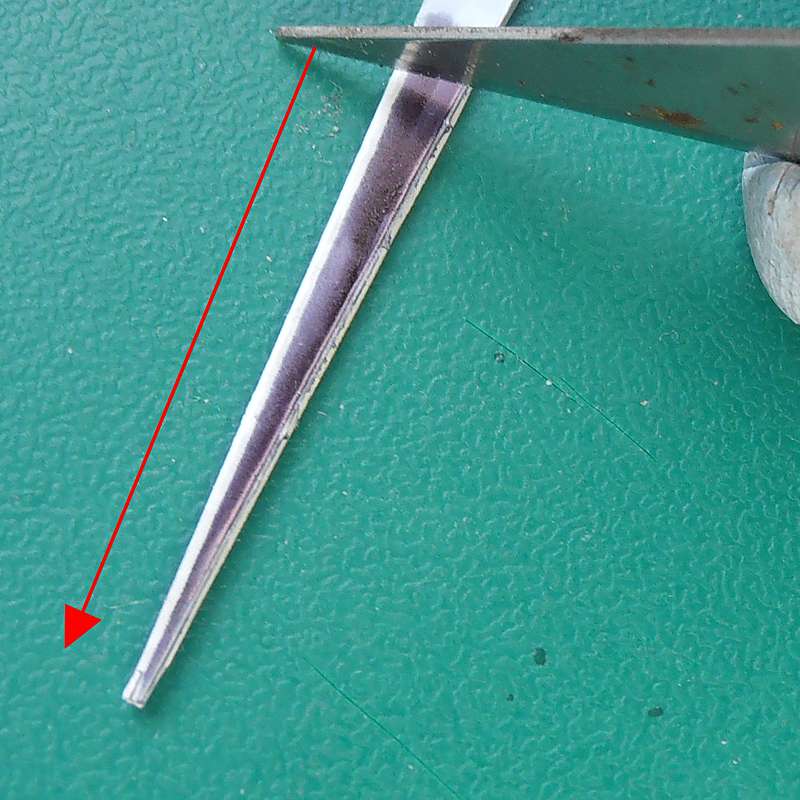
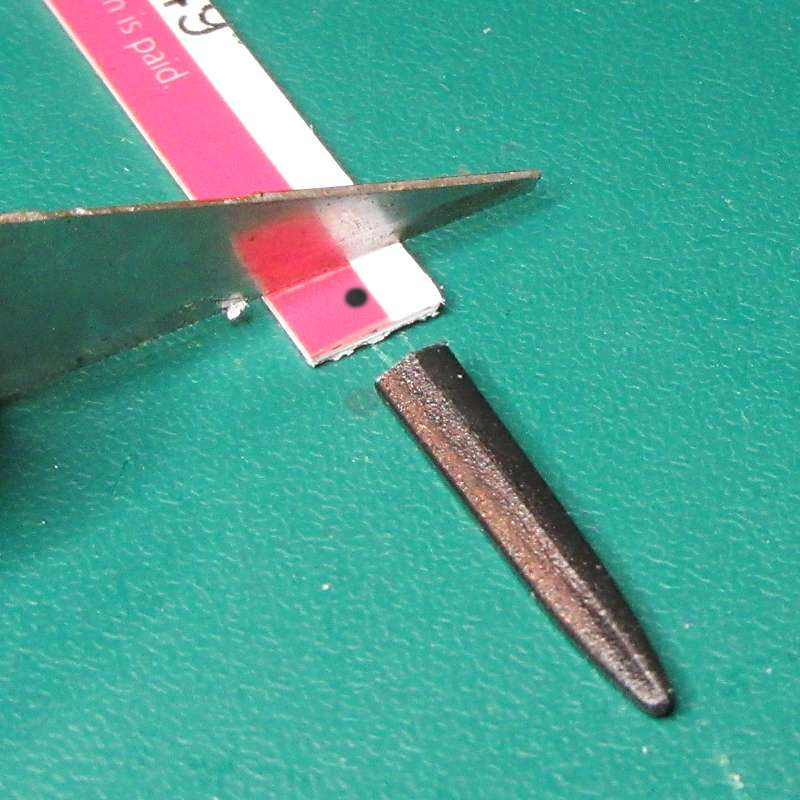
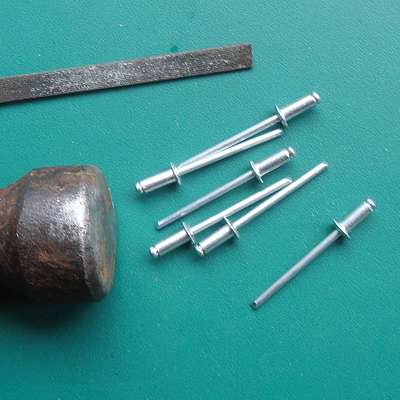
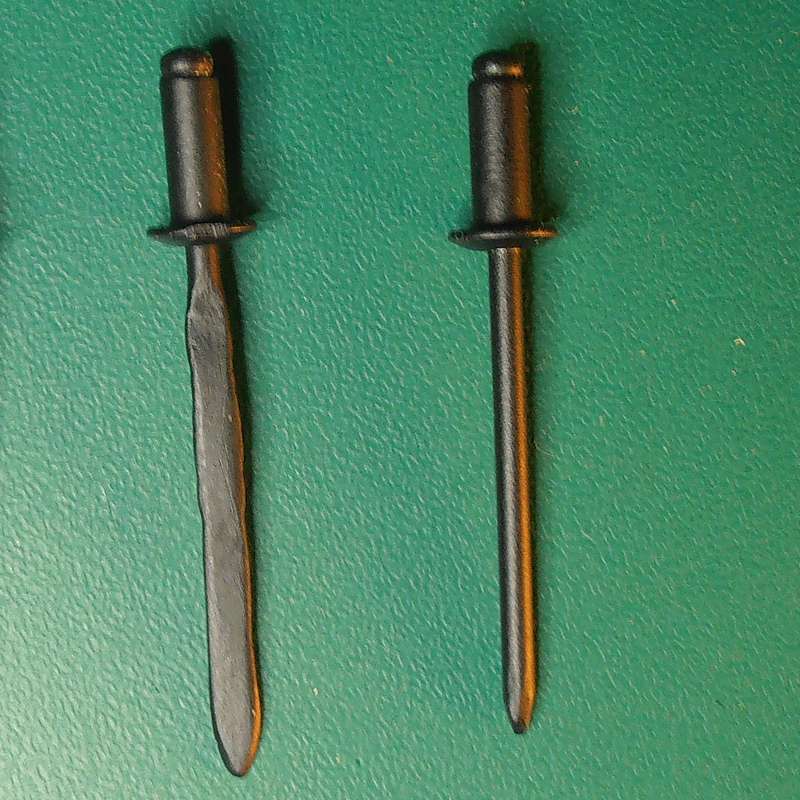
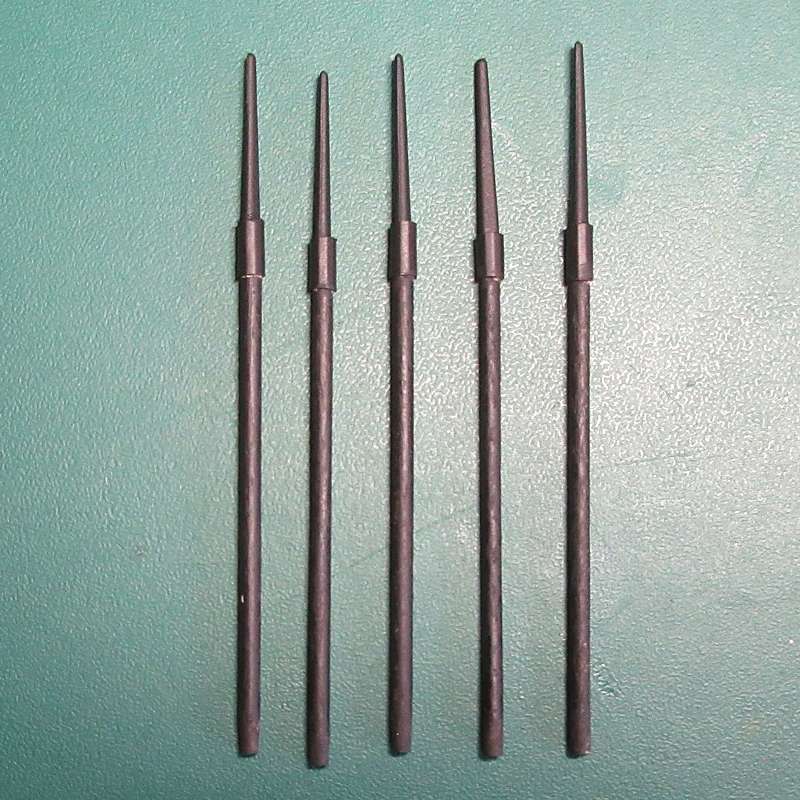
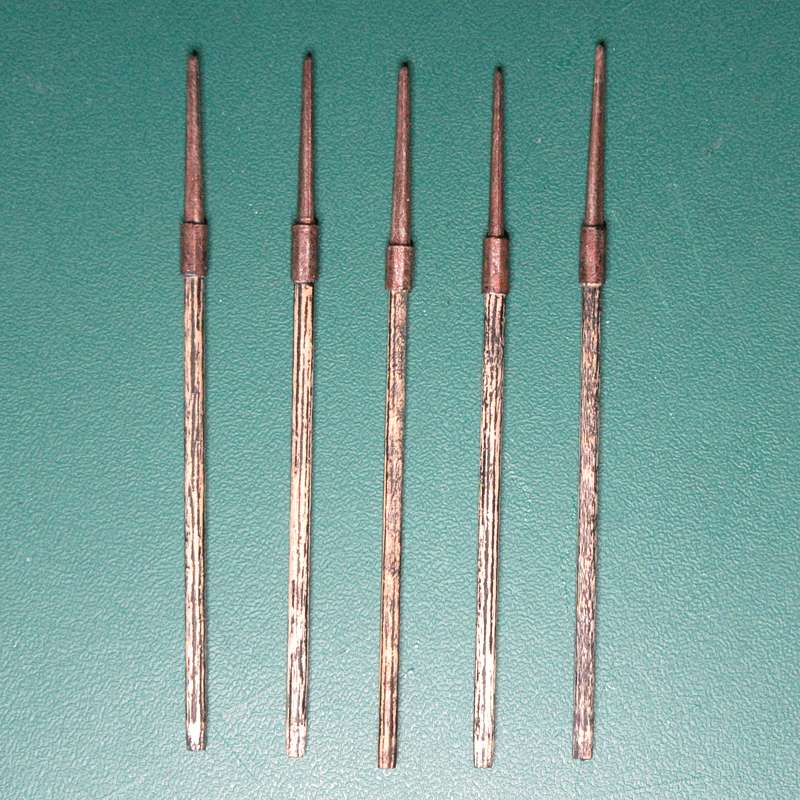
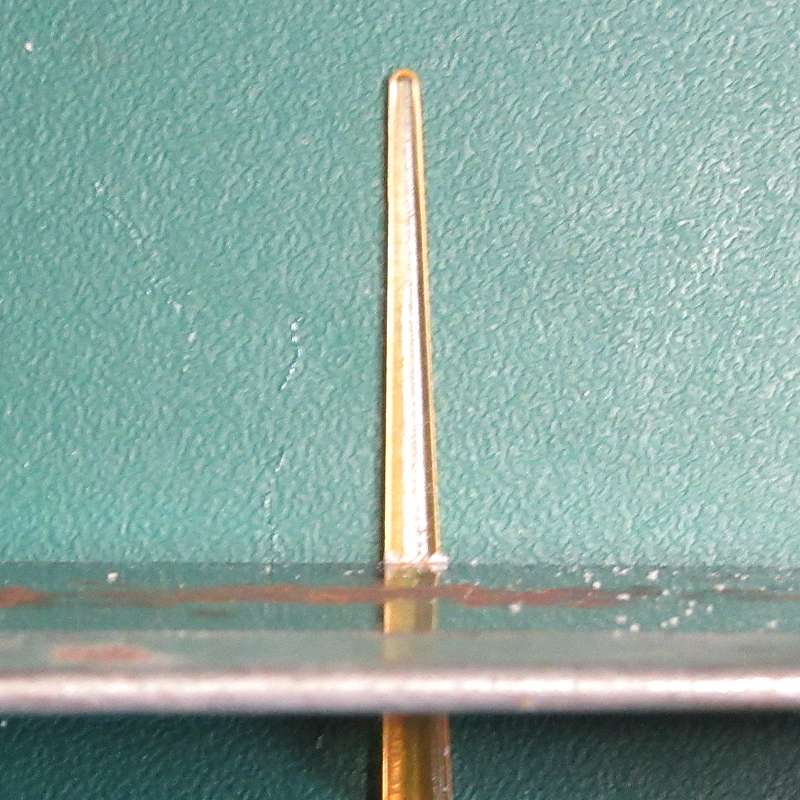
Version 1 - Stage 1 Using the file, make a blunt point on the end of the shaft of the rivet. |
|
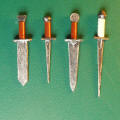
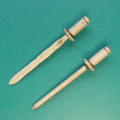
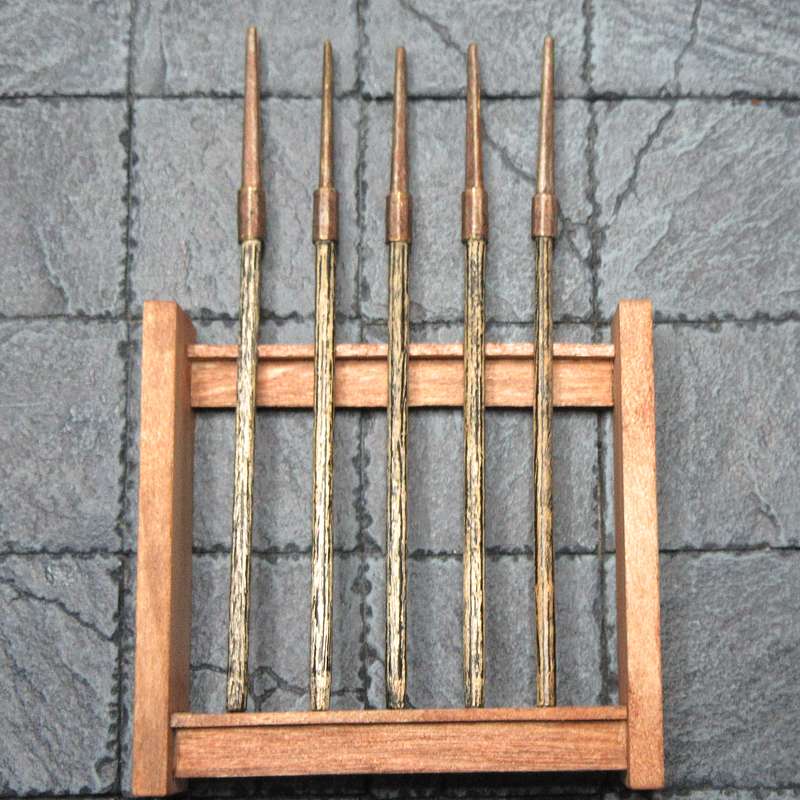
Version 1 -Stage 2 Prime & paint in wood colours and it is done. The image shows one of each version primed in black. |
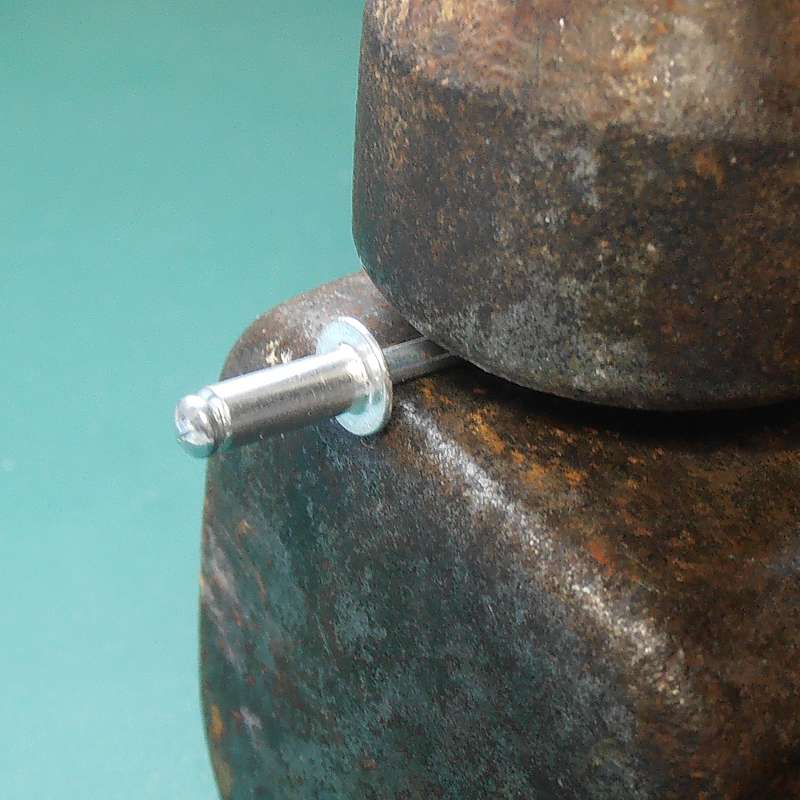 |
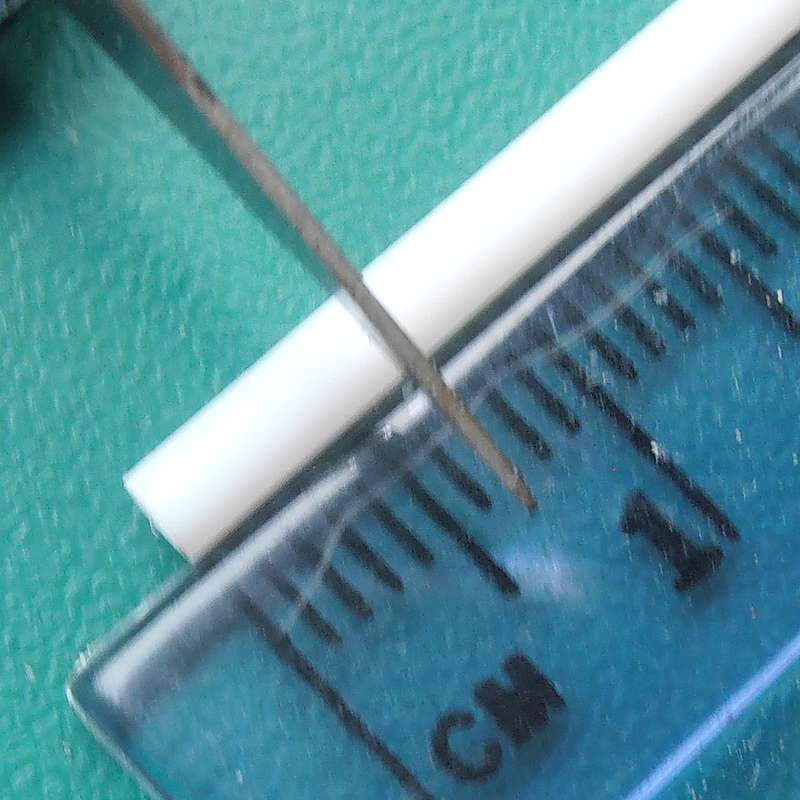
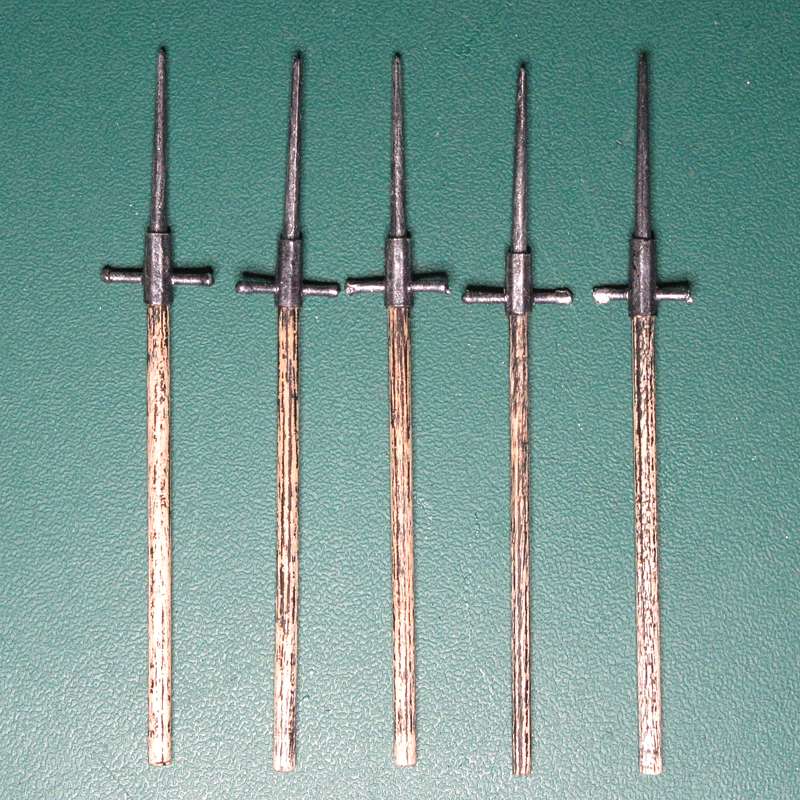
Version 2 - Stage 1 Hold the head of the rivet with a pair of pliers, and hammer the shaft into a flat bar. Be sure to work on a firm surface. This is quite difficult to do, and the process could be less arduous if you heat the metal before hammering, but be careful if you do. |
 |
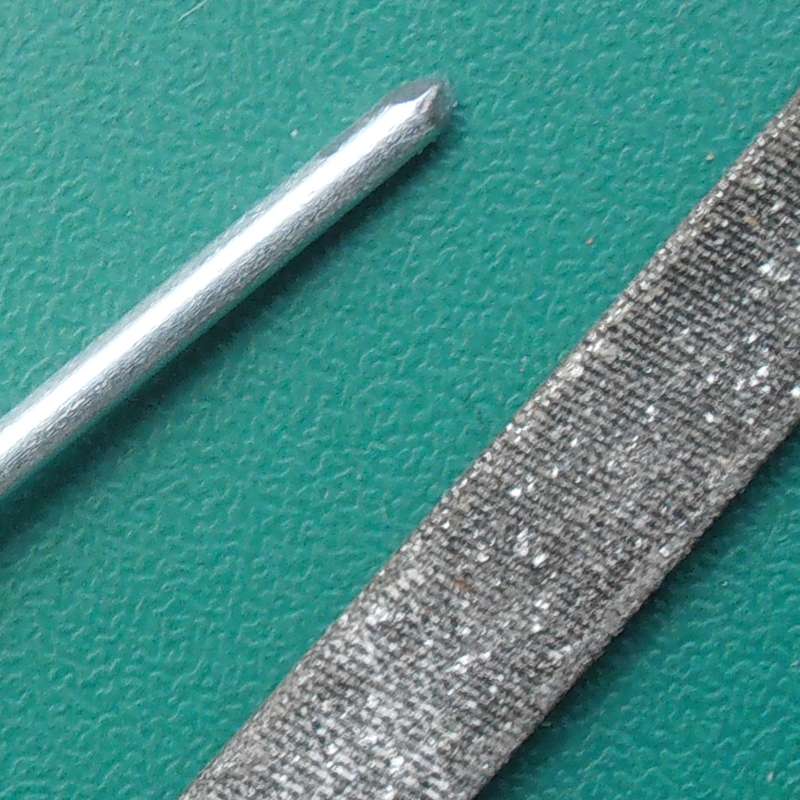
Version 2 - Stage 2 File the end of the shaft to a blunt point.
|
 |
Version 2 - Stage 3 Prime & paint in wood colours.
|
|
Polearms (Click thumbnails for larger images) |
|||||
|
|
Materials & Equipment Cocktail sticks, beads, kebab skewer Plastic tube (cotton bud shaft) Plastic Plant Labels with rounded ends Craft knife, Superglue Hole Punch Primer, Paint & brushes |
|
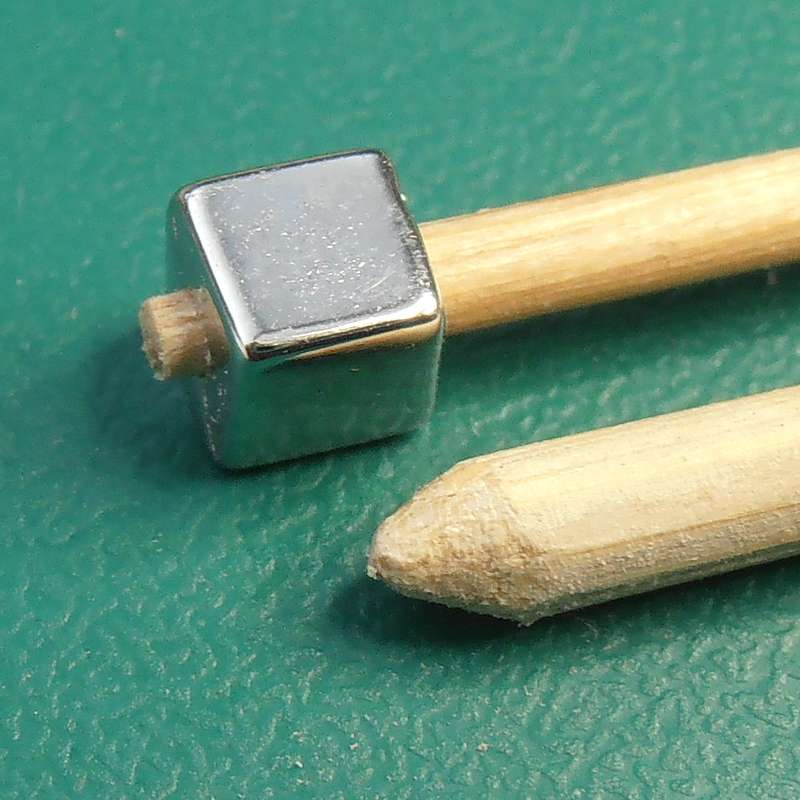
Stage 1 - (Universal) Remove the point from one end of the cocktail stick. Cut a cylinder of plastic tube about 1mm in length and push this onto the cocktail stick, at or near the trimmed end. |
|
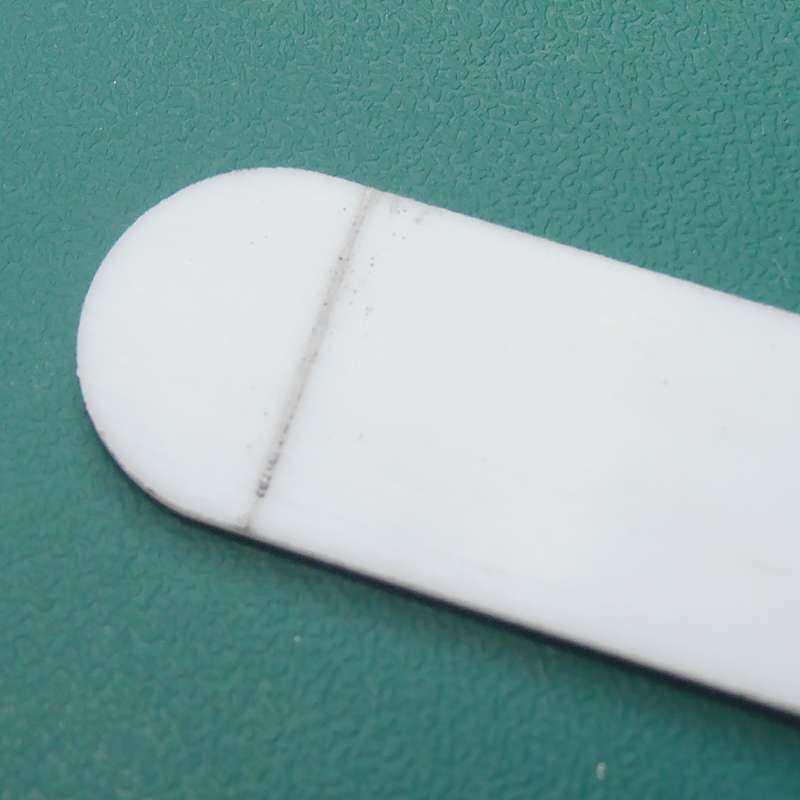
Option 1 - Stage 2 Take one of the plastic plant labels and draw line across about 2mm from the end of the rounded portion. |
 |
Option 1 - Stage 3 Remove the base plate from the hole punch. Looking from below, you can now align the plant label on the line to remove a semi-circle of material from each side. |
 |
Option 1 - Stage 4 Shave the edge of the blade by back-scraping with the craft knife. It may help to colour the plastic using a Sharpie to make it easier to see how much you have removed. Cut the label on the line. |
 |
Option 1 - Stage 5 Attach the blade to a cocktail stick shaft with super-glue. |
 |
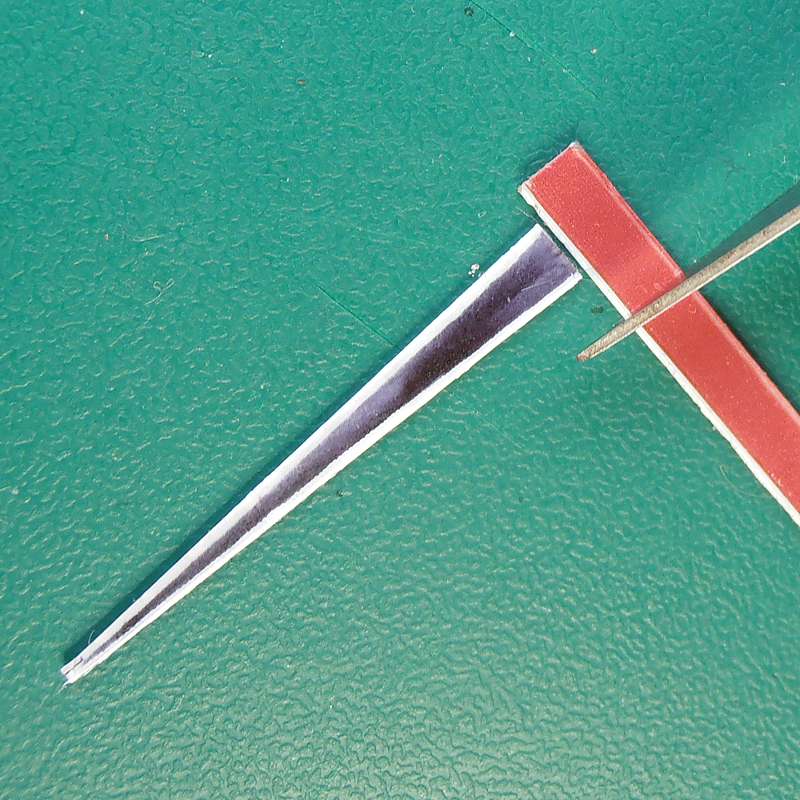
Option 2 - Stage 2 Shave one edge of the plant label by back-scraping with the craft knife - place the knife blade at right angles to the plastic and scrape along the edges. It may help to colour the plastic using a Sharpie to make it easier to see how much you have removed. |
 |
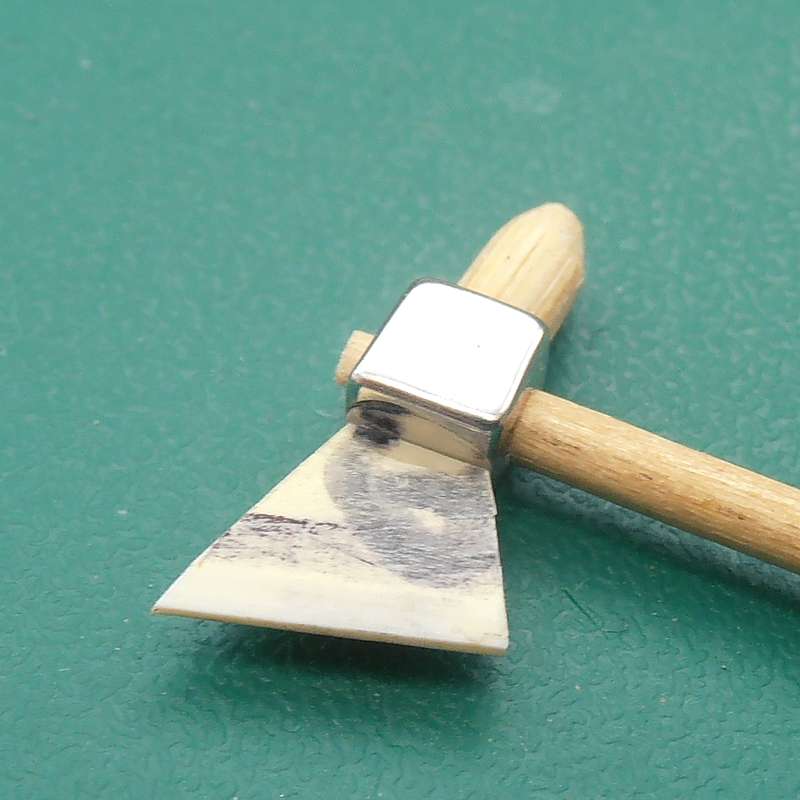
Option 2 - Stage 3 Cut a blade shape from the plant label. Polearms come in a vast range of styles, so you can vary the shape as much as you like. |
 |
Option 2 - Stage 4 Add a plastic collar to an un-trimmed cocktail stick and attach the blade to the shaft with super-glue. |
 |
Option 2 - Stage 5 Trim the point from the other end of the cocktail stick.
|
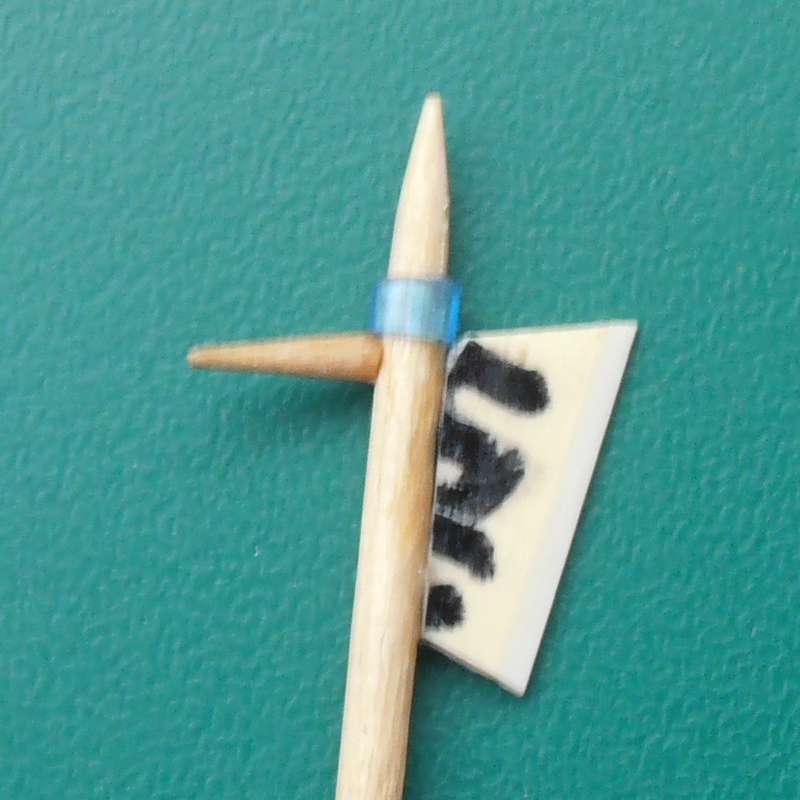 |
Option 2 - Stage 6 Attach the point to the back of the shaft as shown.
|
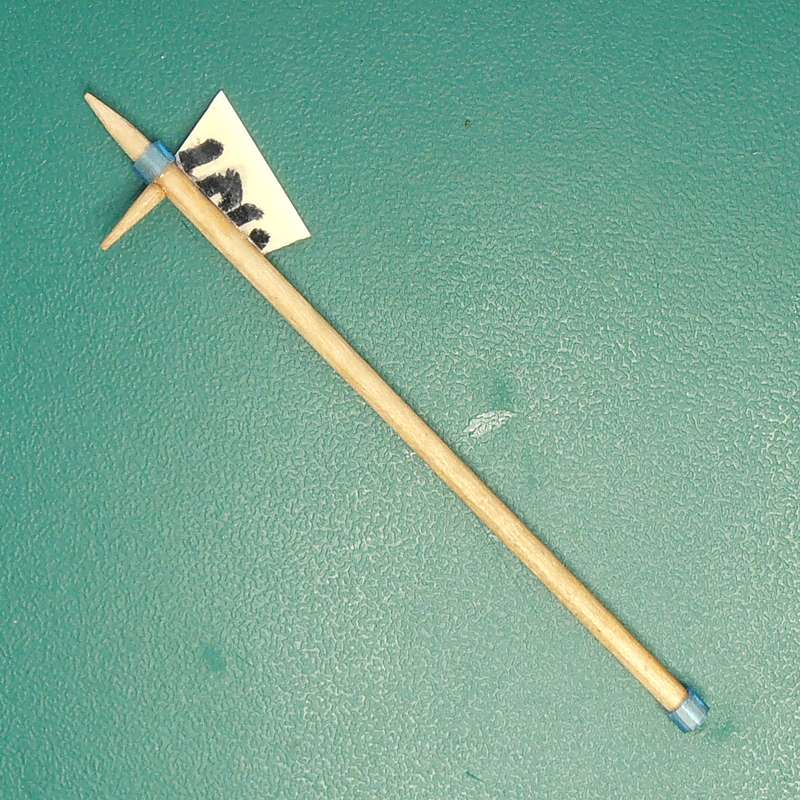 |
Option 2 - Stage 7 You can add a second plastic collar at the base of the shaft if you like. |
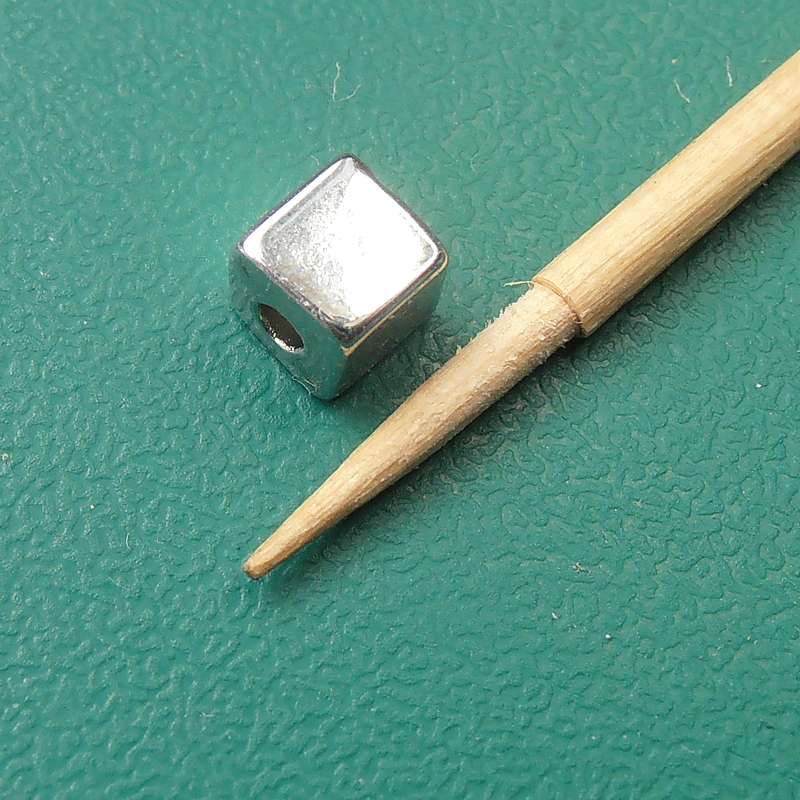 |
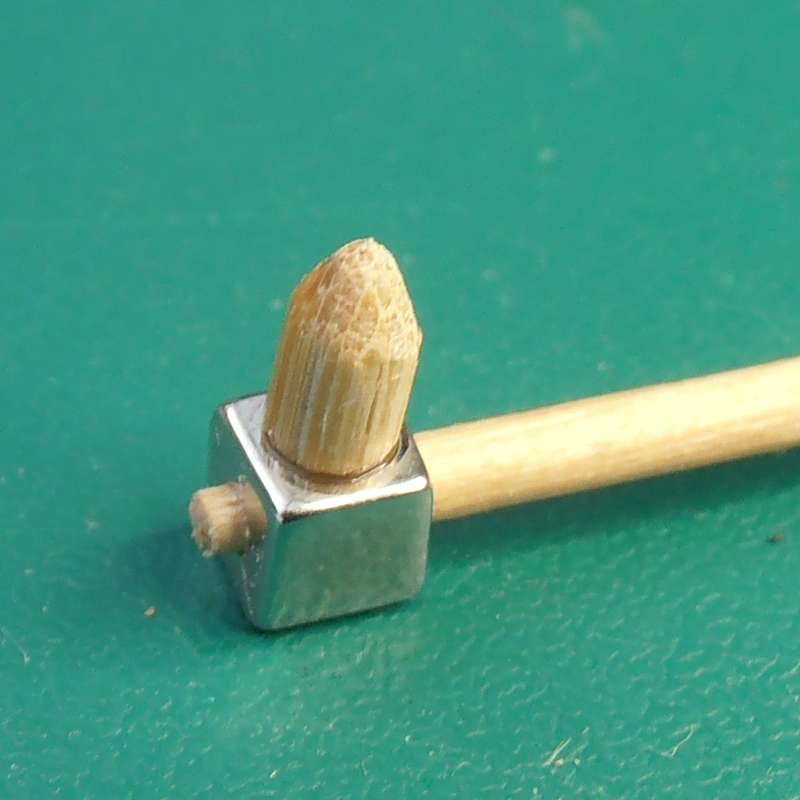
Option 3 - Stage 2 Shave one end of a cocktail stick to allow one of the beads to be slid onto the wood. |
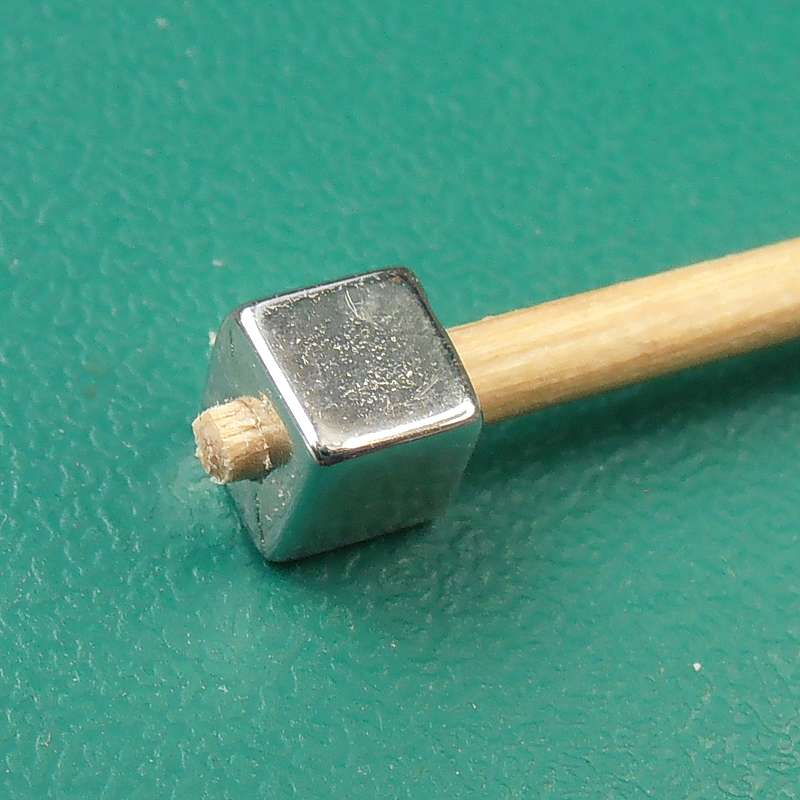 |
Option 3 - Stage 3 Attach the bead with a drop of superglue if needed. Trim the point, or leave it if you prefer. |
 |
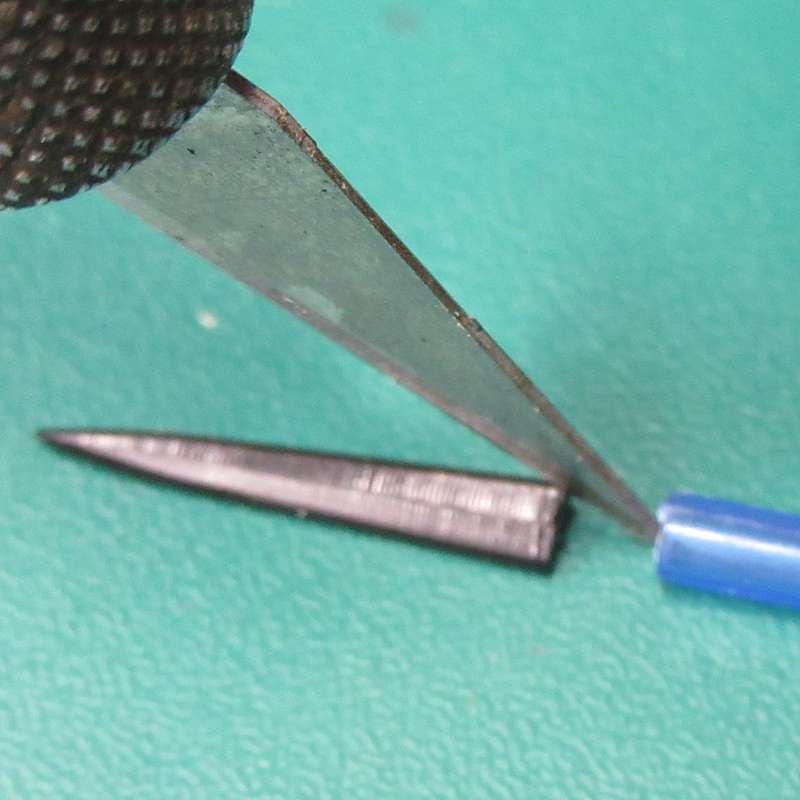
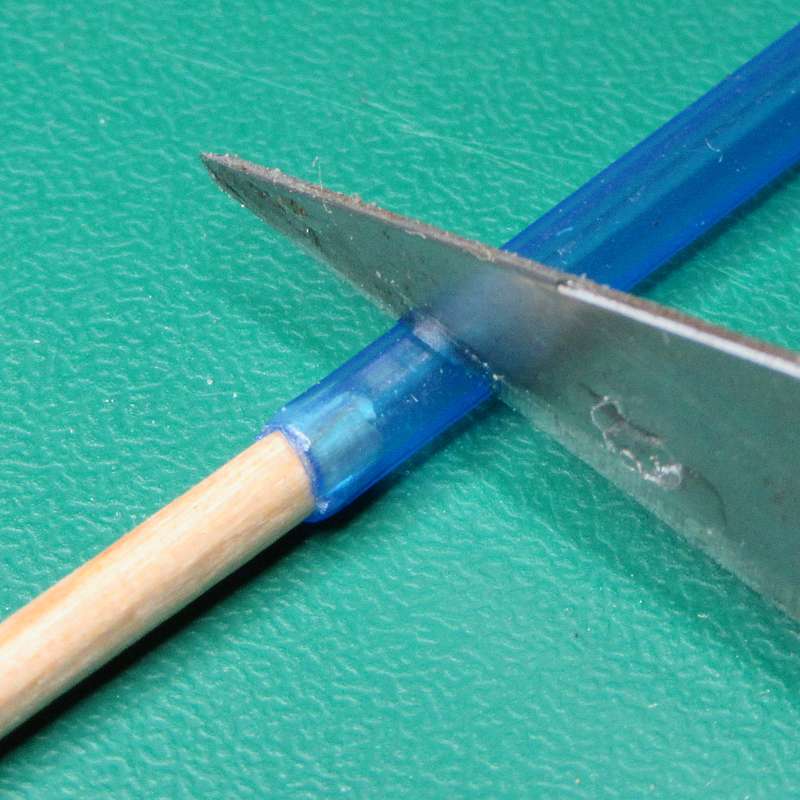
Option 3 - Stage 4 Sharpen the end of a kebab skewer or plastic rod with the craft knife. Sand the point to smooth it. |
 |
Option 3 - Stage 5 Cut the pointed end off the skewer and attach it to one side of the bead.
|
 |
Option 3 - Stage 6 Add a blade cut from the plant label as shown above. |
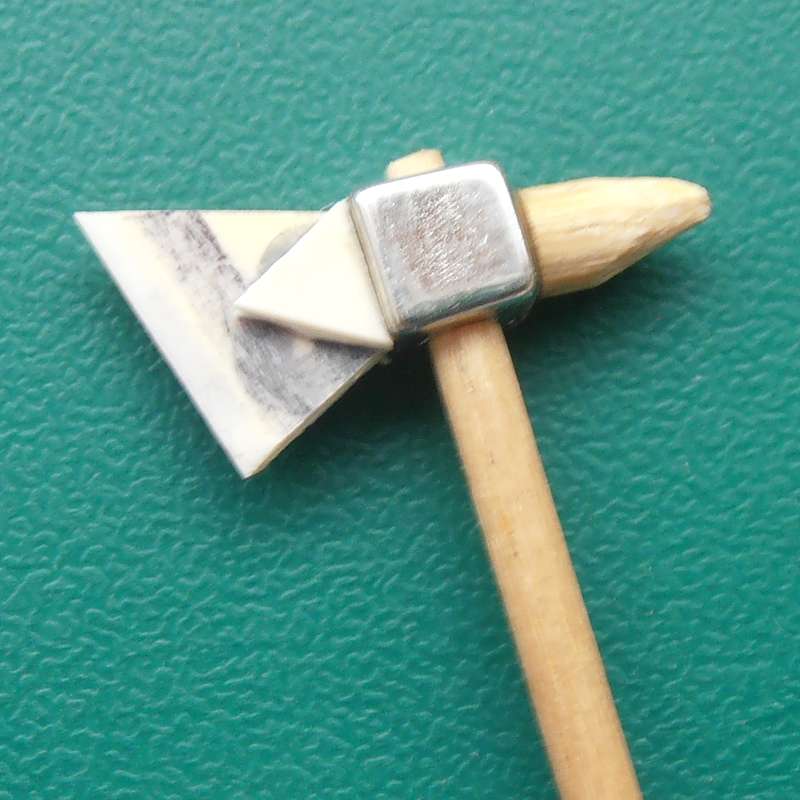 |
Option 3 - Stage 7 I added a couple of small triangles to help strengthen the joint and add extra detail. |
 |
Examples 1 The picture shows some of the completed polearms.
|
 |
Examples 2 Here is another batch of polearms made using similar methods.
|
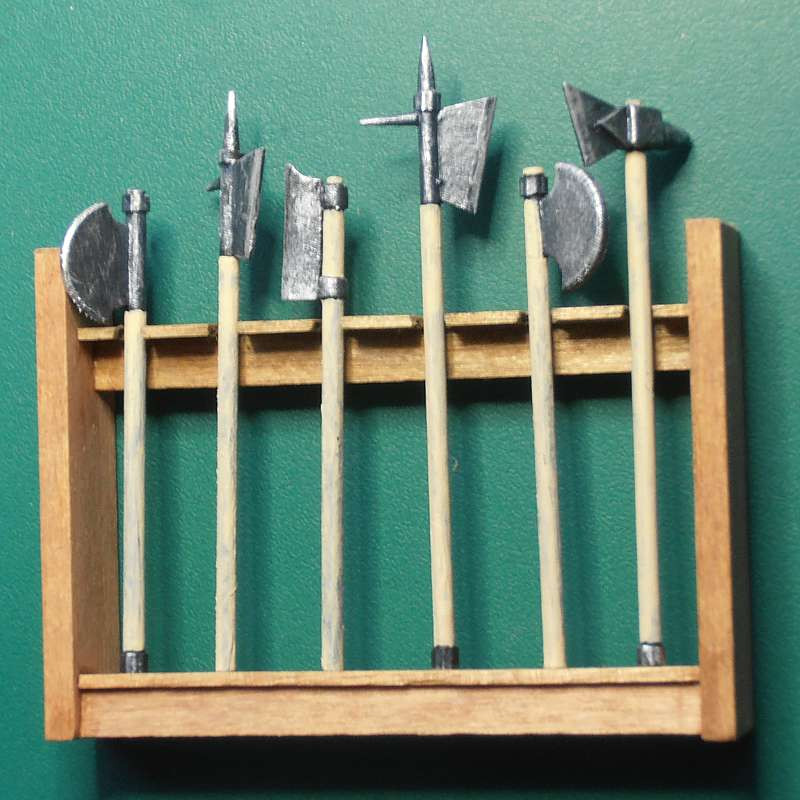 |
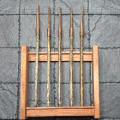
Examples 3 Six polearms painted and arranged on a rack.
|


|
Spears (Click thumbnails for larger images) |
|||||
|
|
Materials & Equipment Plastic comb Cocktail sticks Plastic tube (cotton bud shaft) Superglue Craft knife Paint & paintbrush |
|
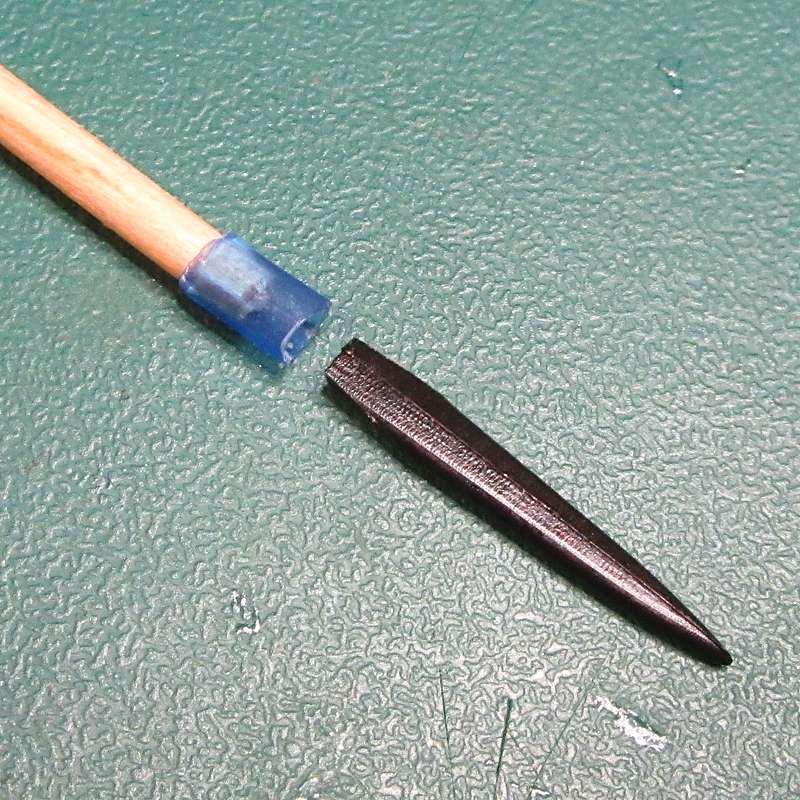
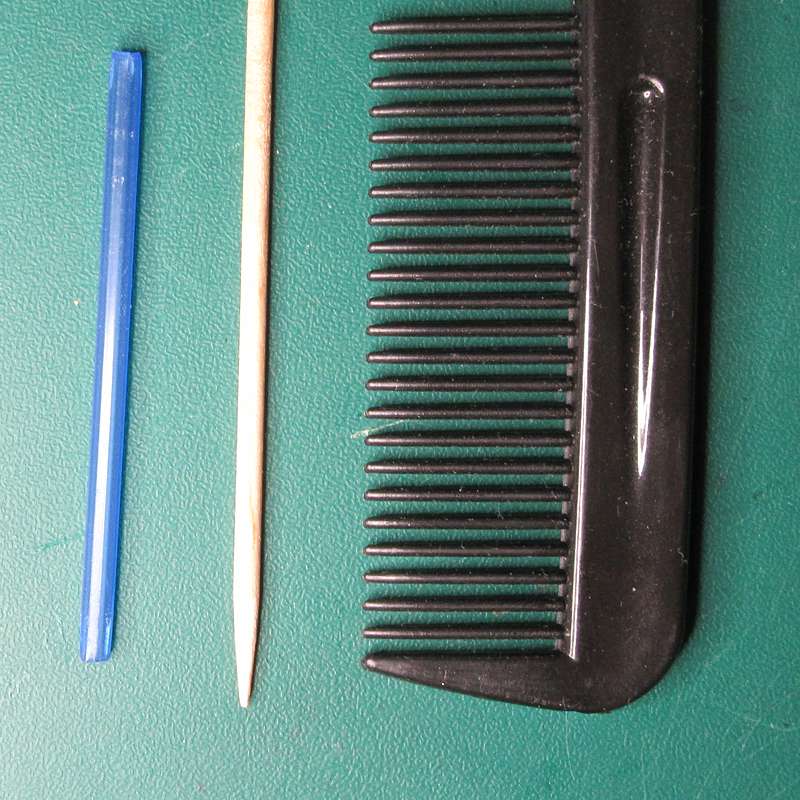
Stage 1 Trim both sharp ends from a cocktail stick. Cut the stick to a shorter length if desired. |
|
Stage 2 Cut a short length of plastic tube, to fit over one end of the stick and hold the spearhead securely in place. |
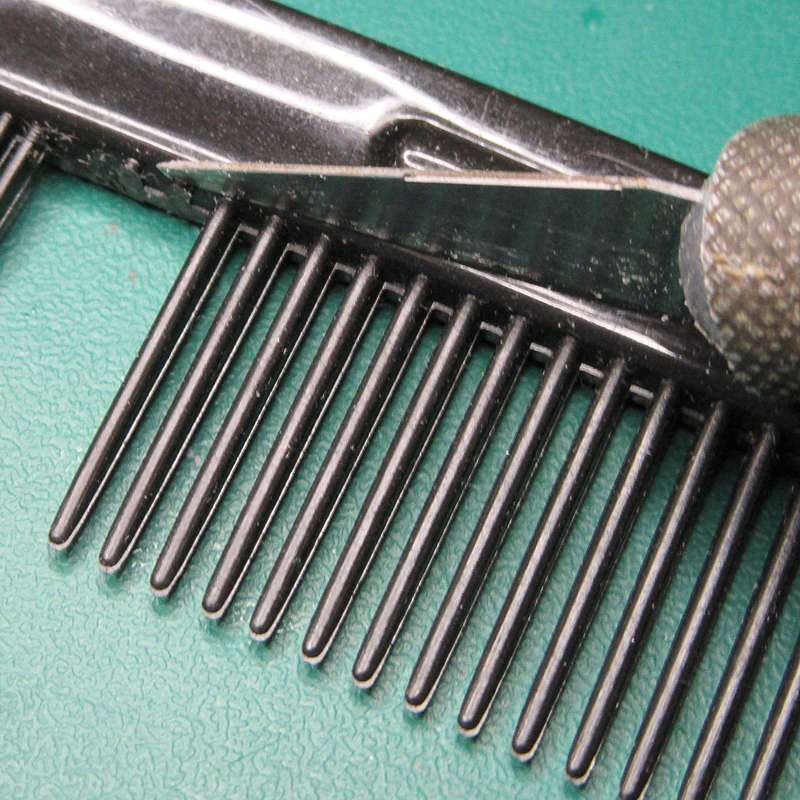 |
Stage 3 Cut a tooth from the comb. |
 |
Stage 4 Check that the comb-tooth fits inside the plastic tube - if it is too wide then trim a little from each side and try again until you get a snug fit. |
 |
Stage 5 Apply a small drop of superglue into the plastic tube. |
 |
Stage 6 Push the spearhead into place and allow the glue to set. |
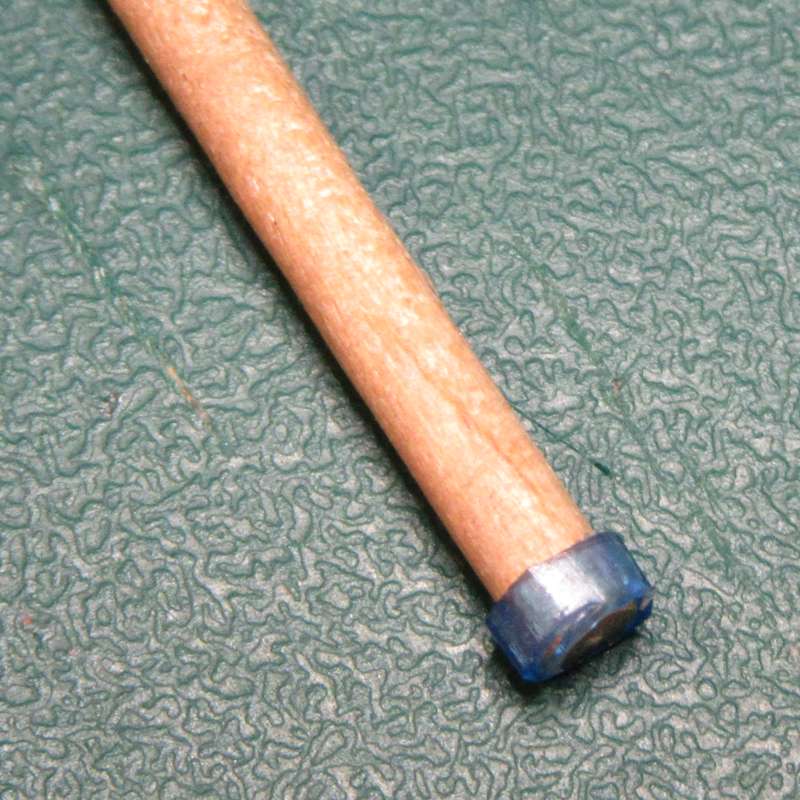 |
Stage 7 (optional) If you like, you can add a small piece of plastic tube to the heel of the shaft. |
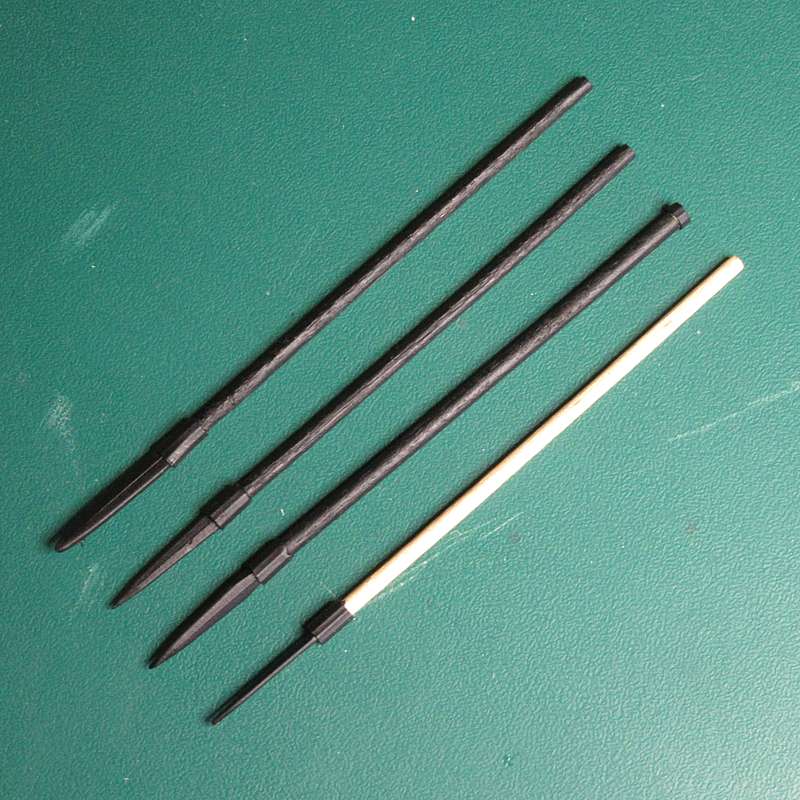 |
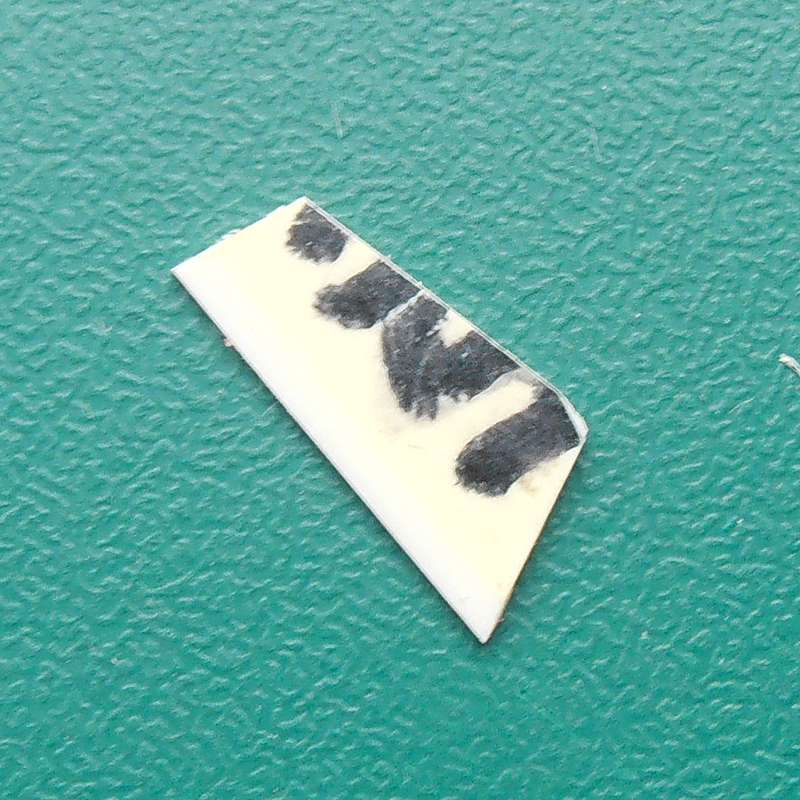
Stage 8 Spray with black primer and allow to dry. I used a strip of post-it note to mask the shaft of the bottom spear. |
 |
Stage 9 Paint in your choice of colours - I used a gunmetal basecoat with silver highlights for the metal parts. If you wish, paint the shafts with a shade of brown, or... |
|
Stage 10 For the spears which had the shafts primed, I scraped off most of the paint with my craft knife before applying a brown ink wash to all the shafts. The result looks like ash wood.
|
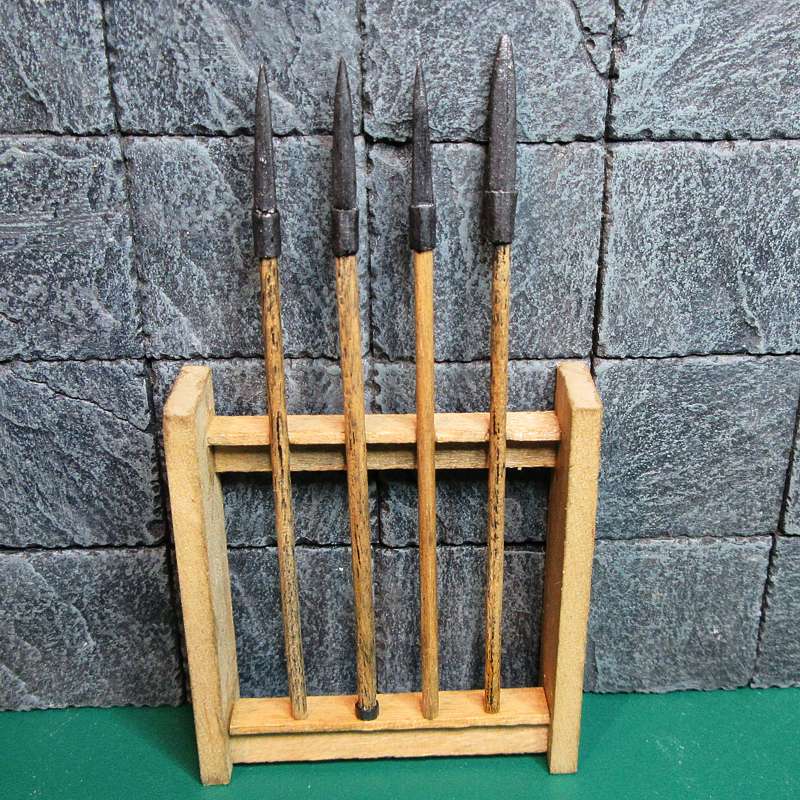 |
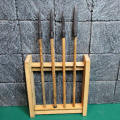
Example Here is a rack of spears made using the same techniques.
|
 |
Spears Video on YouTube How to make spears from cocktail sticks and comb teeth. |
||||

|
Javelins (Click thumbnails for larger images) |
|||||
|
|
Materials & Equipment Plastic cocktail forks Cocktail sticks Plastic tube (cotton bud ) Superglue Razor saw Craft knife Paint & paintbrush |
|
Stage 1 Trim both sharp ends from a cocktail stick. Cut the stick to a shorter length if desired. |
|
Stage 2 Trim the teeth from a cocktail fork using the razor saw. I found that around 20mm (4/5") to be a good length which fit snugly inside the plastic tube. |
|
|
Stage 3 Cut a short length of plastic tube, to fit over one end of the stick and hold the spearhead securely in place. |
 |
Stage 4 Apply a small blob of superglue into the tube to hold the pieces securely. |
 |
Stage 5 Spray with black primer and allow to dry. Mask the wooden shafts if desired. |
 |
Stage 6 Paint in your choice of colours - I used a bronze basecoat with gold highlights for the metal parts. If you wish, paint the shafts with a shade of brown, or... |
 |
Stage 7 Scrape off most of the paint with a craft knife before applying a brown ink wash to all the shafts. The result looks like ash wood.
|
 |
Example Here is a rack of javelins made using this technique.
|

|
Boar Spears (Click thumbnails for larger images) |
|||||
|
|
Materials & Equipment Plastic cocktail forks, Cocktail sticks Plastic rod or wire Plastic tube (cotton bud ) Superglue, PVA Pin vice and drill bit Razor saw, Craft knife Paint & paintbrush |
|
Stage 1 Follow Stages 1-4 in the Javelins tutorial, with one minor tweak - make the connecting tube in Stage 3 a little longer as shown in the next image. |
|
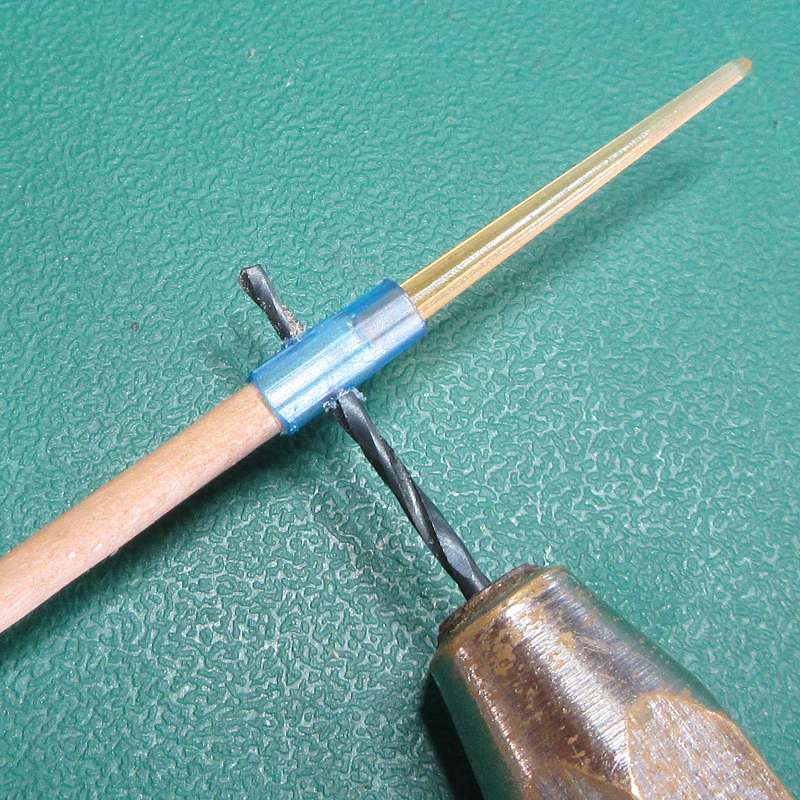
Stage 2 Drill a hole through the centre of the tube and stick as shown in the picture. |
|
|
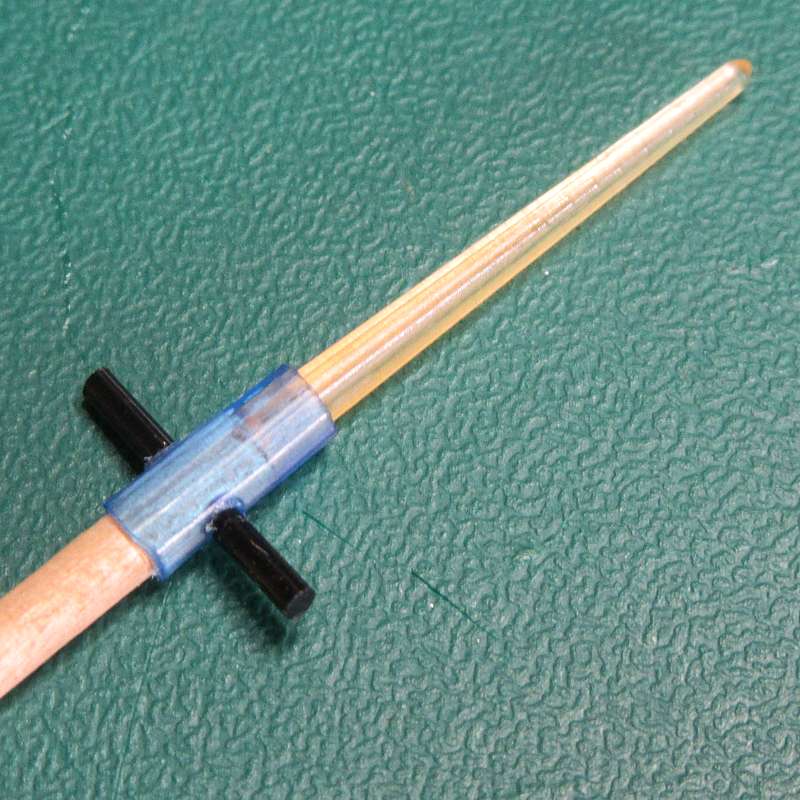
Stage 3 Insert a piece of plastic rod or wire through the hole, leaving 3-4mm protruding at either side. I used a piece trimmed from a brush tine which was left over from making Shortswords. Glue this in place if required. |
 |
Stage 4 Apply a small blob of PVA to each end of the plastic rod, and allow to dry. Repeat as necessary to create a small knob at each end of the cross-bar. |
 |
Stage 5 Spray with black primer and allow to dry. Mask the wooden shafts if desired. |
 |
Stage 6 Paint in your choice of colours - I used a pewter basecoat with silver highlights for the metal parts. If you wish, paint the shafts with a shade of brown, or... |
 |
Stage 7 Scrape off most of the paint with a craft knife before applying a brown ink wash to all the shafts. The result looks like ash wood.
|
 |
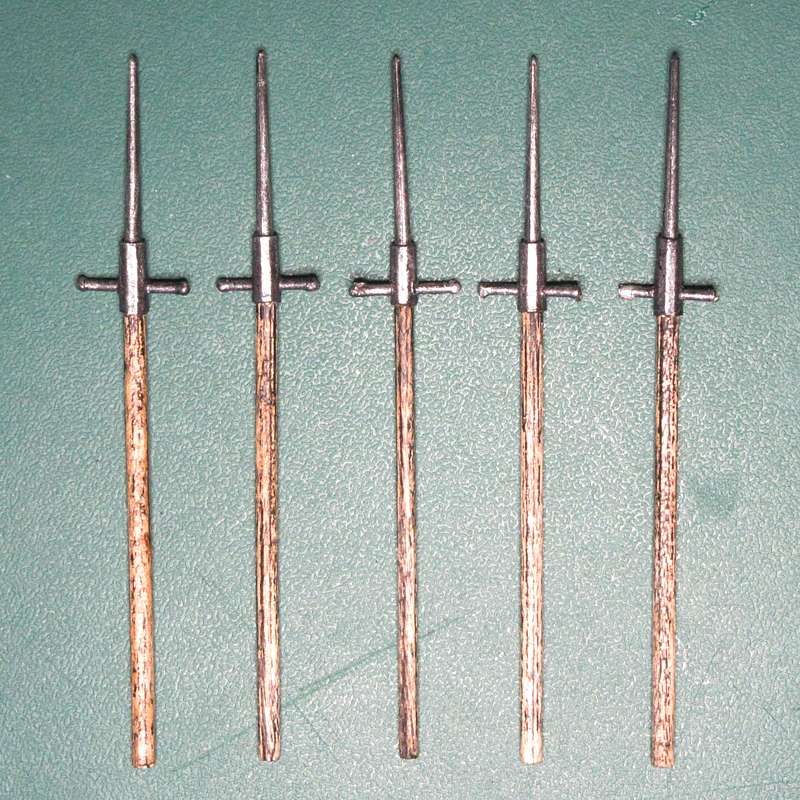
Example Here is a rack of boar spears made using this technique.
|
|
Cloaks (Click thumbnails for larger images) |
|||||
|
|
Materials & Equipment Plastic milk bottle Craft knife or scissors Paint & paintbrush |
|
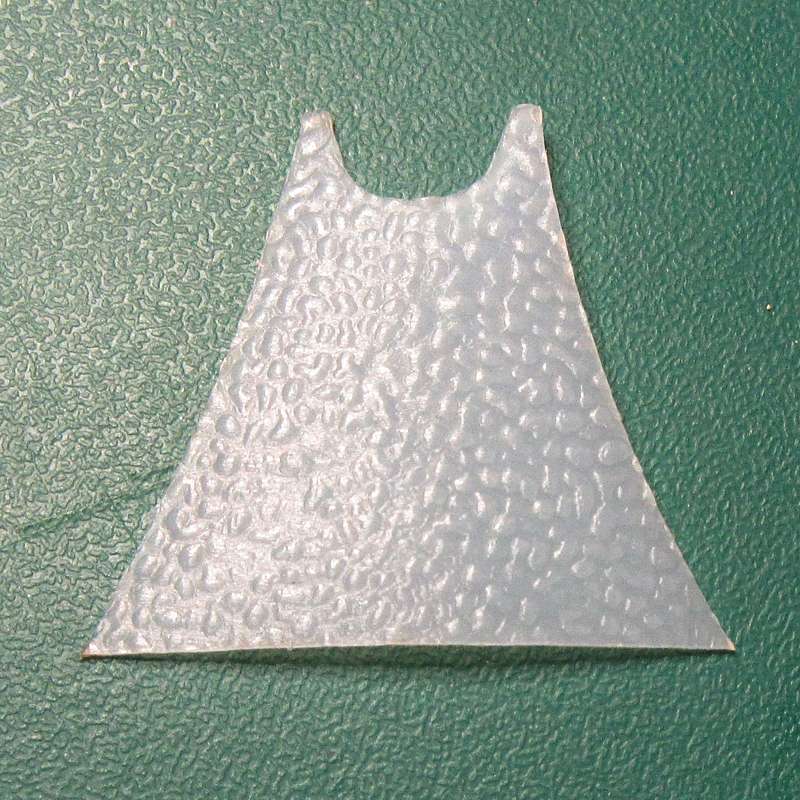
Stage 1 Cut out a panel from the plastic milk bottle as shown. It is easier to cut the panel larger than required, then trim it if necessary. |
|
Stage 2 Draw a template on a piece of paper using a model figure as a reference to get the size right. Alternatively, print the PDF below and use one of those templates. |
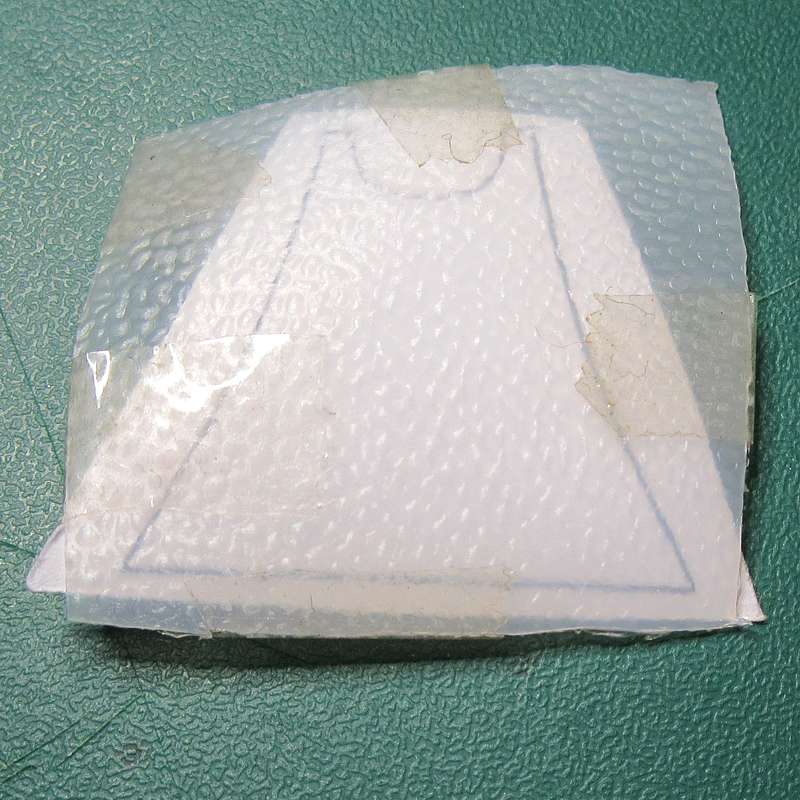 |
Stage 3 Tape the template to the plastic panel. |
 |
Stage 4 Cut around the shape with a sharp craft knife. I found it easiest to remove the neck section first. |
 |
Stage 5 Remove any tape which is still attached to the piece. |
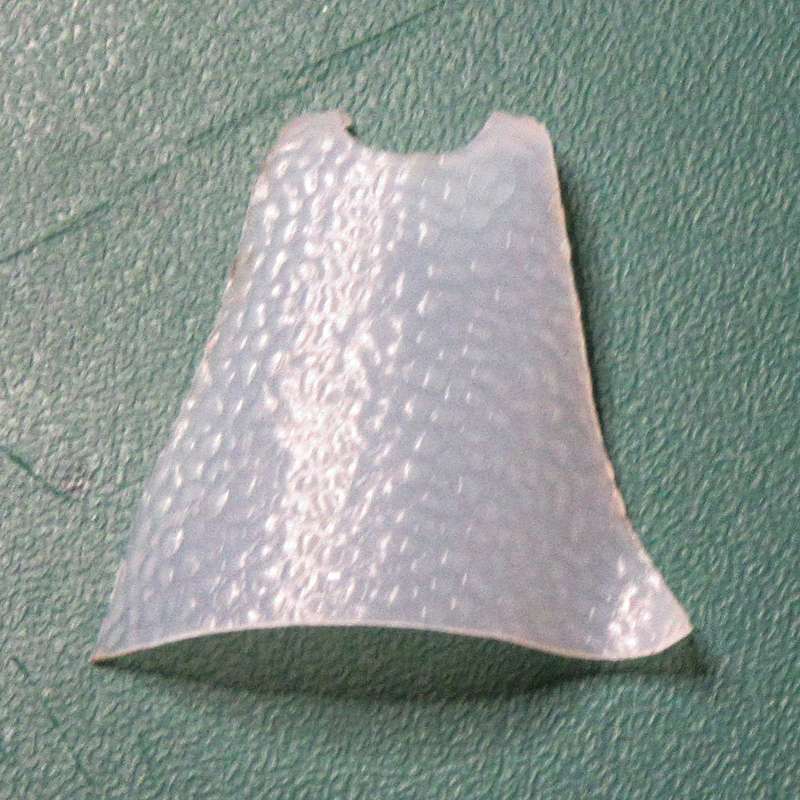 |
Stage 6 Curve the plastic to form a more natural, rounded shape. |
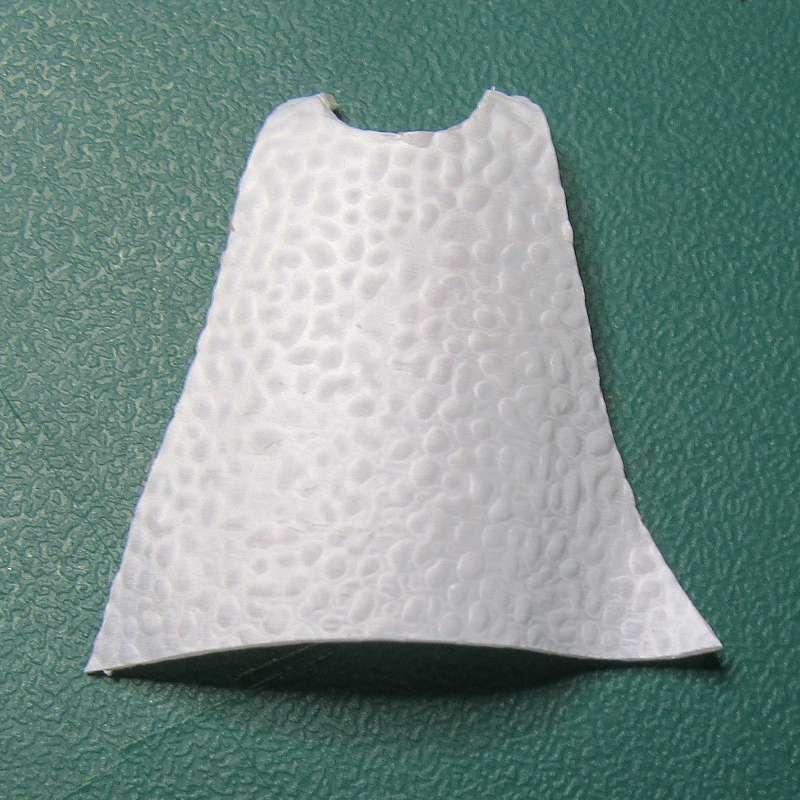 |
Stage 7 Apply a coat of primer and allow to dry. |
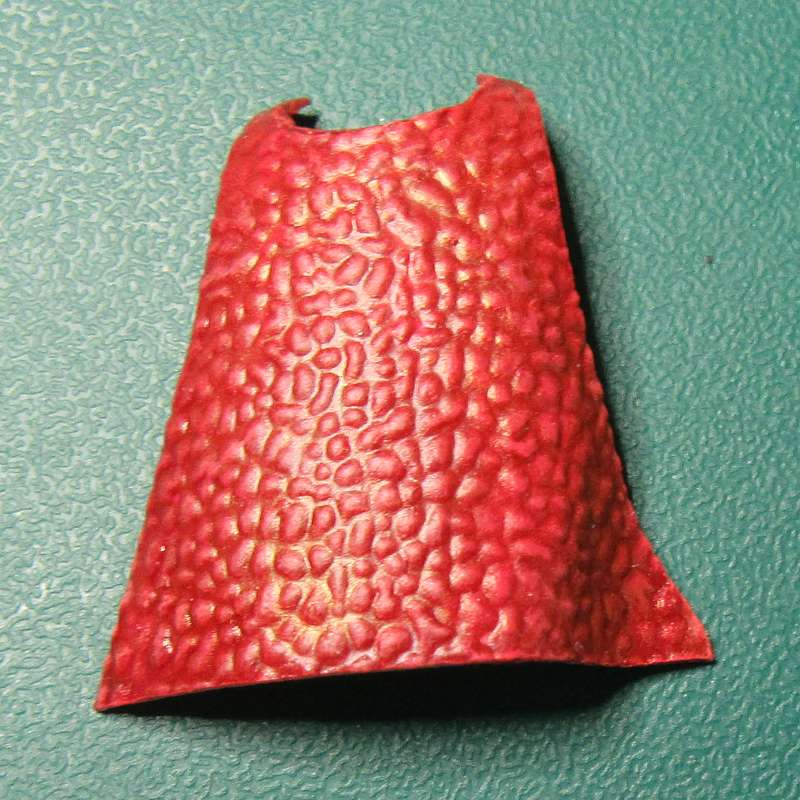 |
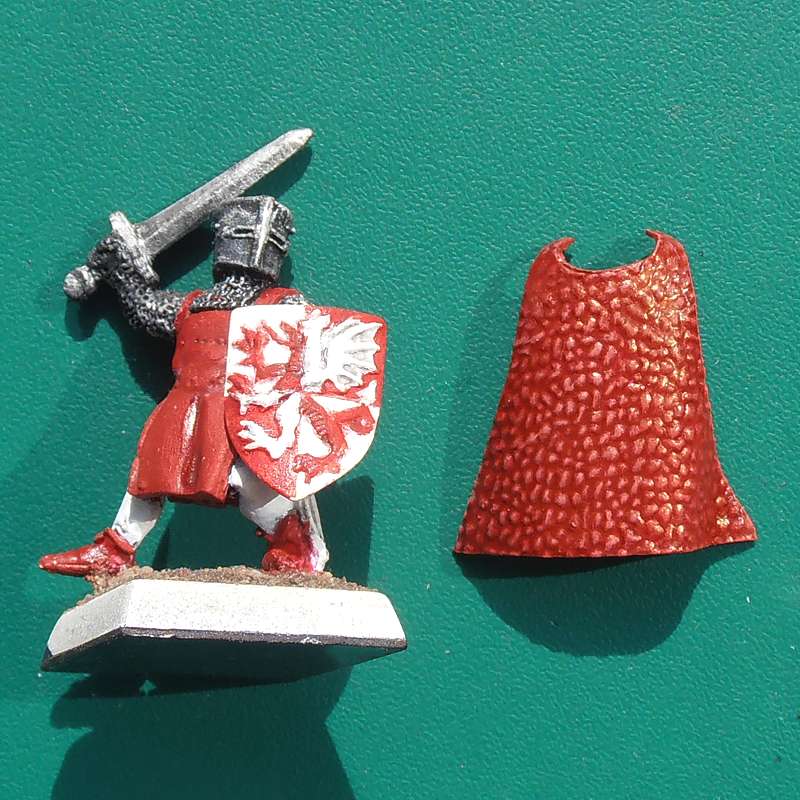
Stage 8 Paint in your choice of colours - I went for shades of red to match the figure the cloak was made for. |
 |
Stage 9 I attached the cloak with a small blob of blu-tack to allow it to be removed. If you prefer you could glue it in place and add clasps from epoxy putty at the shoulders. |
 |
Example 1 Here is the finished cloak attached to a knight figure. |
 |
Example 2 The knight figure seen from the side. |
 |
Templates Click the image to open a PDF file with templates for 4 variations on cloaks. The outlines should be roughly right for 28mm scale, when printed at Actual Size. |
||||

|
Greaves (Click thumbnails for larger images) |
|||||
|
|
Materials & Equipment Plastic milk bottle Craft knife or scissors Hole punch Paint & paintbrush |
|
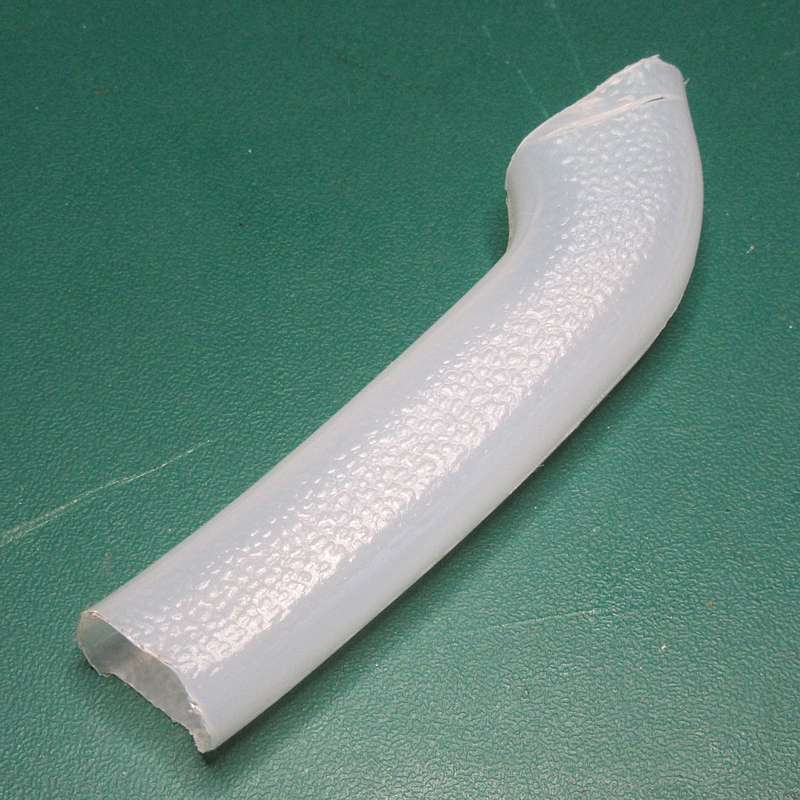
Stage 1 Cut the handle from the milk bottle. |
|
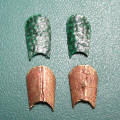
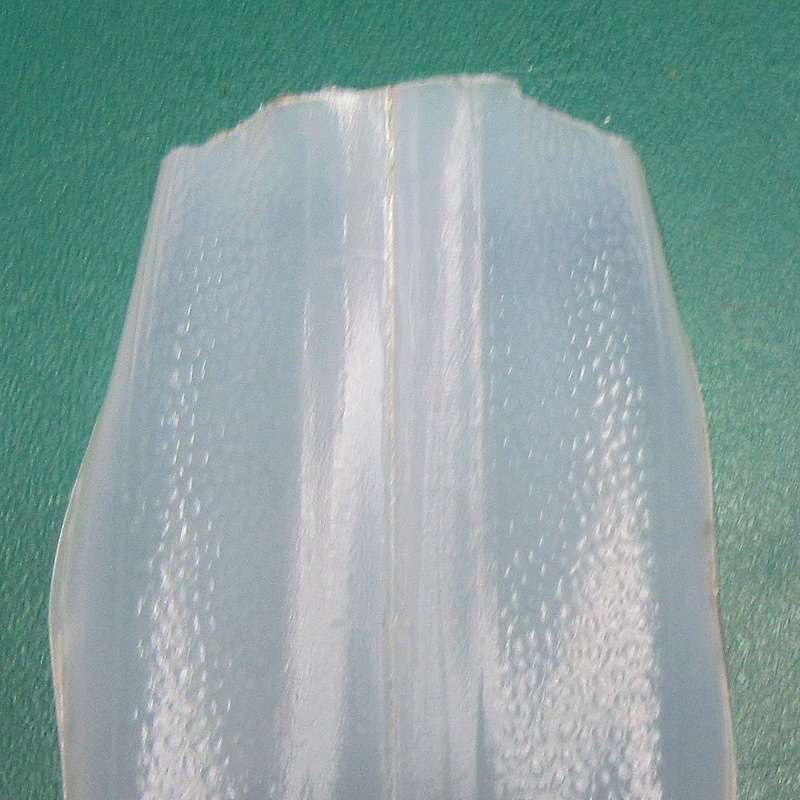
Stage 2 Cut along the seam on the inside face of the handle. This should give you two textured strips and a smooth strip with a seam. |
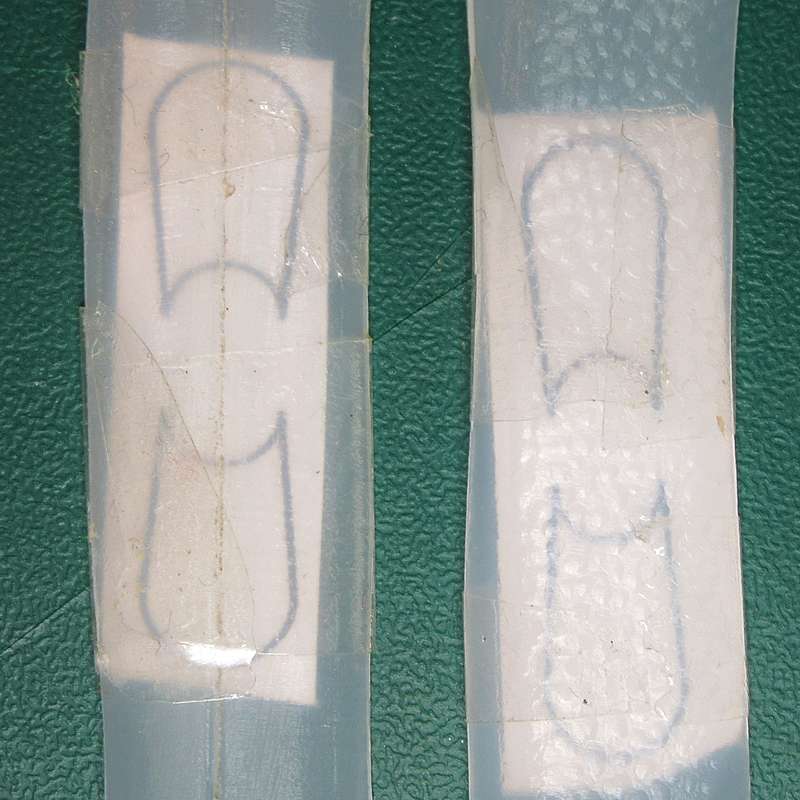 |
Stage 3 Draw a template on a piece of paper using a model figure as a reference to get the size right. Alternatively, print the PDF below and use one of those templates. Tape the template to the plastic panel. |
 |
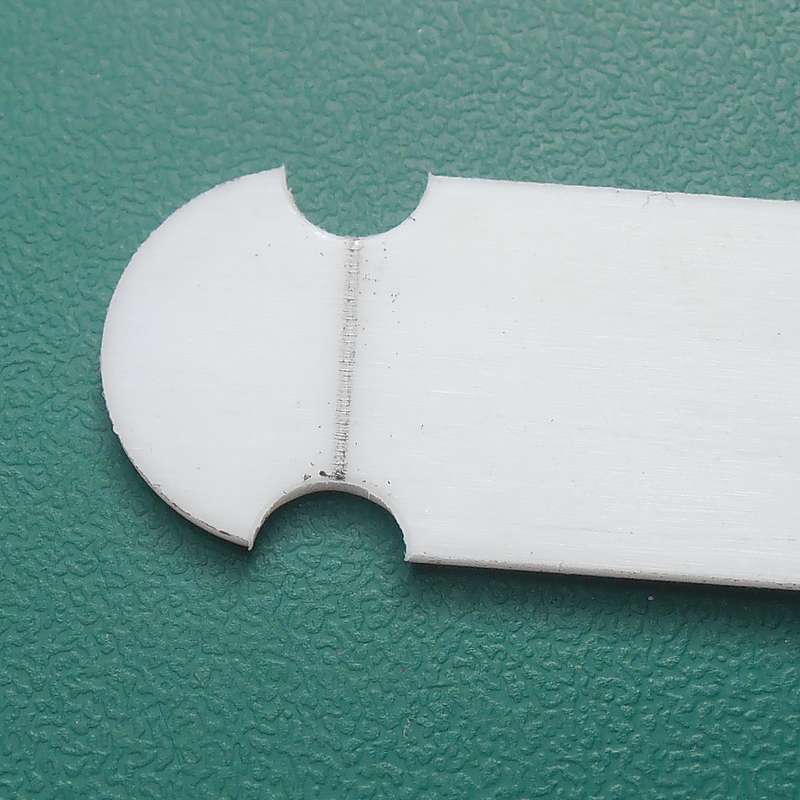
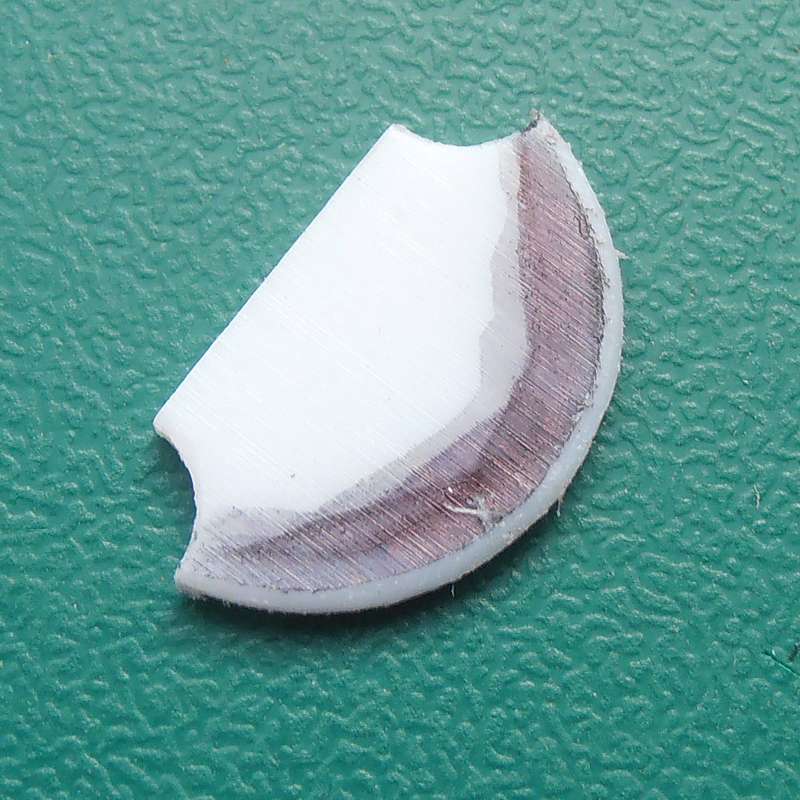
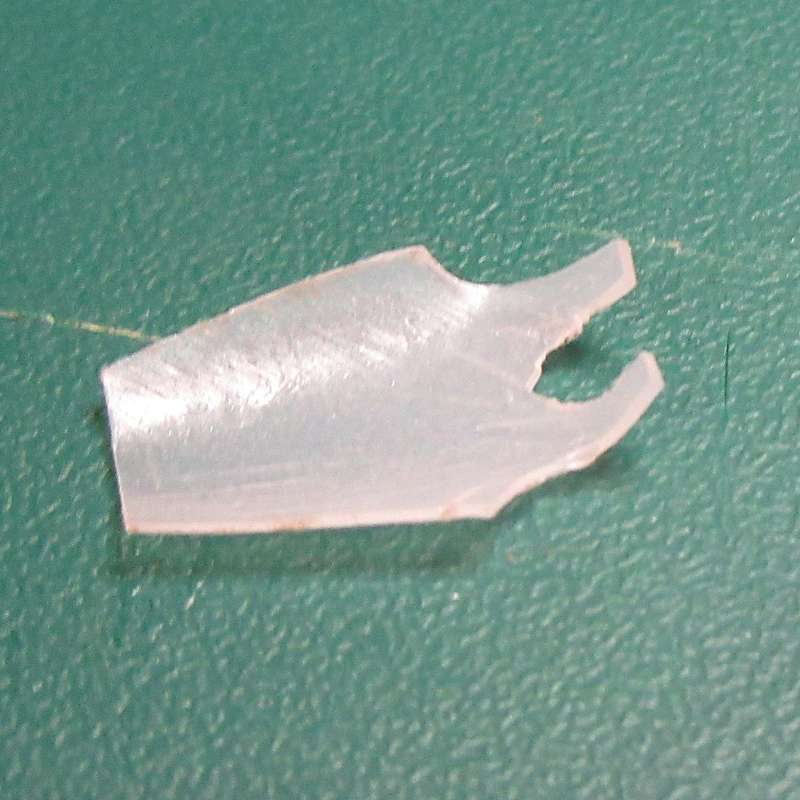
Stage 4 Remove the concave piece of material using a suitable hole punch. This is much easier than using the craft knife for this step. |
 |
Stage 5 Carefully cut around the rest of the template with a sharp craft knife. You may need to curve the plastic again, as the cutting process tends to flatten it out. |
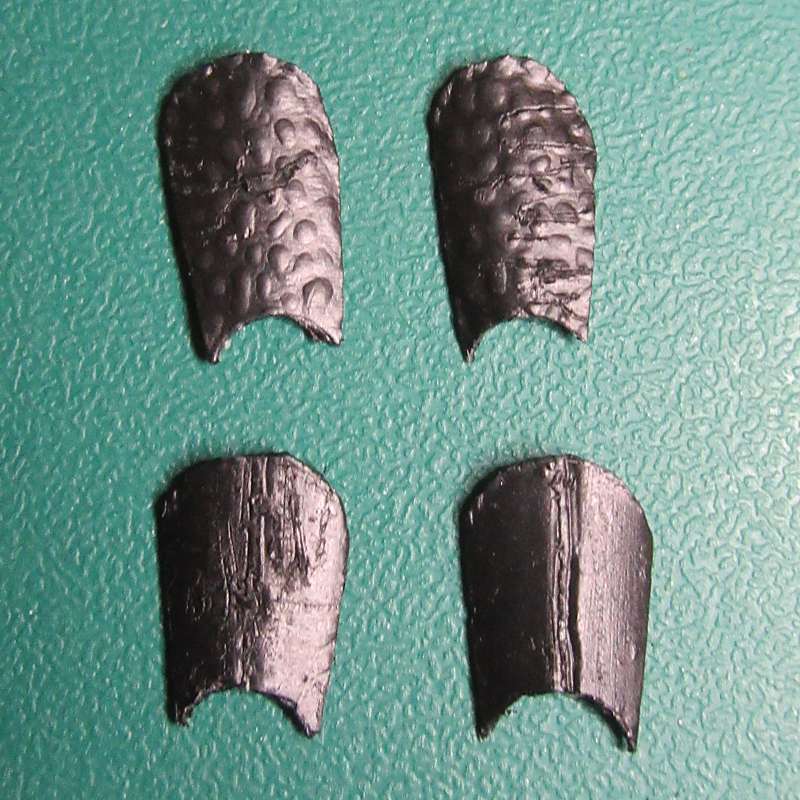 |
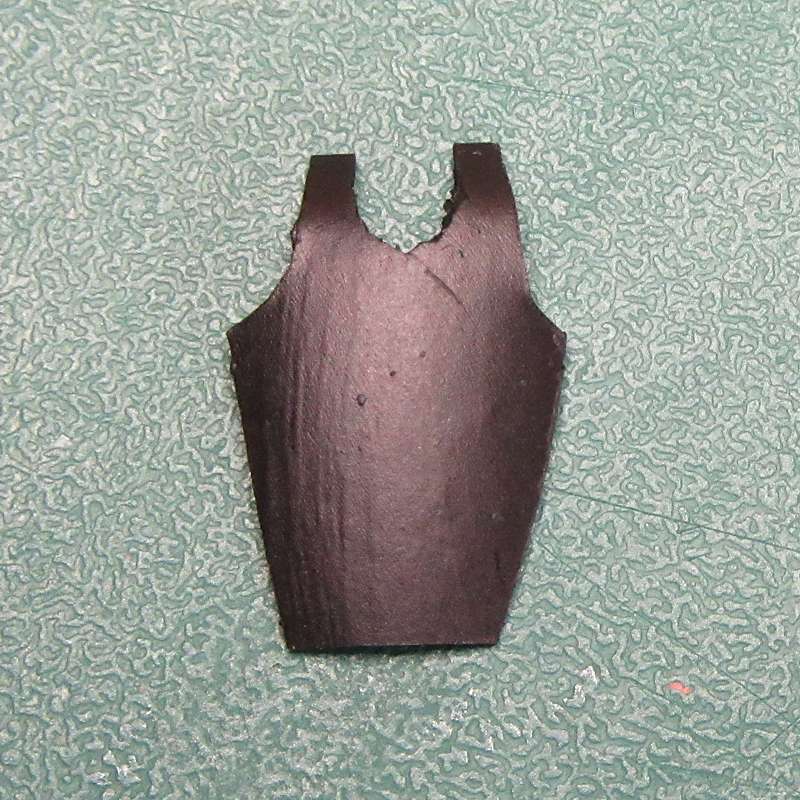
Stage 6 Apply a coat of primer and allow to dry. |
 |
Stage 7 Paint in your choice of colours - I opted for shades of green on the textured pair, and bronze with gold highlights on the smooth ones. |
 |
Templates Click the image to open a PDF file with templates for 4 variations on greaves. The outlines should be roughly right for 28mm scale, when printed at Actual Size. |
|
Breastplates (Click thumbnails for larger images) |
|||||
|
|
Materials & Equipment Plastic milk bottle Craft knife or scissors Paint & paintbrush |
|
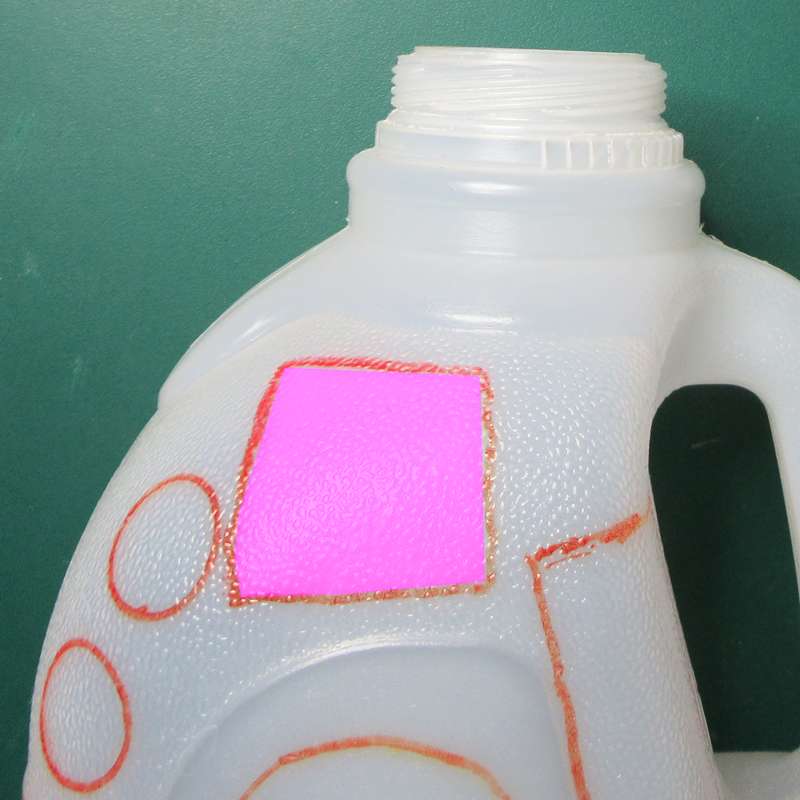
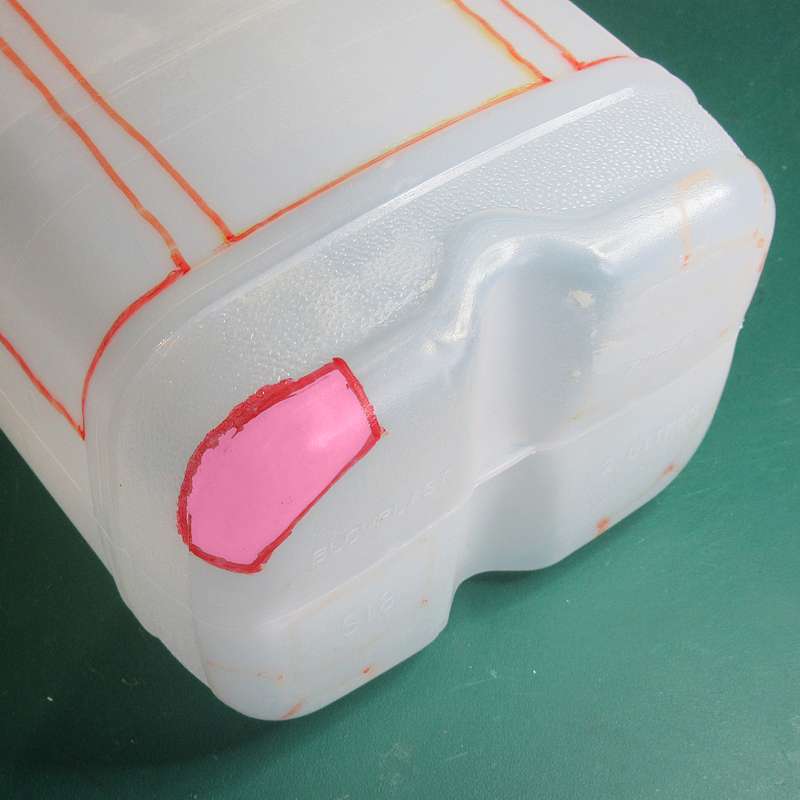
Stage 1 Cut one of the bottom corners from the plastic milk bottle as shown. |
|
Stage 2 This section of the bottle has a smooth texture, and curves in two directions, so it is perfect for a breastplate. |
 |
Stage 3 Draw a template on a piece of paper and tape this onto the plastic section. Use a model figure as a reference to get the size right. Alternatively, print the PDF below and use one of those templates. |
 |
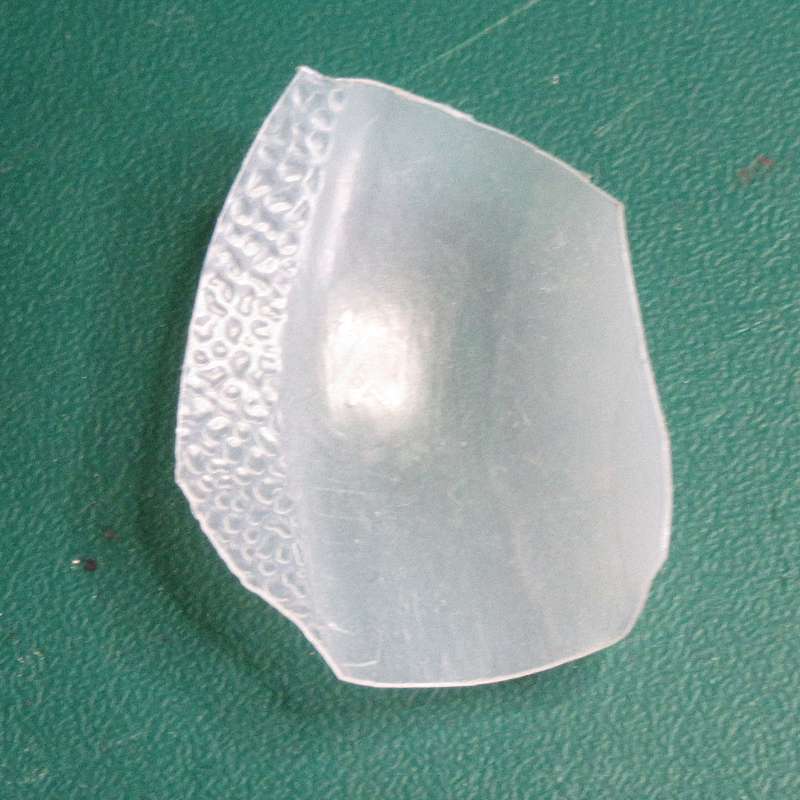
Stage 4 Carefully cut out the shape of the breastplate with a sharp craft knife. |
 |
Stage 5 You may need to bend the plastic back into shape, since the cutting process tends to flatten out the curves. |
 |
Stage 6 Spray with black primer and allow to dry. |
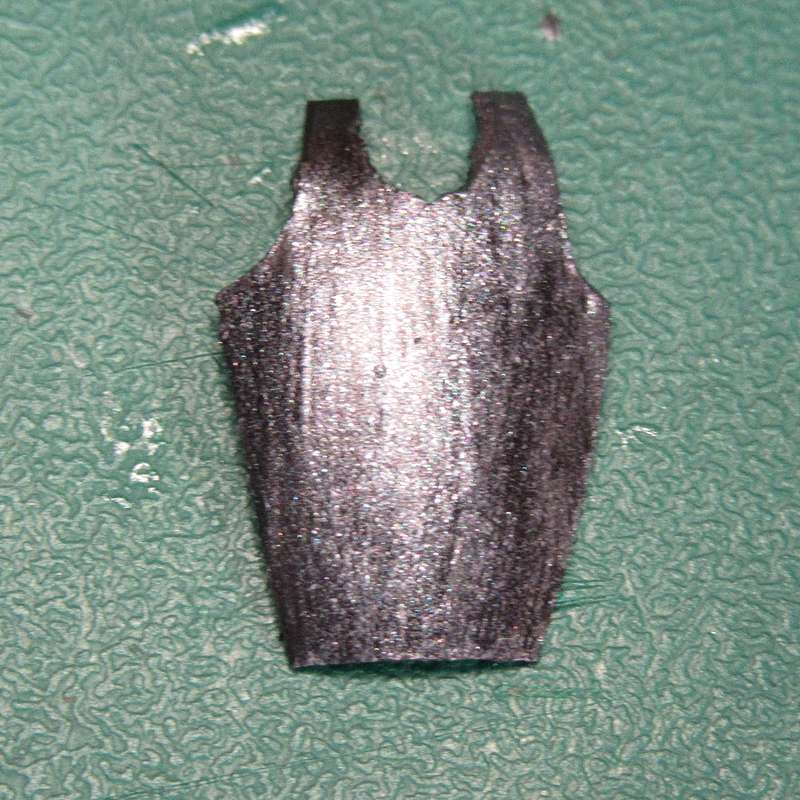 |
Stage 7 Paint in your choice of colours - I used a gunmetal base coat, drybrushed with silver highlights. |
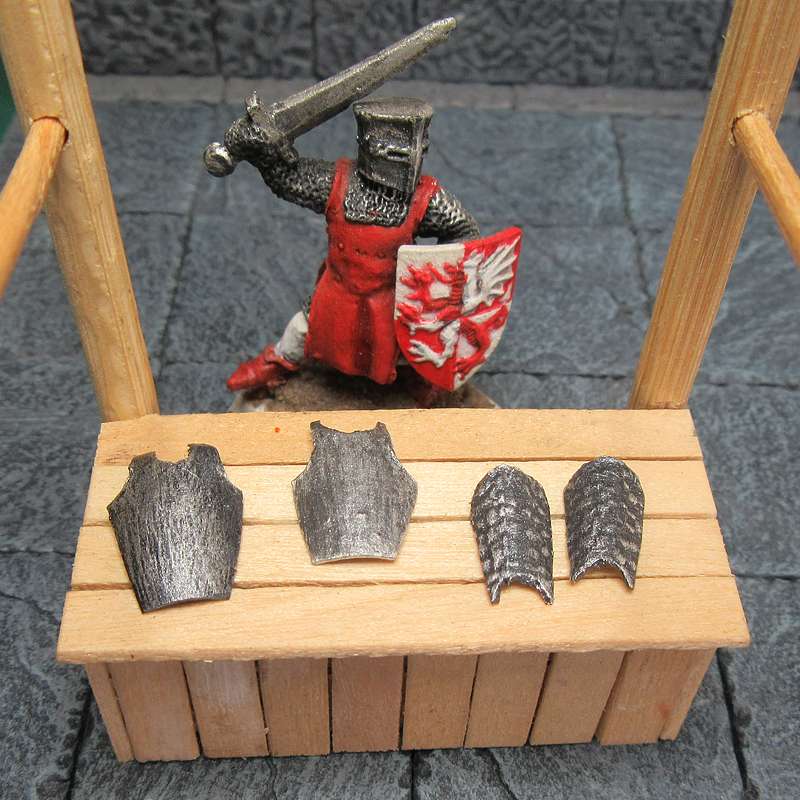 |
Examples A couple of breastplates on a market stall along with a pair of greaves. |
 |
Templates Click the image to open a PDF file with templates for 8 variations on breastplates. The outlines should be roughly right for 28mm scale, when printed at Actual Size. |
||||
Contact me with suggestions, comments or questions.
These articles are provided under this Creative Commons Licence:
![]()