| Contents | |||||||
 |
Making hunting trophies from plastic toys. |
 |
How to make animal skin rugs.
|
 |
One way to make use of the headless body. |
 |
Making a bench using the legs from a plastic toy. |
 |
How to make joints of meat from the legs of a plastic toy. |
 |
Making a displacer beast from a plastic toy. |
 |
How to make a cage to hold or transport an animal. |
||

|
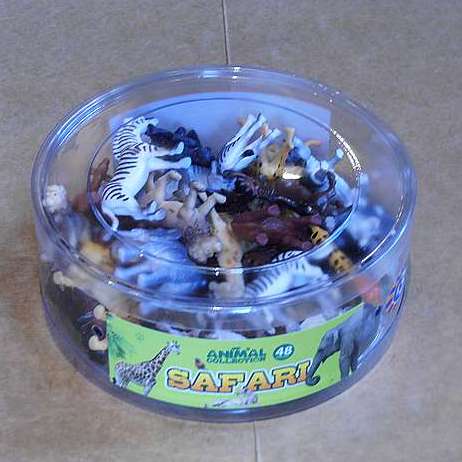
Hunting Trophies (Click thumbnails for larger images) |
|||||
|
|
Materials & Tools: Plastic animal figures Plant labels or craft sticks Superglue Razor saw Craft knife Primer Paint and brushes |
|
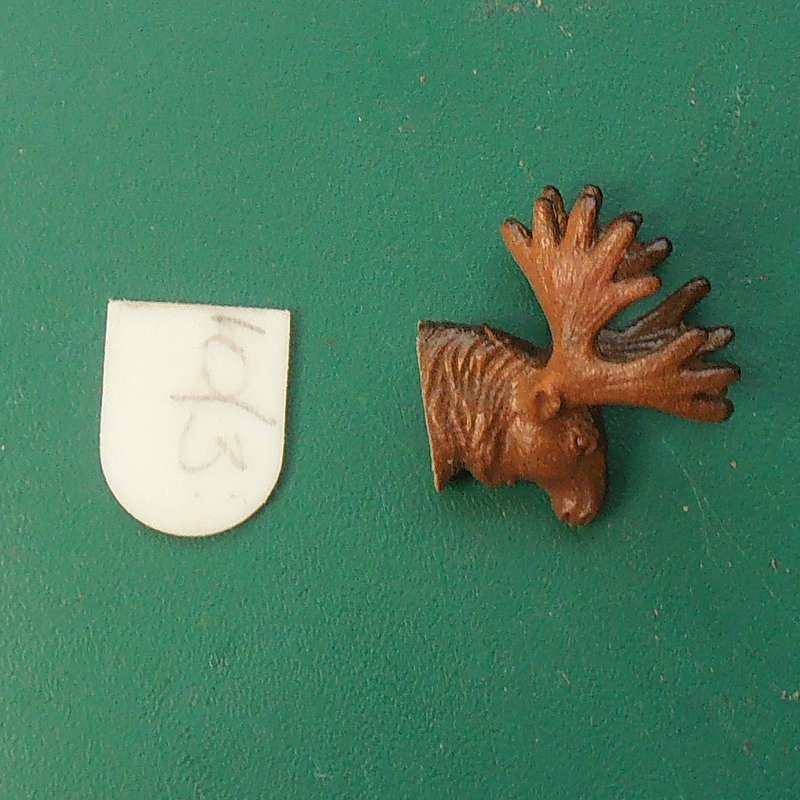
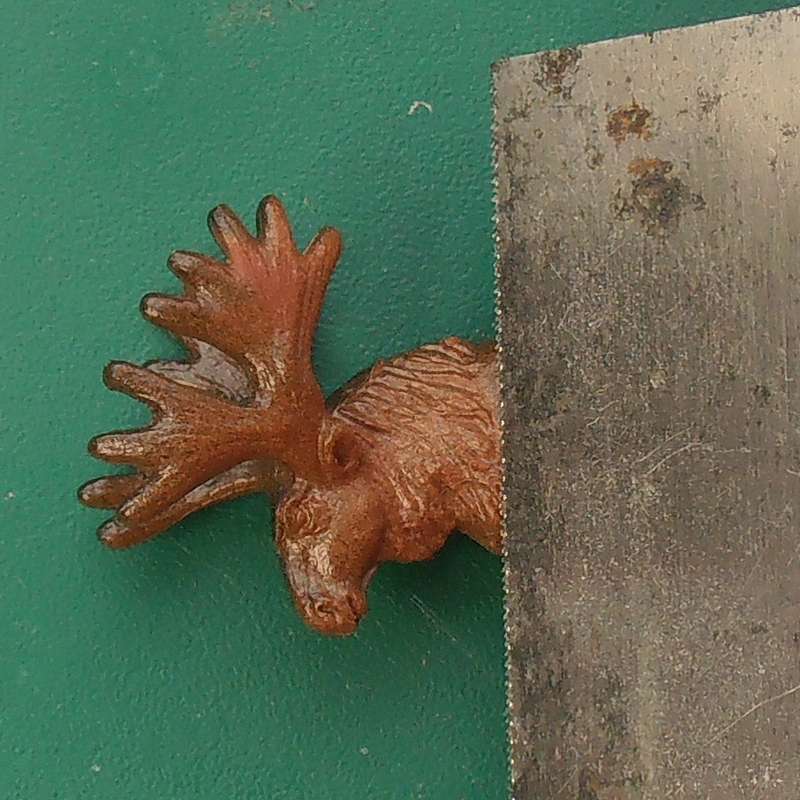
Stage 1 Carefully cut the head from the animal model using the razor saw. Clean the cut edge with the craft knife, if necessary. |
|
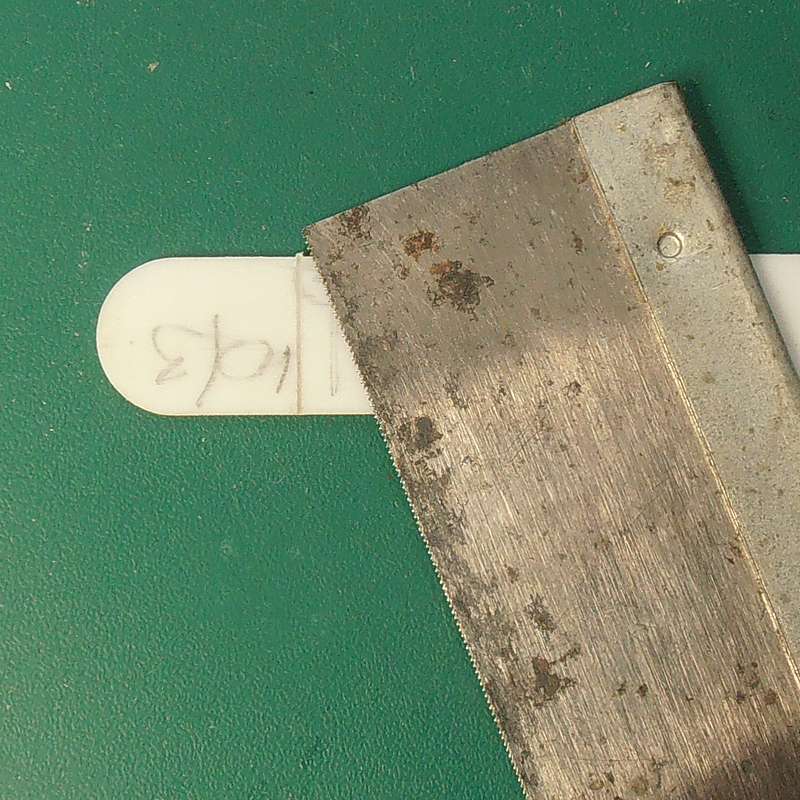
Stage 2 Select a plant label which is a little wider than the neck of the animal. Place the severed head on the plant label and mark where it needs to be cut. You can use a craft stick if you prefer. |
 |
Stage 3 Cut the plant label or craft stick with the razor saw to create a plaque. Clean the cut edge if necessary. If you don't want to repaint the head, then make a wooden plaque, and stain it. |
 |
Stage 4 Superglue the head into position on the plaque. If you used a craft-stick for the plaque, and pre-stained it, then you can leave the model at this stage. |
 |
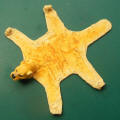
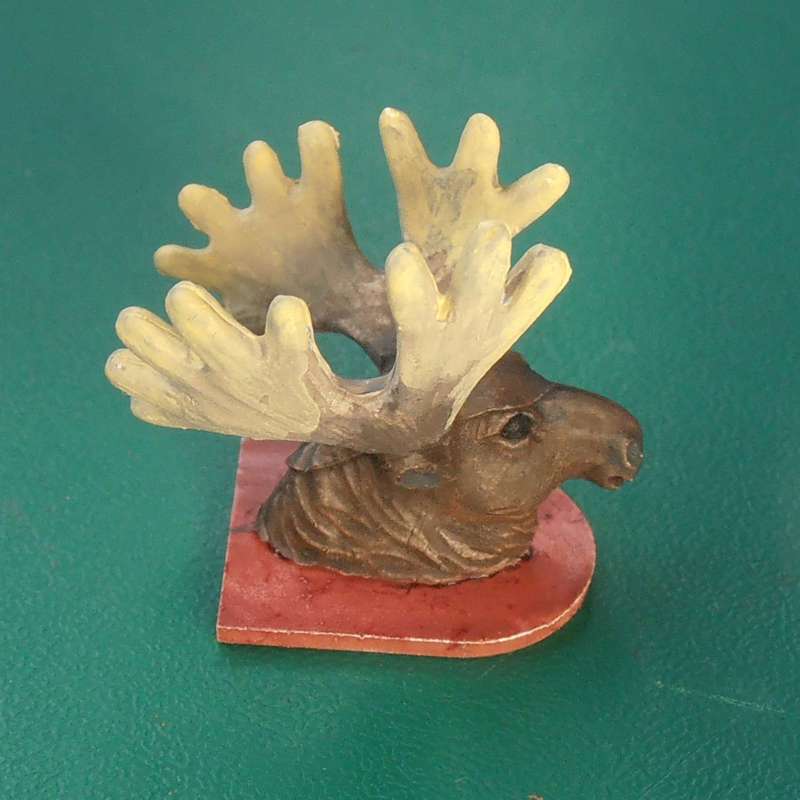
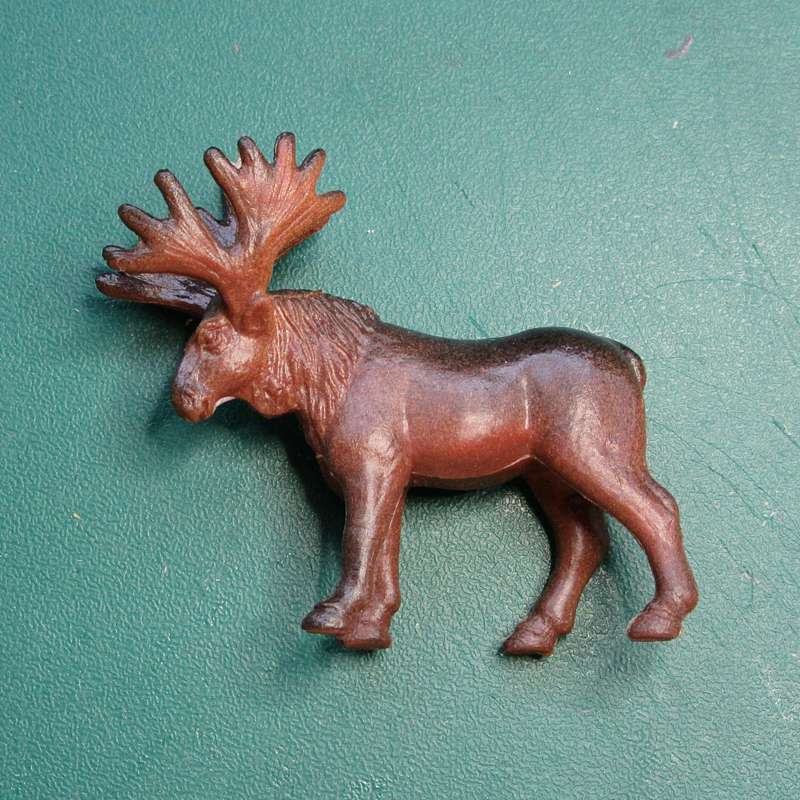
Example 1 Unpainted animal head mounted to a stained wood plaque. |
 |
Stage 5 Spray the piece with primer and allow to dry |
 |
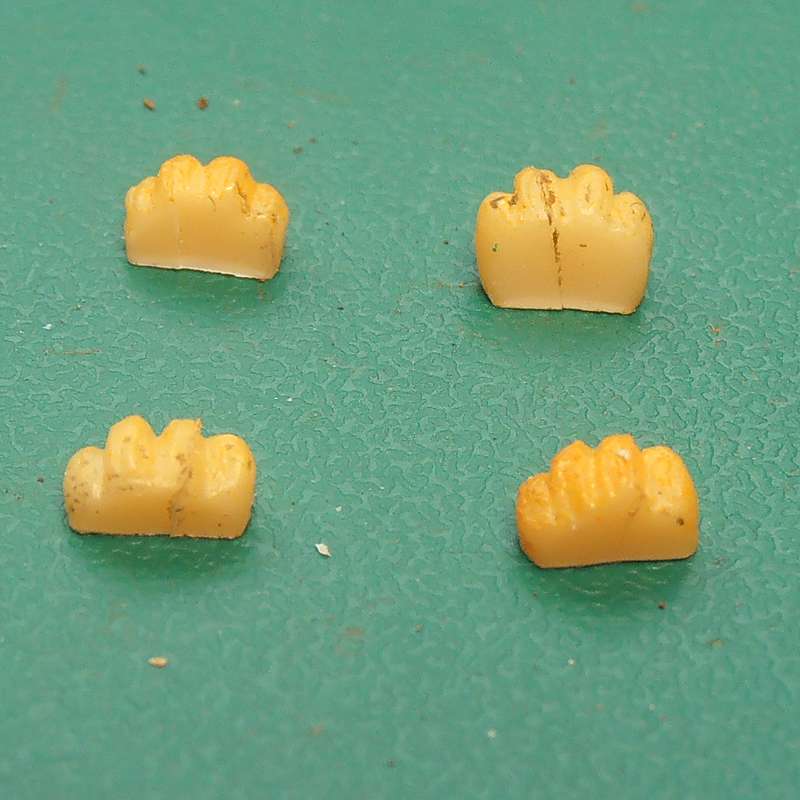
Stage 6 Paint the model in your choice of colours - use an online image search if you want to find reference pictures.
|
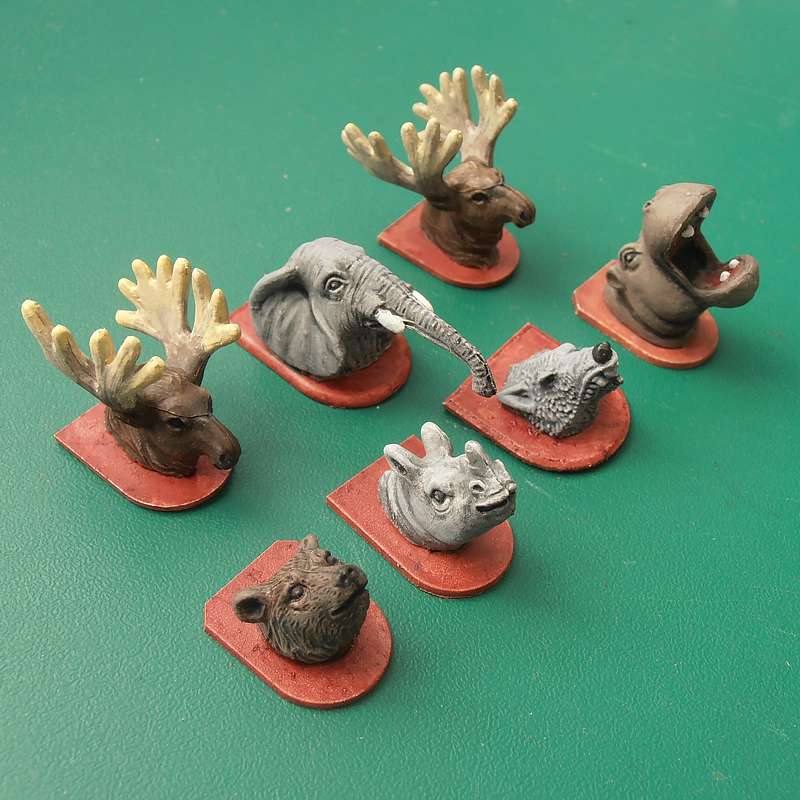 |
Example 2 More trophy heads after painting. I varied the size and shape of the plaques a little by using different plant labels, trimming the top corners of some, and rounding the edges of others. |

|
Animal Skin Rugs (Click thumbnails for larger images) |
|||||
|
|
Materials & Tools: Plastic animal figure Paper and card (cereal pack) Razor saw Craft knife Hot glue gun Primer, paint and brushes |
|
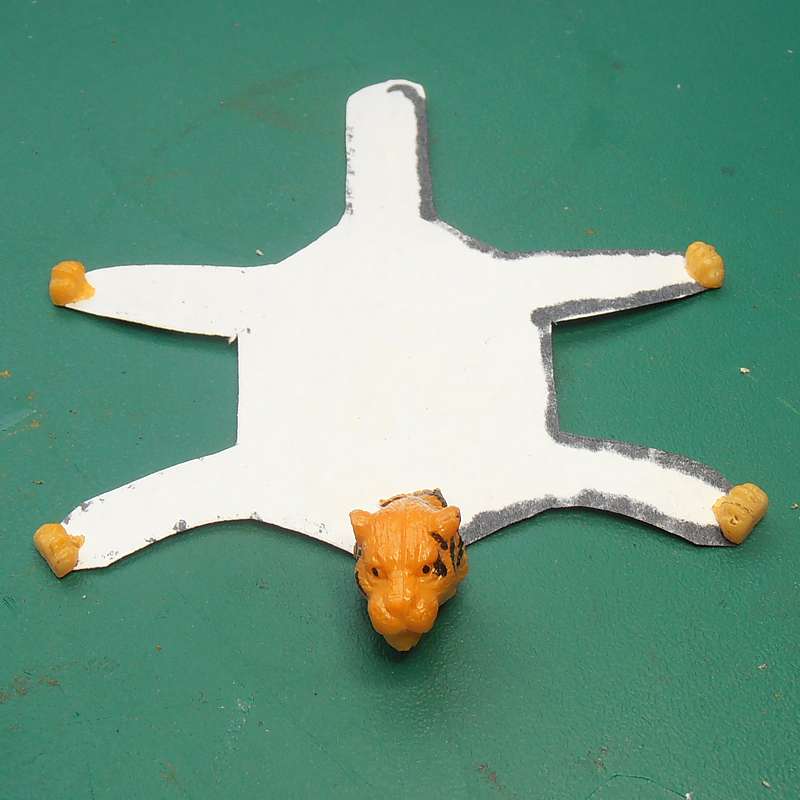
Stage 1 Carefully remove the head from the plastic animal figure with the razor saw. |
|
Stage 2 Fold the paper in half and lay the figure with its back along the fold. Trace around the figure. |
 |
Stage 3 Remove the feet from the model. I used a craft knife since the plastic was relatively soft, but use the razor saw if you feel safer. |
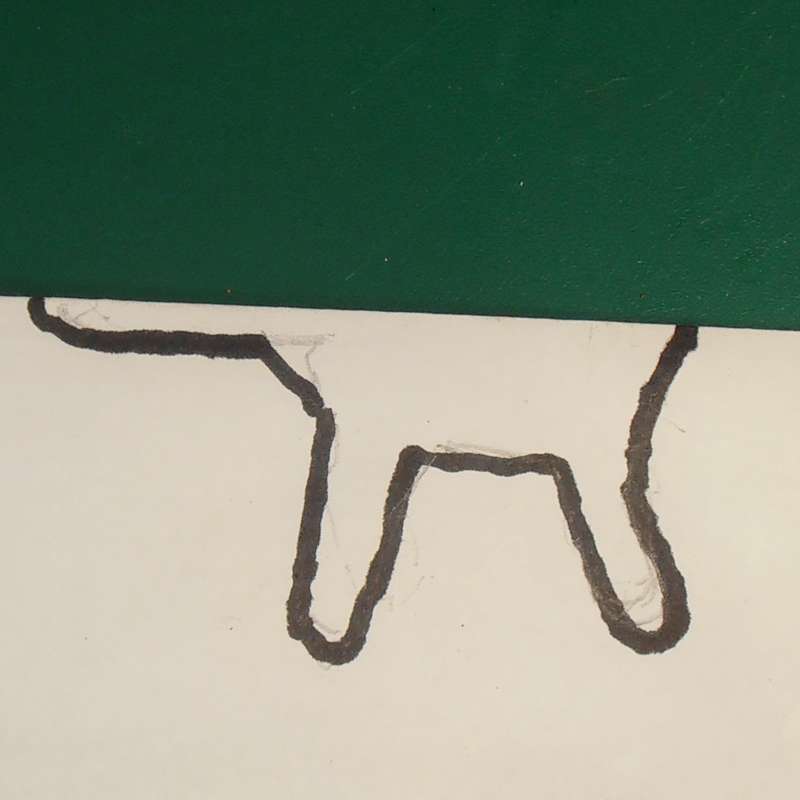 |
Stage 4 Amending the drawing - imagine the tail is straight and that the legs and tail are about twice as wide as on the model. |
 |
Stage 5 Cut out the folded paper template, then unfold it. Here I placed the plastic pieces in position to check everything looked about right. |
 |
Stage 6 Transfer the template onto some stiff card. |
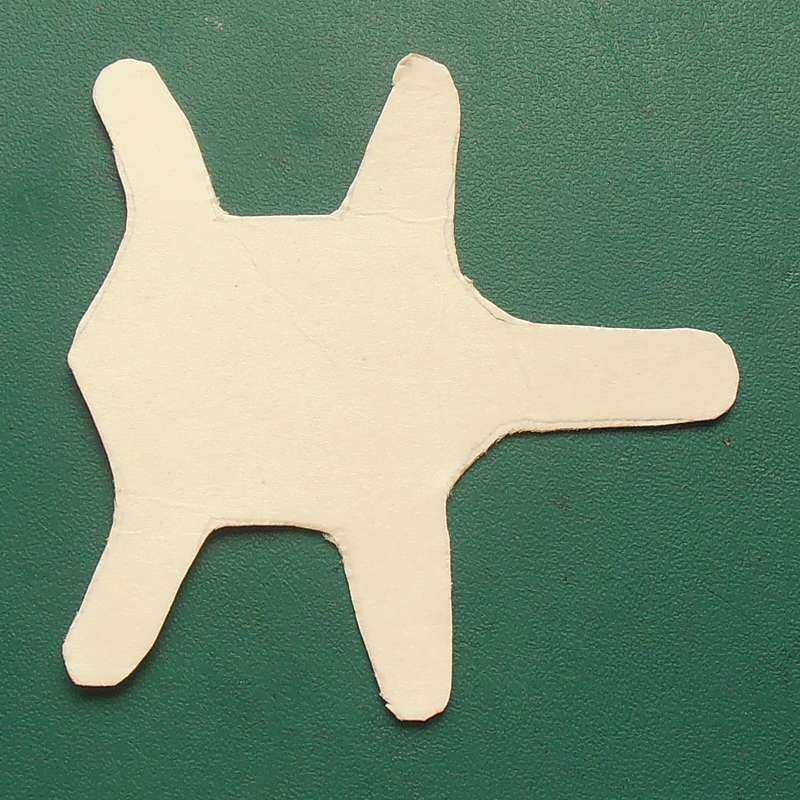 |
Stage 7 Cut out the shape using a craft knife or sharp scissors.
|
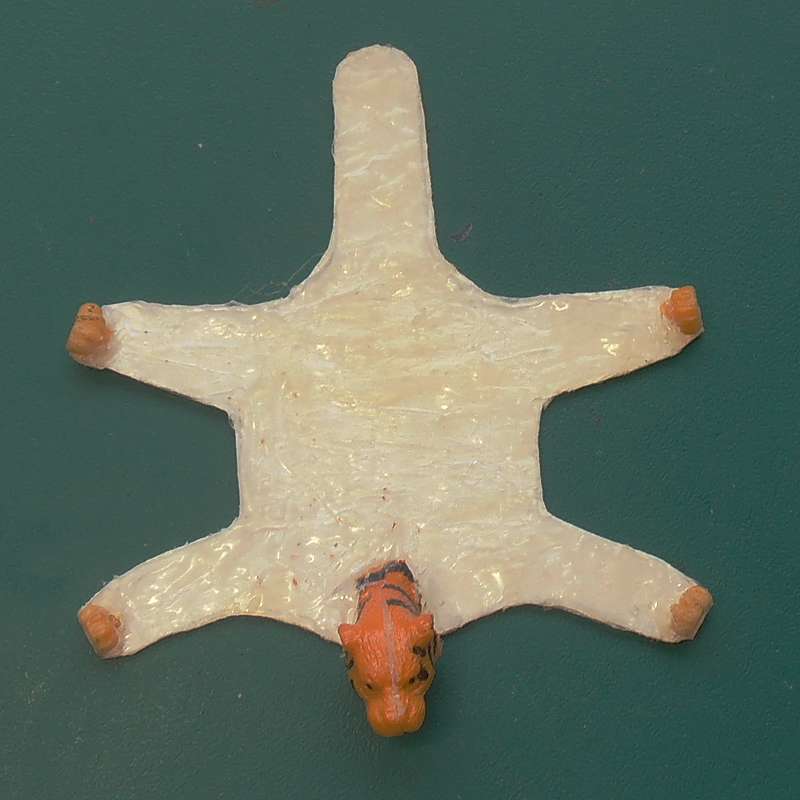 |
Stage 8 Using the hot glue gun, attach the head and feet into position, then apply a thin, fairly smooth layer of glue all over the card. |
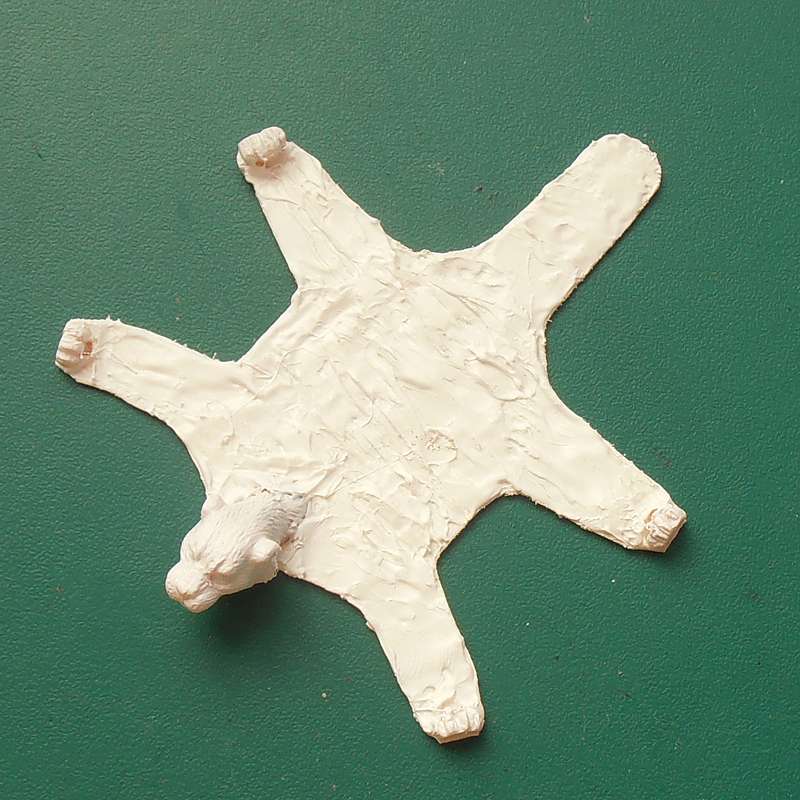 |
Stage 9 Prime the model and leave it to dry. |
 |
Stage 10 Paint the model in your choice of colours - use an online image search if you want to find reference pictures. |
||


|
Carry Pole (Click thumbnails for larger images) |
|||||
|
|
Materials & Tools: Plastic animal figure Cocktail stick Razor saw, Craft knife Tweezers, clothes peg, clamp Cotton thread Hot glue gun Primer, paint and brushes |
|
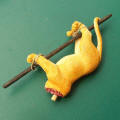
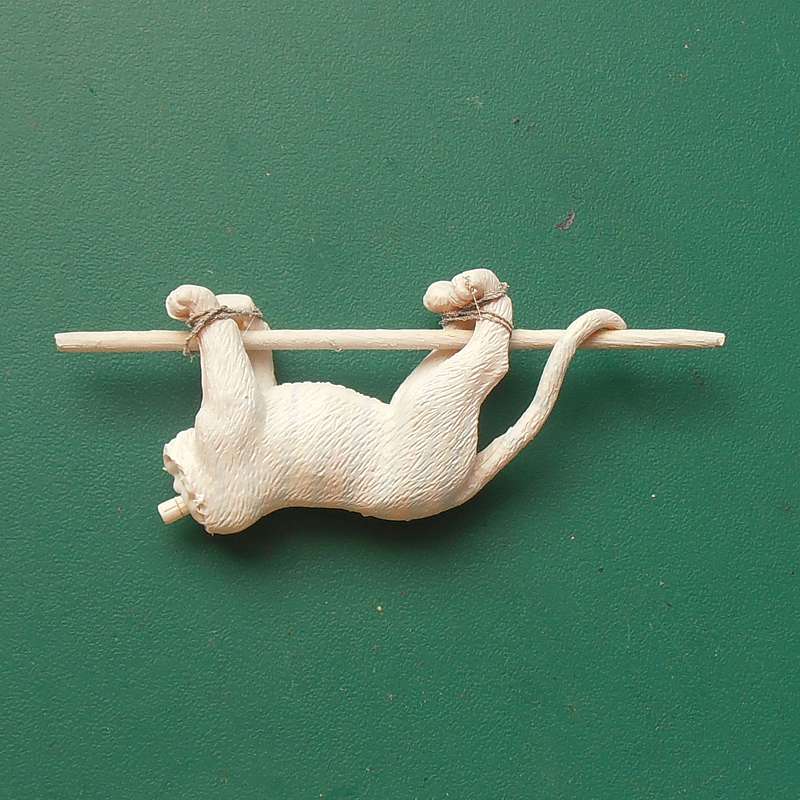
Stage 1 Carefully cut the head from the animal model using the razor saw. Clean the cut edge with the craft knife, if necessary. If you made a set of Trophy Heads, you will already have some headless animal models. |
|
Stage 2 Drill a hole towards the back of the neck to accept a piece of the cocktail stick. |
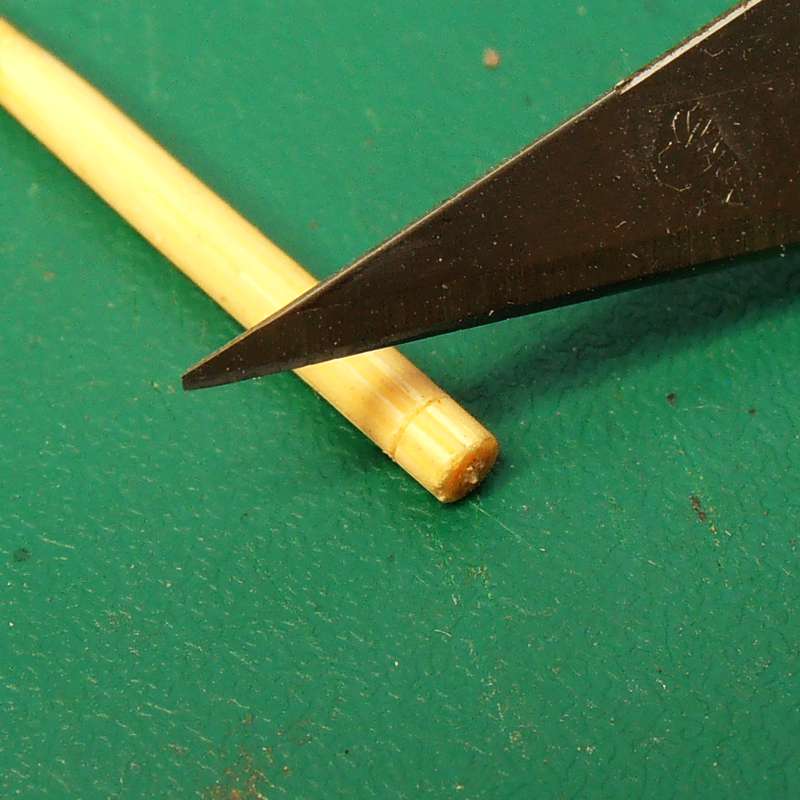 |
Stage 3 Scribe a groove around the cocktail stick using a craft knife to represent a joint in the spine. |
 |
Stage 4 Test the fit and trim the stick to length. Now remove the stick again. |
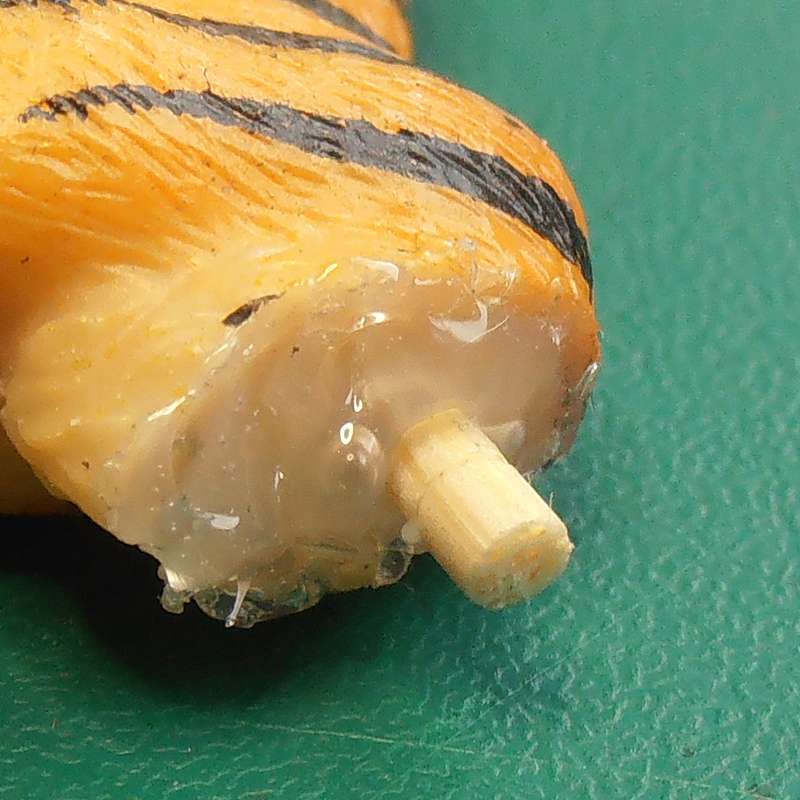 |
Stage 5 To hide the smooth cut, smear a layer of hot glue over the neck, then carefully insert the stick back into the hole before the glue sets hard. Use a pair of tweezers for accuracy and safety reasons. |
 |
Stage 6 Clip the tail onto a clothes peg, and immerse the figure in a cup of boiling water to soften the plastic material. Leave for a couple of minutes. |
 |
Stage 7 Remove the figure and carefully clamp the legs together. Dip the figure into cold water to set the legs into the new position.
Please be careful not to burn yourself. |
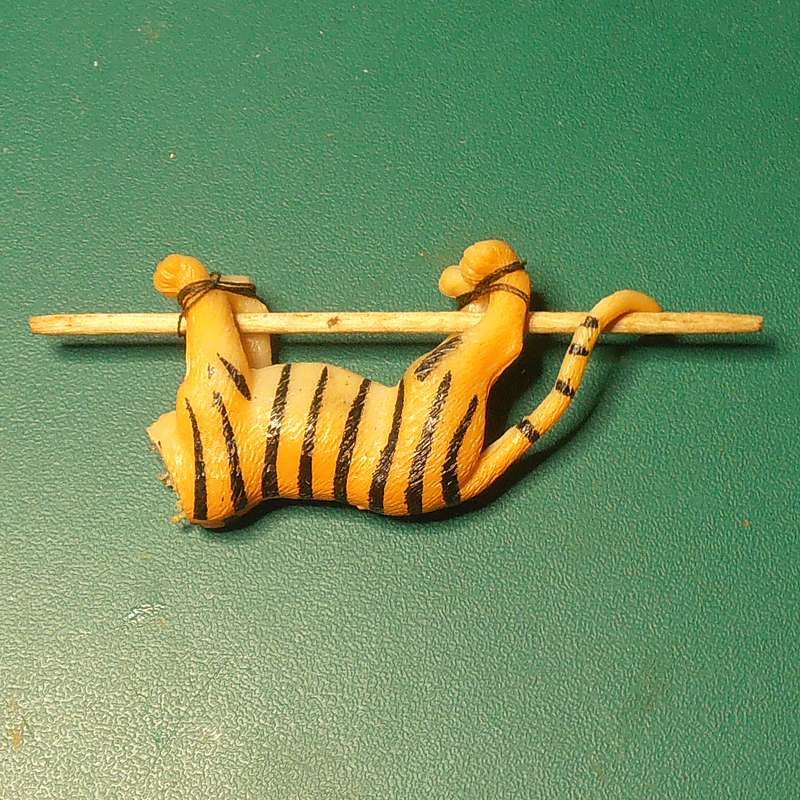 |
Stage 8 Insert a cocktail stick between the animal's legs and tie the feet together with cotton thread. |
 |
Stage 9 Prime the model and leave it to dry. |
 |
Stage 10 Paint the model in your choice of colours - use an online image search if you want to find reference pictures. |
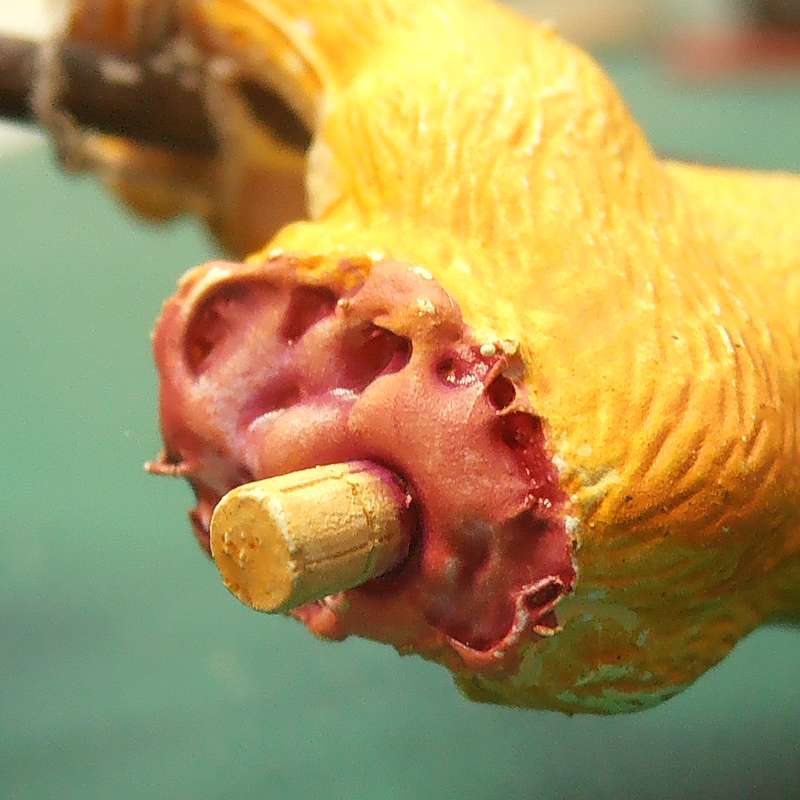 |
A close-up of the neck. |
|
Animal Bench (Click thumbnails for larger images) |
|||||
|
|
Materials & Tools: Plastic animal figure Basswood or craft stick Razor saw Craft knife Dental tool Hot glue gun Primer, paint and brushes |
|
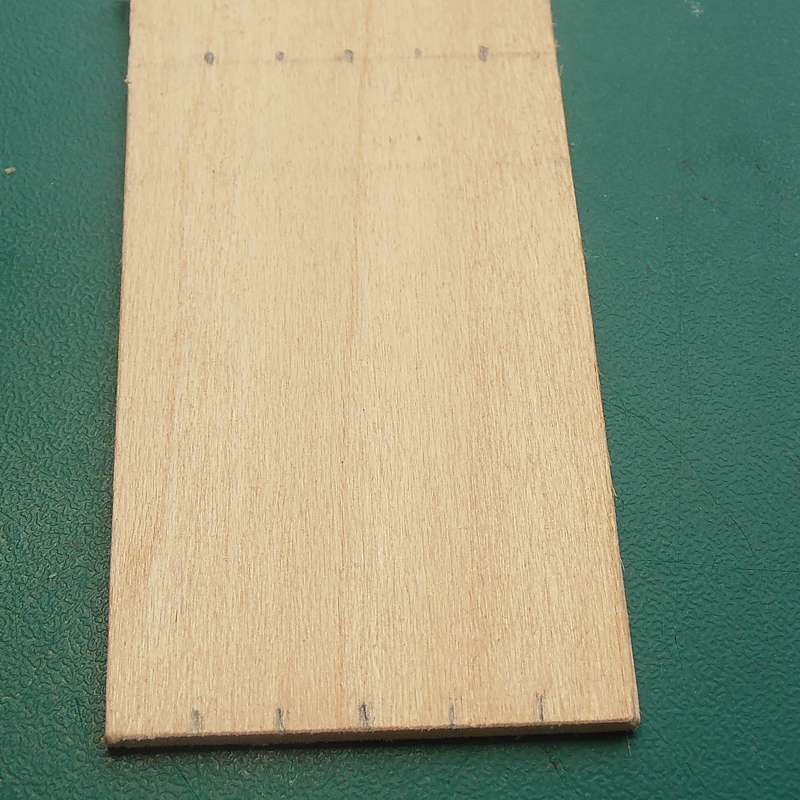
Stage 1 Mark out a series of planks on the basswood. |
|
Stage 2 Scribe the lines between the planks with a dental tool. |
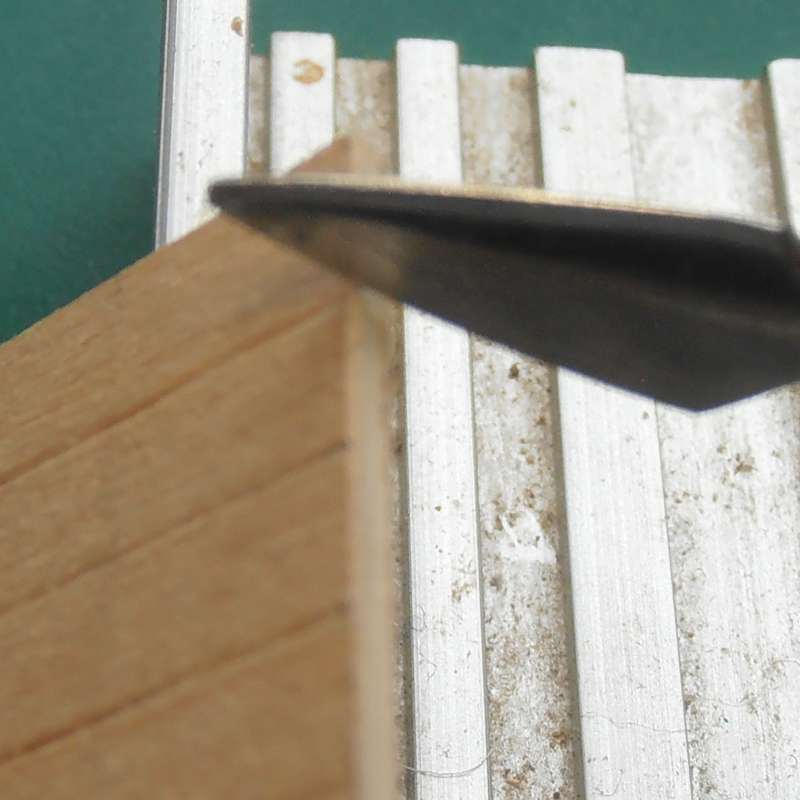 |
Stage 3 Cut the wood to size with the razor saw to create a seat, then indent both ends where the scribed lines finish. |
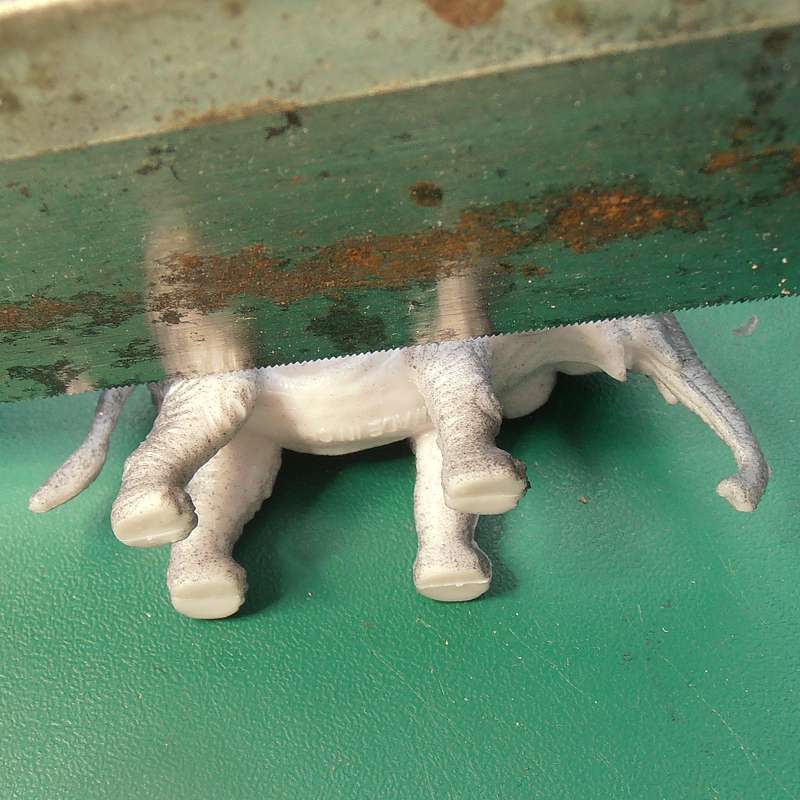 |
Stage 4 Carefully remove the legs from the plastic animal figure with the razor saw. If you already made a set of Hunting Trophies, you will already have some headless animal models. |
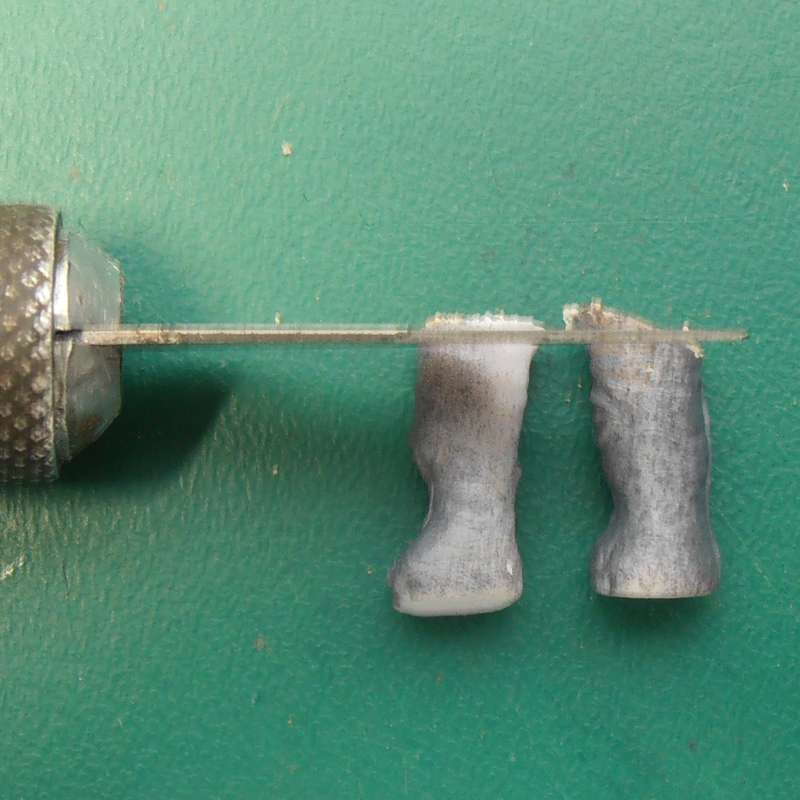 |
Stage 5 Trim each leg with the craft knife to make them the same length. Spray the legs with primer and allow to dry. Meanwhile, stain the wooden seat. |
 |
Stage 6 Using the hot glue gun, apply a small blob to the top of each leg and attach them to the corners of the wooden seat. |
 |
Stage 7 Paint the legs in your choice of colours.
|
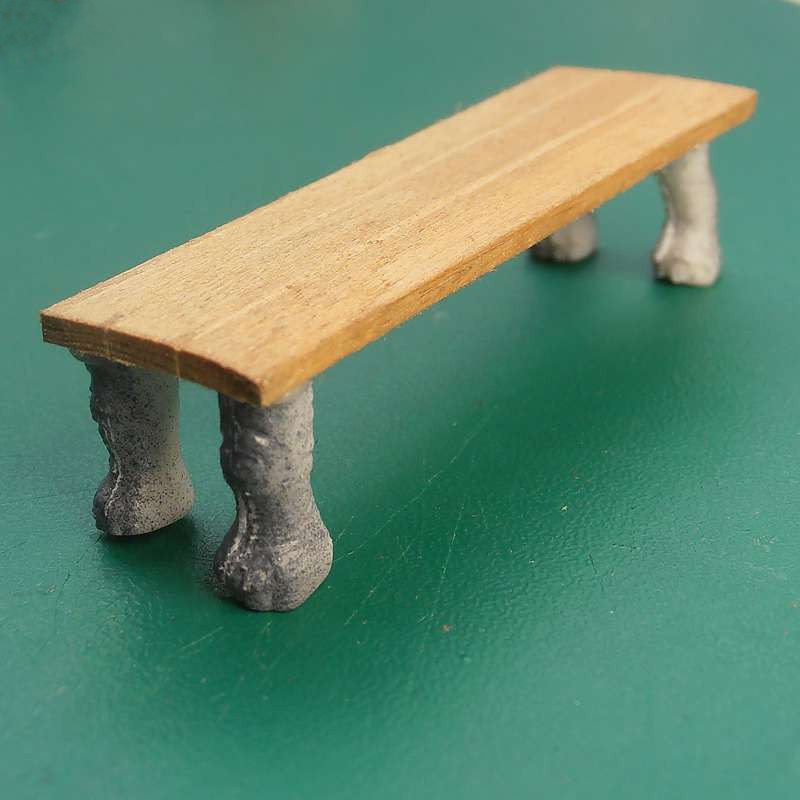
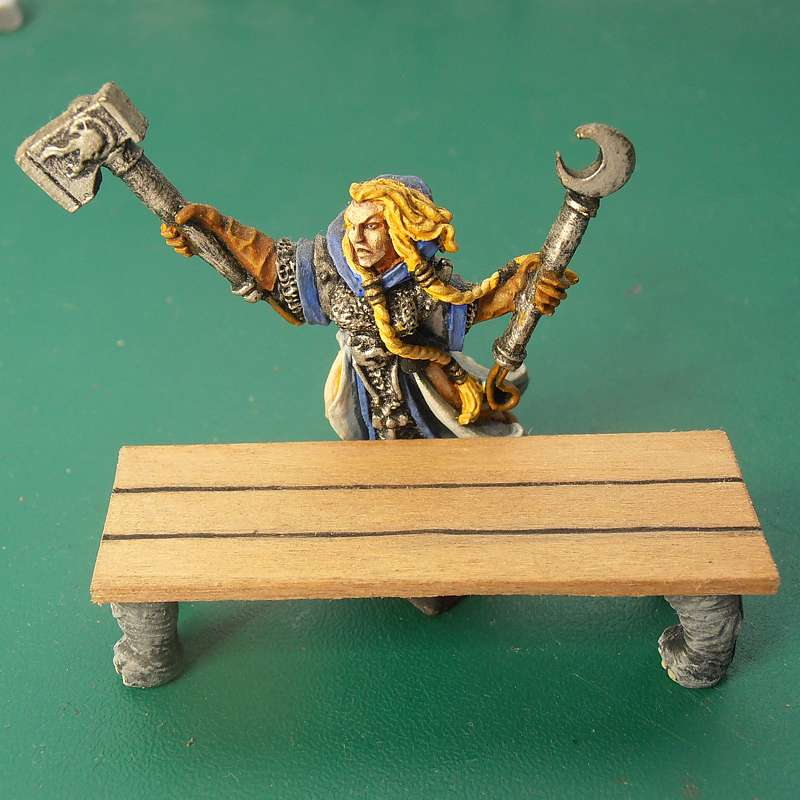 |
Example A finished bench, with a figure to show the scale. |

|
Joints of Meat (Click thumbnails for larger images) |
|||||
|
|
Materials & Equipment Plastic animal
toy Craft knife Pin vice and drill bit Cocktail stick Hot glue gun and glue Paint and brushes |
|
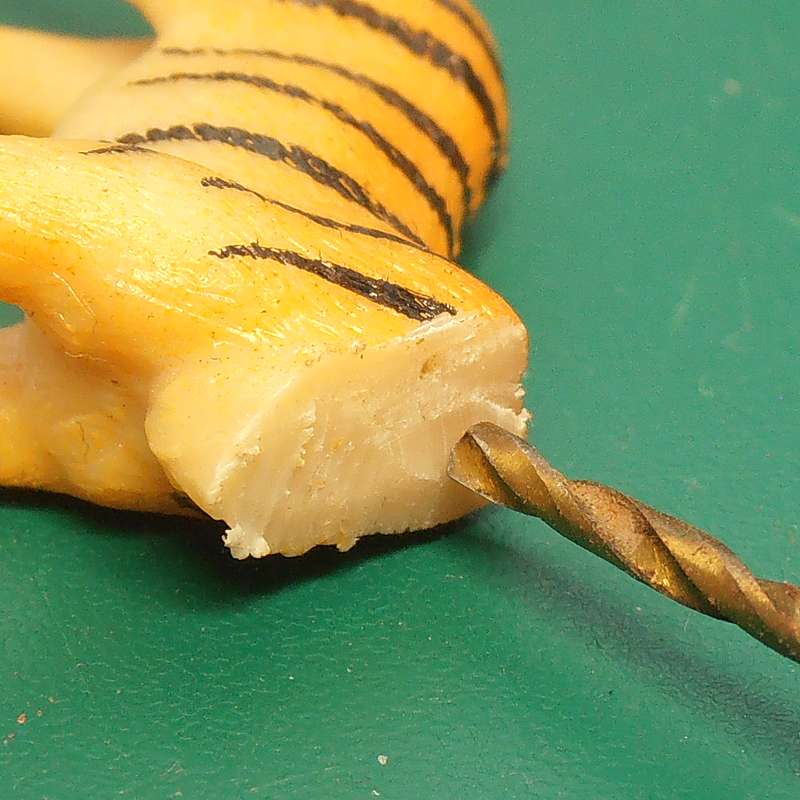
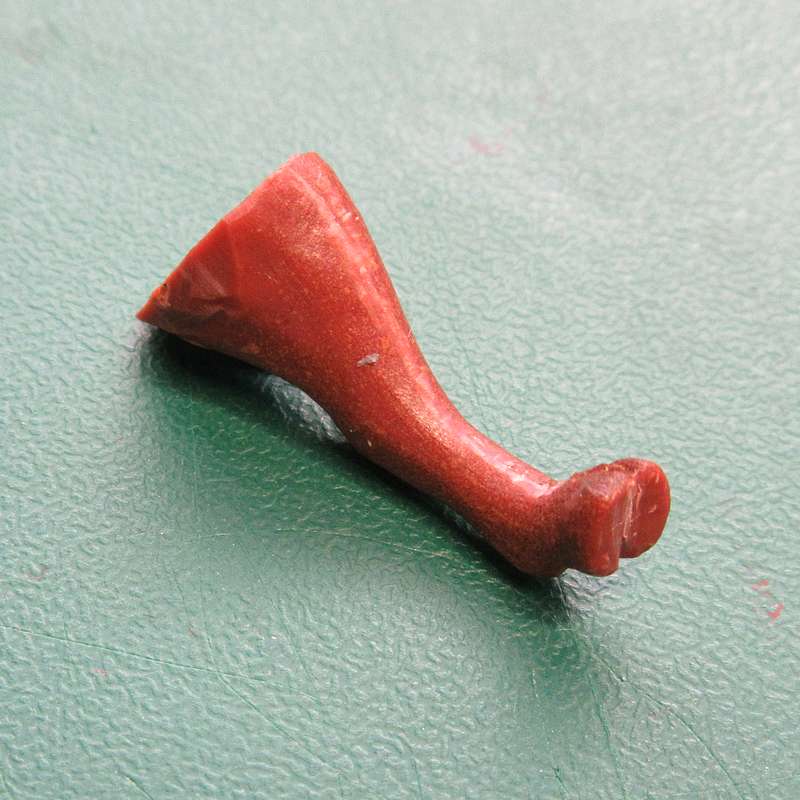
Stage 1 Cut a leg from the toy animal using the razor saw. |
|
Stage 2 Clean up any moulding lines with the craft knife. I also cut a groove between the hoof-pads on the bottom of the foot. As a slightly different option, you could remove the foot at the ankle. |
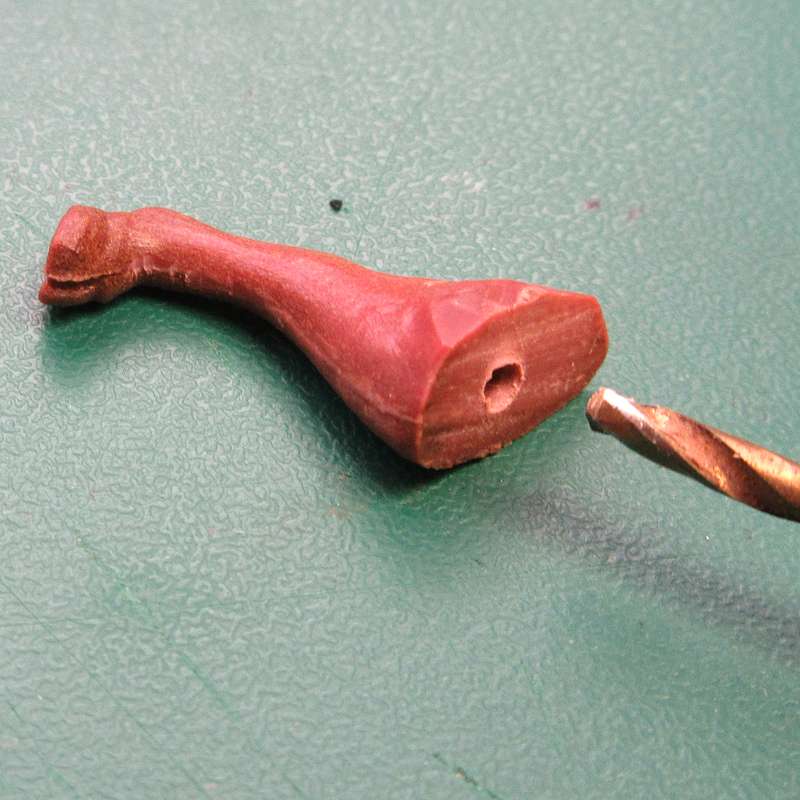 |
Stage 3 Drill a hole in the top of the leg to accept a length of cocktail stick. |
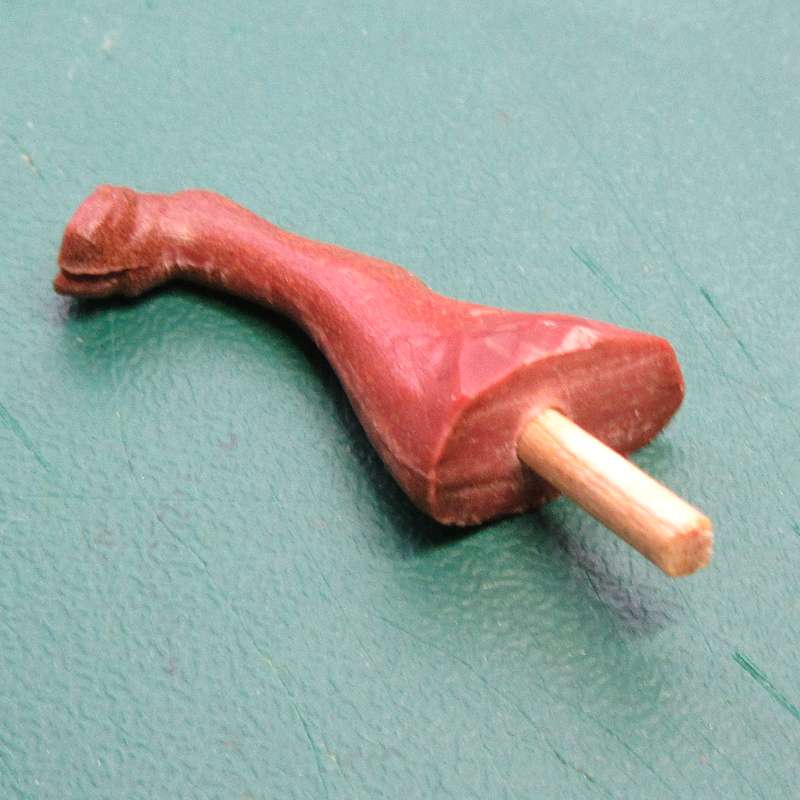 |
Stage 4 Cut a length of cocktail stick and insert it into the hole. Leave about 1 cm of the stick protruding |
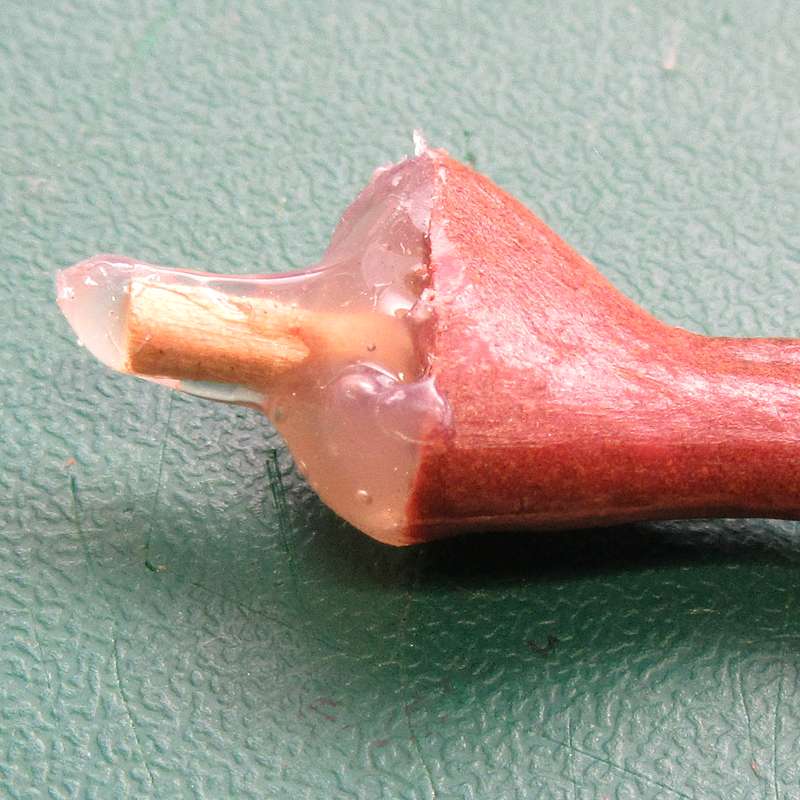 |
Stage 5 Using the hot glue gun, cover the end of the leg with glue, and add a blob at the end of the cocktail stick too. Whilst doing this I ended up with a thread of glue each side of the stick, which look a little like tendons. |
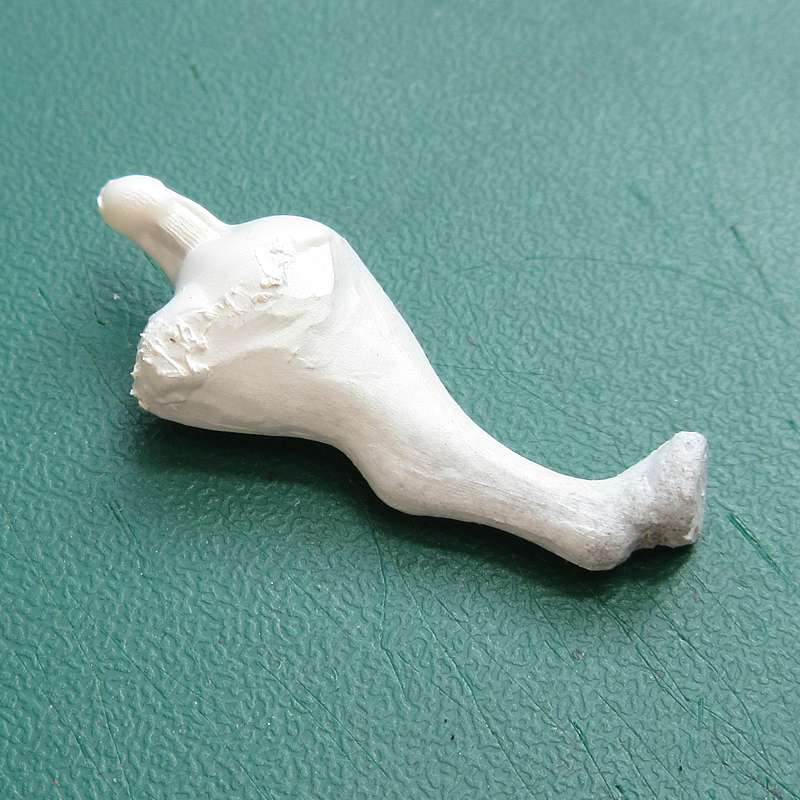 |
Stage 6 Once the glue has cooled, trim off any excess threads of glue, then prime the model. |
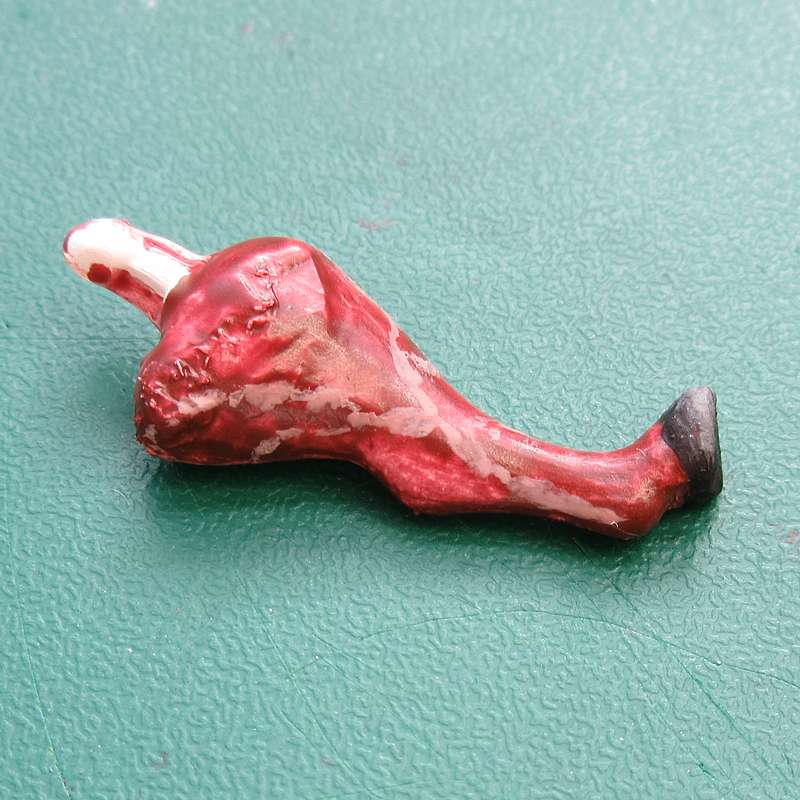 |
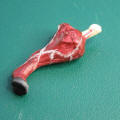
Stage 7 Paint the model to resemble a leg of venison. I used a mix of burnt umber and red for the meat colour, and added some streaks of light pink. |
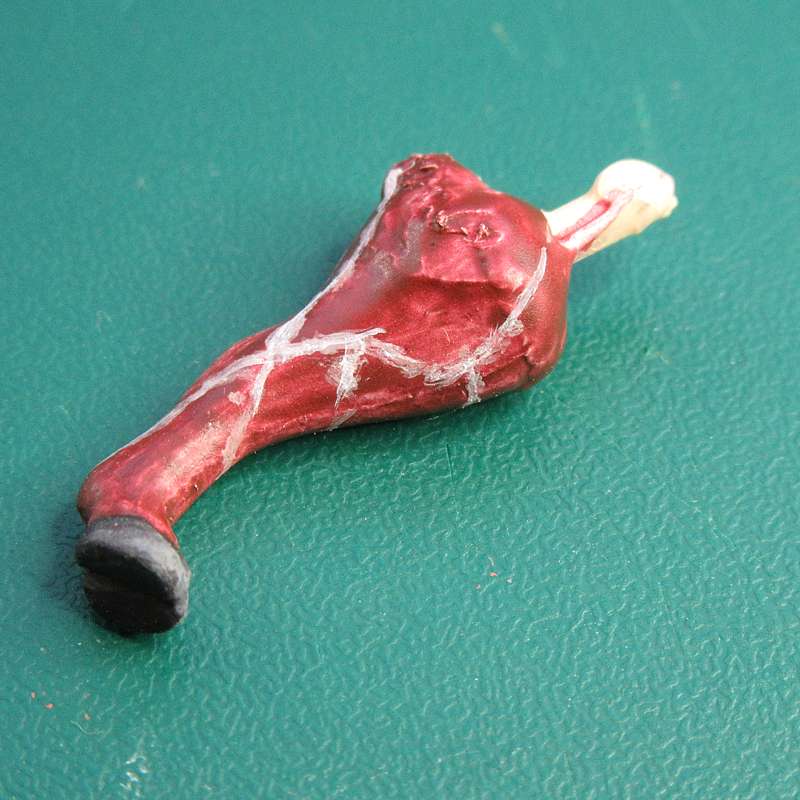 |
Stage 8 Add a little pure white and highlight the streaks. If you want the meat to look freshly butchered, add a coat of gloss varnish to give the model a wet appearance. |

|
Displacer Beast (Click thumbnails for larger images) |
|||||
|
|
Materials & Equipment Plastic toy big cat Florists wire Epoxy putty Craft Knife Map Pin or pin vice & drill bit Superglue, Pliers Paint & brushes |
|
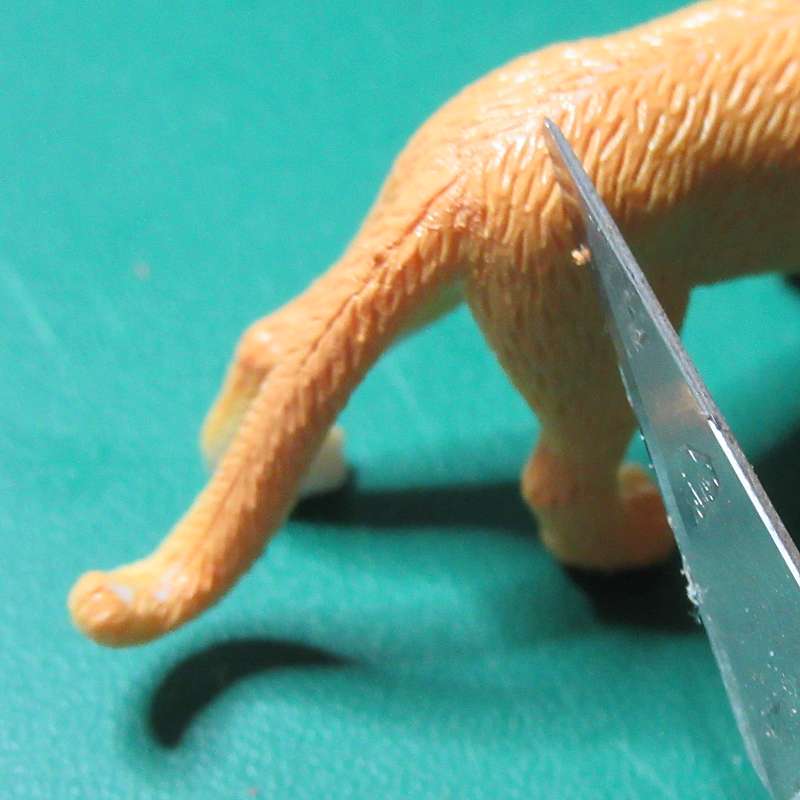
Stage 1 Using the craft knife, remove any mould lines on the plastic toy. |
|
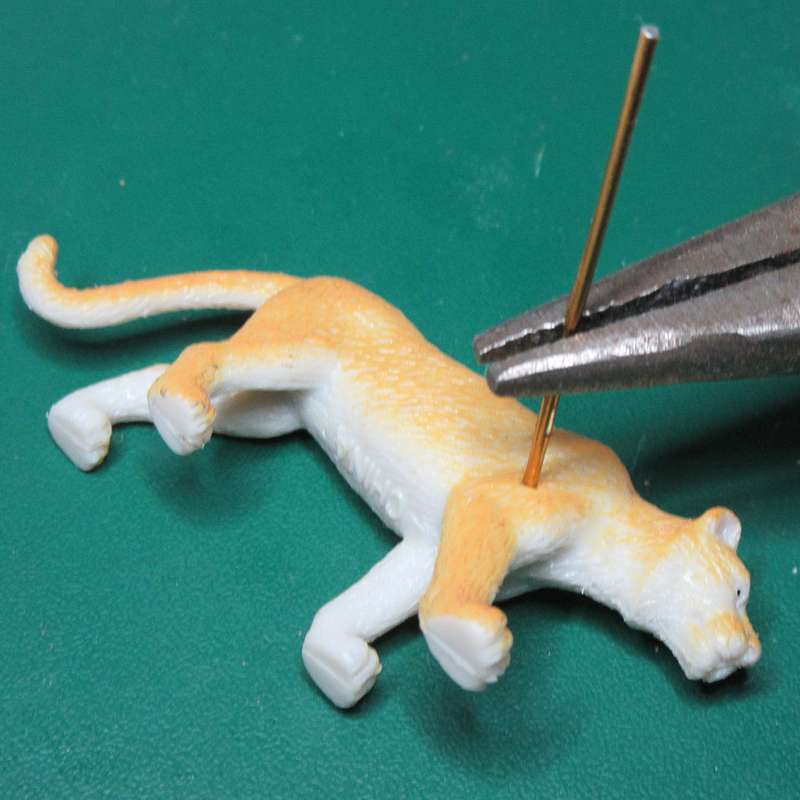
Stage 2 Push a map pin into the toy at into the shoulder muscle. Make a second hole in the opposite side of the model. If the plastic is too hard for this, use a pin vice and drill bit to make the hole. |
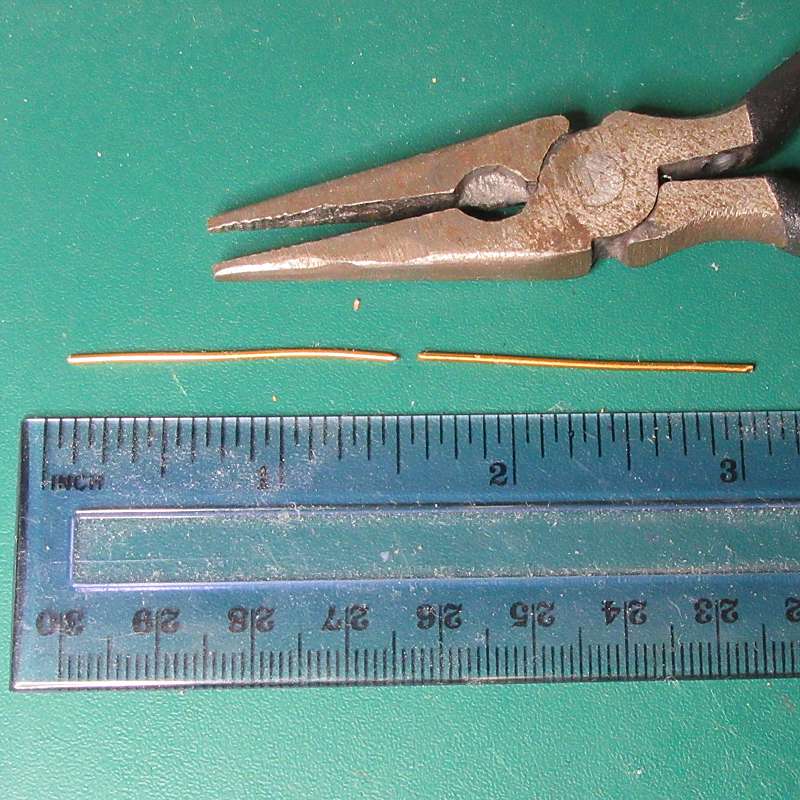 |
Stage 3 Cut two pieces of florists wire to around 37mm / 1.5" in length. . |
 |
Stage 4 Add a small drop of superglue to one end of the wire, then push it into the hole. |
 |
Stage 5 Repeat the process on the other side. Allow the glue to dry. |
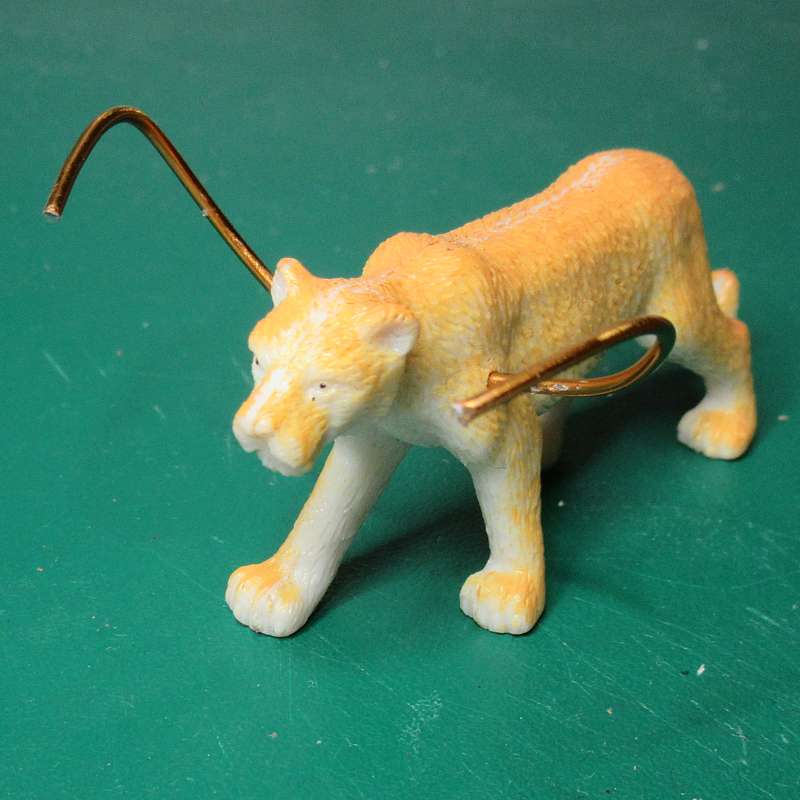 |
Stage 6 Bend the wires to form a suitable shape for the tentacles. |
 |
Stage 7 Thoroughly mix some epoxy putty, and roll out a "sausage" about 2mm in diameter, and cut off a piece around 37mm / 1.5" in length, to match the wire. |
 |
Stage 8 Flatten out the roll to create a thin strip of putty. |
 |
Stage 9 Fold the putty strip around the wire and smooth out the joint. Try to be sure to make a nice joint with the body of the cat. |
 |
Stage 10 Add a small blob of putty to the end of the tentacle, flatten it out into a rough teardrop shape. Repeat stages 7 - 10 on the other wire and allow the putty to set hard. |
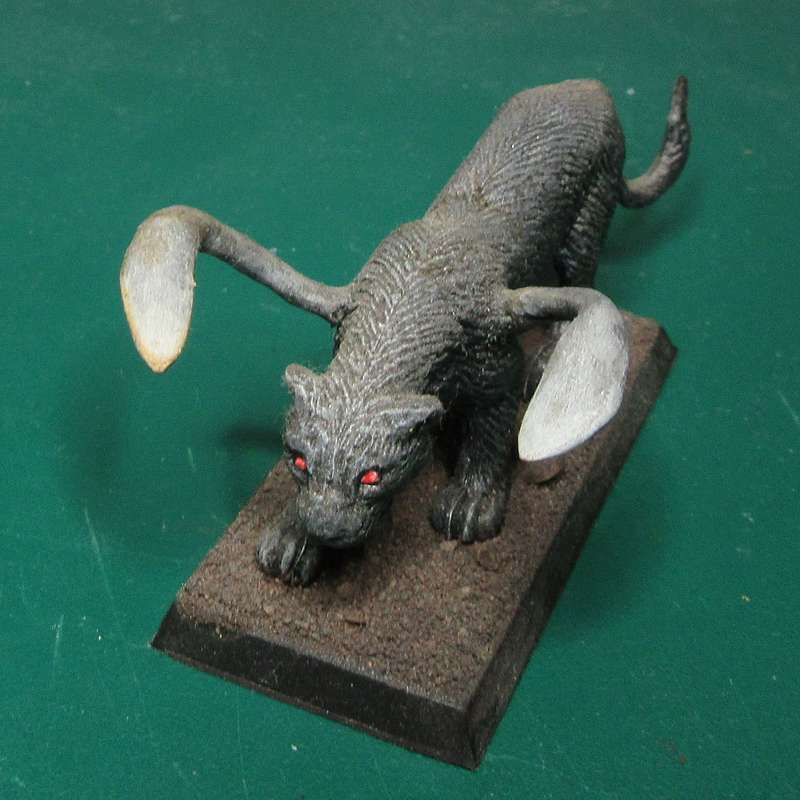 |
Stage 11 Glue the model to a base, prime and paint.
|


|
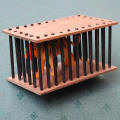
Animal Cage (Click thumbnails for larger images) |
|||||
|
|
Materials & Equipment Plastic animal toy Basswood, Cocktail sticks Craft Knife Pin vice or rotary tool & drill bit PVA, styrofoam Paint, ink & brushes, black Sharpie |
|
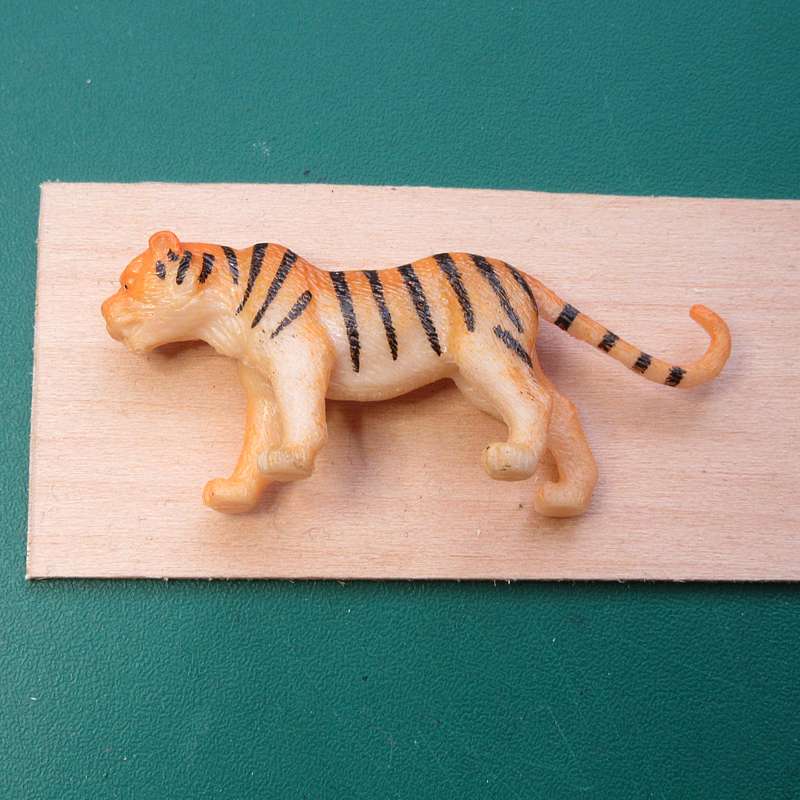
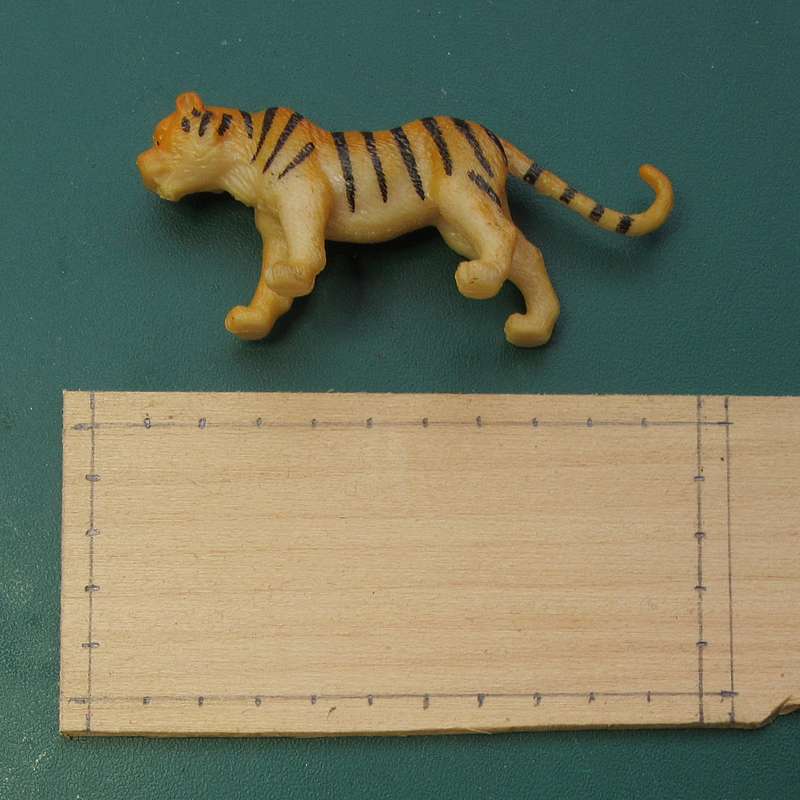
Stage 1 Lay the toy animal on a piece of basswood and mark a rectangle about 12mm (1/2") larger at each side. Cut two rectangles of basswood to this size, which will form the top and bottom of the cage. |
|
Stage 2 Mark a second rectangle 3mm (1/8") inside the first and then mark the position of the holes about 6mm (1/4") apart. |
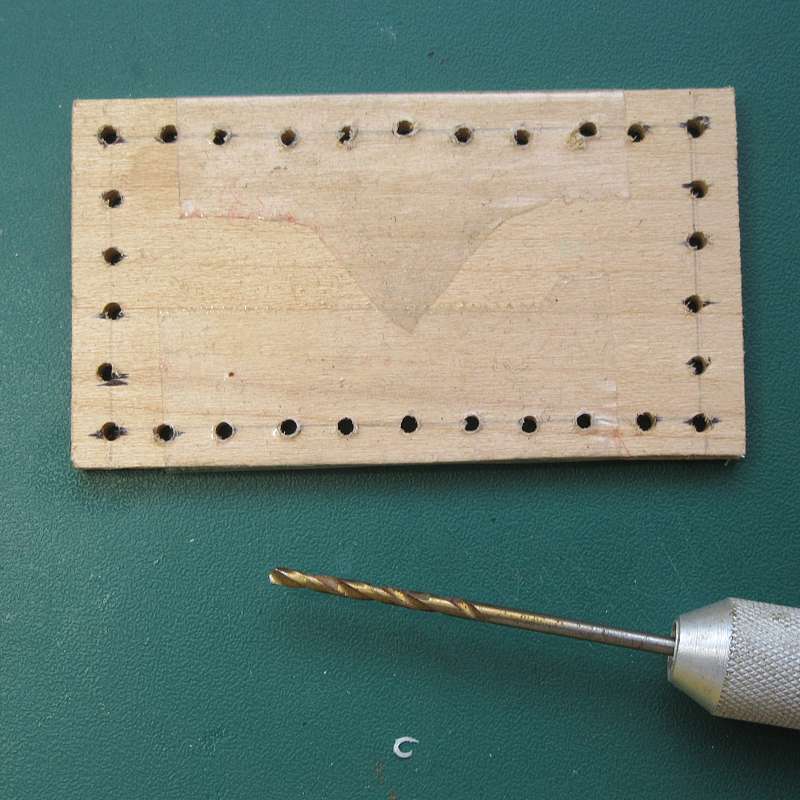 |
Stage 3 Tape the two pieces of basswood together to keep the holes perfectly aligned, then drill through both pieces where you marked each of the holes. I used a rotary tool for speed, but a pin vice will suffice if you don't have one. |
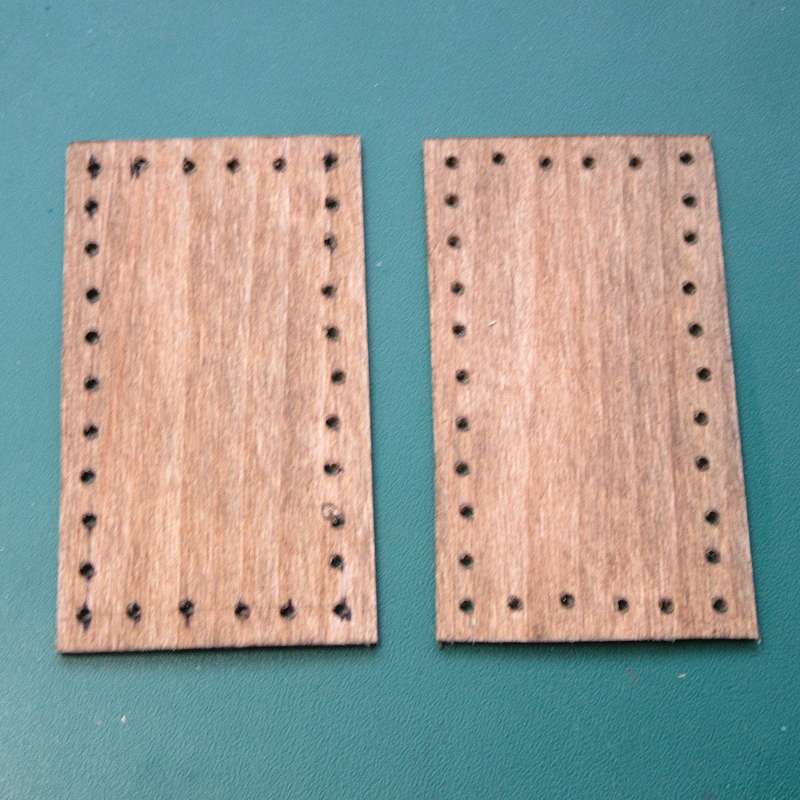 |
Stage 4 Remove the adhesive tape and stain the two pieces of wood. I used a mix of black and brown ink washes for these. |
 |
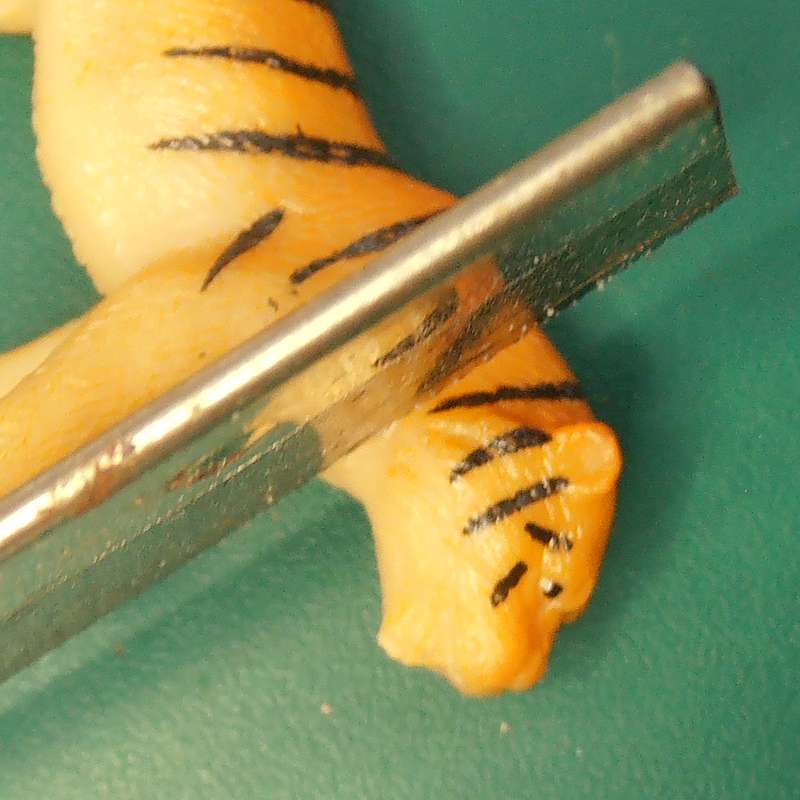
Stage 5 The bars are formed from lengths of cocktail stick. Since the tiger model is not very tall, I was able to get two bars from each stick. Trim the points off each end and cut them in half with a craft knife. |
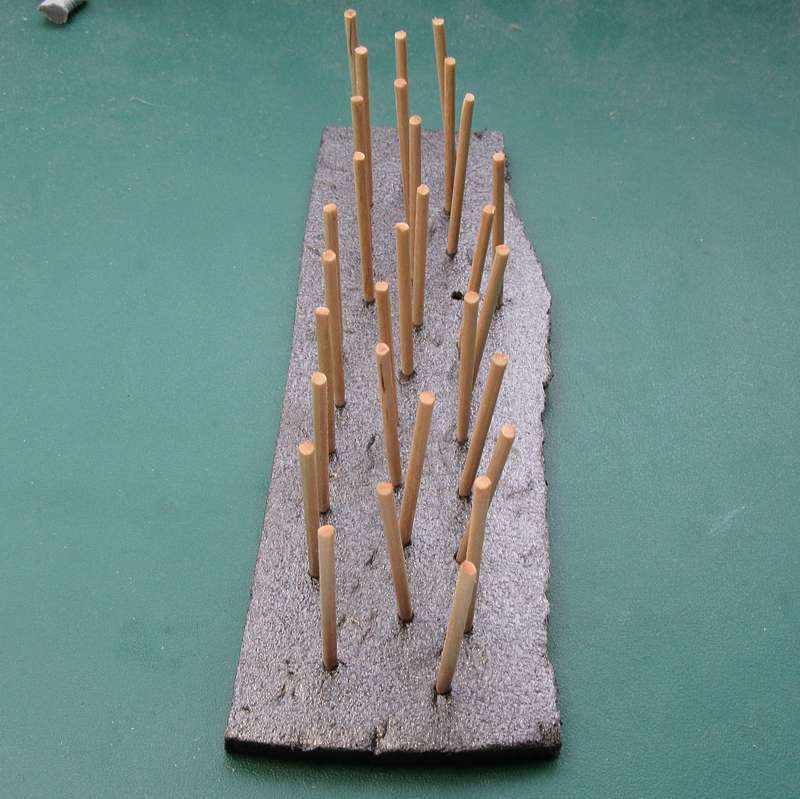 |
Stage 6 It is much faster to paint the bars before assembly. Insert the tip of each into a piece of foam as shown, then spray with black primer. You can touch up the parts you missed with a black marker. (The foam is from food packaging) |
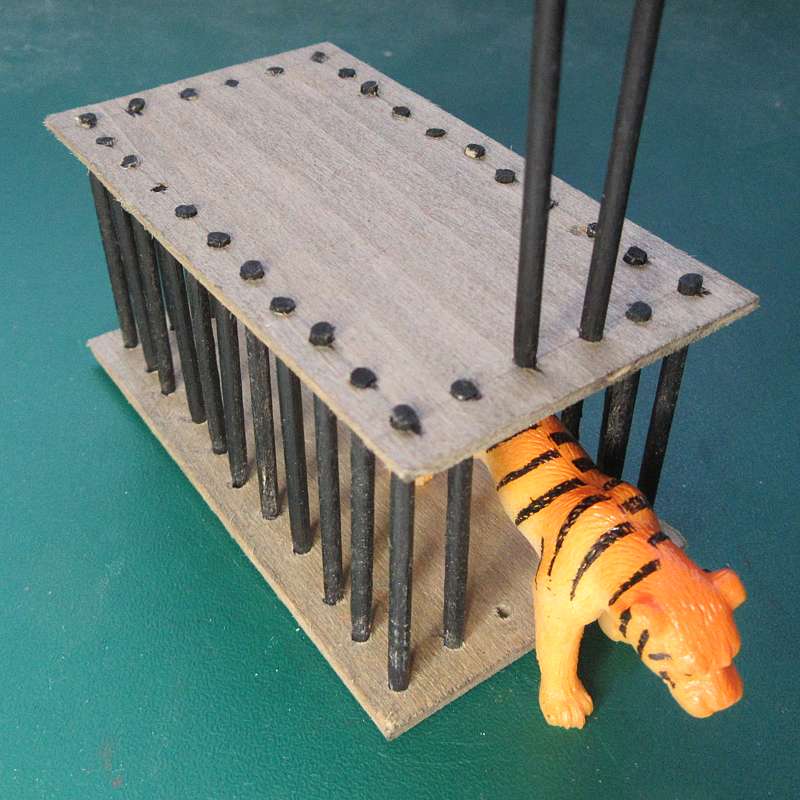 |
Stage 7 Insert the bars into the basswood sheets. Glue them in place with a drop of PVA if they are a loose fit. Leave enough space at one end to insert the plastic toy before inserting the last few bars. Glue the toy in position if desired. |
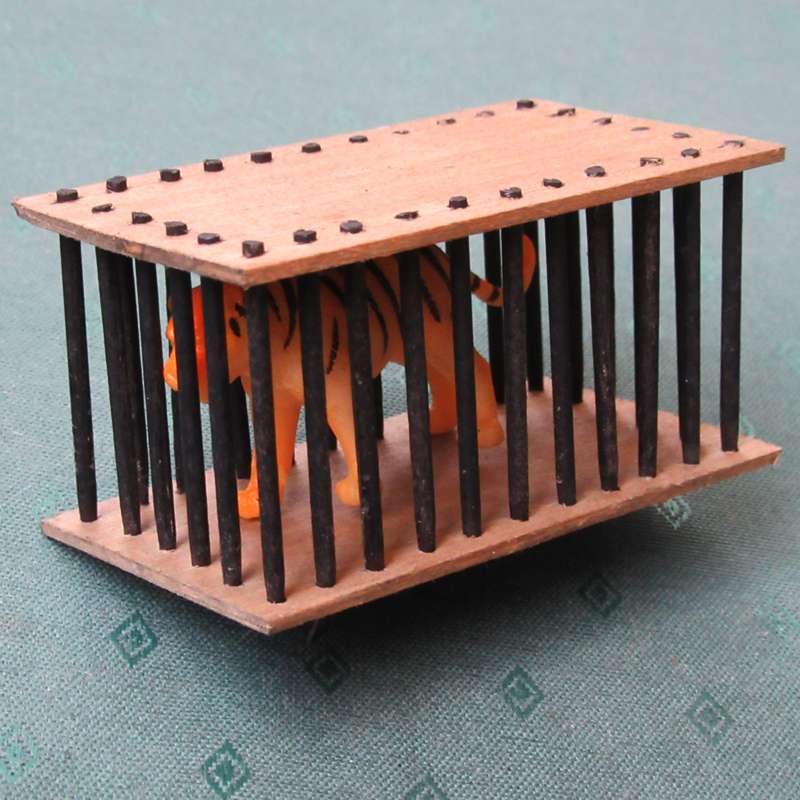 |
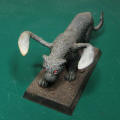
Stage 8 The finished cage. If you want more detail, you could drybrush the bars with a metallic colour and paint the animal toy beforehand. |
Contact me with suggestions, comments or questions.
These articles are provided under this Creative Commons Licence:
![]()